Jump to content


Photo

GCEBE - Abrahams 1998 GC8 WRX

GC8 wrx subaru rexy ej20

  • Please log in to reply
41 replies to this topic

#1 Abraham Iqbal

Abraham Iqbal

    New Member

  • Members
  • Pip
  • 11 posts

Posted 16 September 2016 - 05:07 PM

Sorry guys, Copying and pasting from another forum where i have posted this as well - Thread is pretty pic heavy so far and pretty wordy. If you have any questions please ask :) 


Hi All, 
 
I thought it would be time for me to finally post up a thread about my 1998 GC8 WRX. I've owned the car for roughly 6 months, i bought it in decent condition and did the basics to get it up to scratch. This is more of a "look what i've done, let me know if you have any questions about it" and to track all the changes and upgrades that get done to the car to look back on . 
 
Engine/Driveline: 
- Standard EJ20T Engine with 195xxx KMS
- Standard TMIC 
- TD04 Turbo 
- Rebuilt gearbox by All Drive Subaroo with 2008 - 2010 internals 
- Replaced Clutch with Daiken/Exedy OEM 
- Hardrace Engine/Transmission/Pitch Mounts 
- Whiteline Positive Shift Kit 
- Kartboy Shifter Bushings (Front And Rear)
- GFB Ge-Force 2 Boost Controller configured with low/high boost presets 
- "Resonatorectomy"  
- Front Driveshafts Replaced 
- Ebay EL Headers 
- Turbo Back 2.5" Exhaust with Varex Muffler 
- Ebay Short Shifter (Looking for a standard length shifter if anyone had one shout out)
- Full Major Service Including Belts and Rocker Cover Gaskets
- Rear Main + Gudgeon Cover 
- PSR Silicone intake 
- HEL Braided Clutch Slave Line 
 
Handling/Suspension: 
- Standard WRX Wheels 
- Front Hardrace Endlinks 
- Shagged Suspension all around :'( 
- Cusco BCS 
- HEL Braided Brake Lines (To Be Fitted) 
- STI Carbon Fibre Front Strutbar 
- Whiteline ALK
 
Interior/Audio Visual: 
- Alpine Single Din 
- Audison 6 X 9 Rears in parcel shelf (cut out done by previous owner) 
- Hertz Front Speakers
- Sundown SA12 Sub 
 
Exterior: 
- Rear Window Visor 
- Painted Lower Front Bar Opening Black (PlastiDip) 
- Tint all around 
- OEM Lip Kit 
- Amber Corner Lights
- Crystal Foggies 
 
Odds/Ends: 
- Aircon Re-Gas and O-Ring replacement 
- Steering rack O-Ring replacement
 
Future Mods: 
- Rear Endlinks 
- Front/Rear Swaybars
-  Rear Strutbar 
- MCA Blue Coilovers 
- VF35/VF34 
- STI Injectors 
- New ECU + Tune 
- STI Tripple Gauge Pod - Currently Waiting To find another top vent to be cut up so it fits. 
- Replacement door cards because mine are worn from the previous owner (again yell out if you have any) 
 
There is still heaps more to go, probably lots ive missed but i will add more as i find more pictures, i hope everyone likes it, let me know if there are any suggestions for the future 
 
 
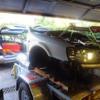
Long story short, i believed the shafts had issues and changed them. I then found out my front diff (possibly) was gone, loud rattling while driving .. so off it went to ADS in peakhurst 
 
20151214_112156_zps9jmgxrig.jpg
 
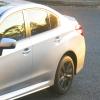
Here are some of the latest pics as well 
 
Dat A$$ 
20151107_165338_zpsfbeb0hdx.jpg
 
20151107_165349_zpsms48khrq.jpg
 

Just installed my ALK today! got the comfort version (Was a good price), it feels AMAZING. I cannot describe the amazing feeling, i havent got an alignment yet but it already feels so good, it just feels so planted and pulls through turns like they were nothing - what was once a sloppy feeling while turning and cornering hard has turned into a tight smooth experience. 
 
I would suggest the ALK to anyone and everyone!
 
Silicone inlet is done ... PLEASE EVERYONE TAKE YOUR MANI OFF TO DO THIS IT TOOK FOREVER, sounds and looks sexy though, for a PSR product .. it wasnt the best fit .. but i love it nonetheless <3
 

Few more pics and updates guys 
 
This is the GD+ Belt cover mod. I managed to pick it up cheap from a seller on FB. All it took was a little trimming around the PS RES and a piece of steel to match up with the original bolt hole and it went straight on. Probably the best bang for buck mod to tidy up the engine bay, the original covers were a combo of plastic and steel and looked pretty grubby even when painted. you can also see the PSR silicone intake i ended up fitting. A word of warning REMOVE THE INTAKE MANIFOLD! it was such a headache and for a PSR product, the fitment wasn't the best (still having issues with the bov return line)
 
20160207_171553_zps77qxaofr.jpg
 
Next up is the new CF STI strut brace i picked up today for a decent price, honestly i can't feel much of a difference probably because the front it pretty stiff already after the ALK. to be honest after the ALK, the front end feels spot on stiff, i can hook it at decent speeds through turns and the car sticks like glue.
 
20160207_171604_zpspmqlwwtu.jpg
 
another shot of the strut brace, more directed to the silicone Y pipe (ebay special) but fixed my boost leak issues, the previous one was a stock subi one that has hairline cracks and caused issues
 
20160207_171613_zps79j2uxhc.jpg
 
Cusco BCS - best bang for buck besides braided brake lines that you can buy (braided lines already waiting to be installed but i would like to do the brakes at the same time so i am waiting for the moment). Pedal feel improved so much, it went from a sloppy spongy feel to a solid pedal feel with heaps of feedback. 
 
You can also see the boost solenoid for the GFB G-Force II controller. The GFB features gain control and sensitivity control which improves the response from the stock TD04 so much, it pulls nearly all the way to the redline, it also improved the pull, it picks up so bloody quick now, and allows multiple boost maps with the 6 presets - so far i have high boost, low boost, high boost with high gain and low boost with low gain, it also features scramble boost with a button click so the boost can be wound up for overtaking or racing. 
 
20160207_171617_zpsqptxwdia.jpg
 
Control unit for the GFB - stealthy behind the wheel and easily visible while driving. 
 
20160207_171432_zpsmc9osbzn.jpg
 
Subaru fender plug - improves directed airflow and also tidies up the bay after removing the resonator. fairly cheap from america ($2 but with $50 shipping   :( ) but ended up getting it for $15 ish shipped from tuspeed. 
 
20160207_171816_zpswfuiyjt8.jpg
 

Time for another update guys, finally installed my RCA Kit, was probably the easiest mod i have done on the car yet. Pics Below: 
 
was so simple to install, i would recommend 10/10 just like my other basic mods haha. Seriously, look up on youtube how to remove subaru ball joints takes 5 minutes a side or 10 without a pickle fork like me . 
 
Everything removed
 
20160307_190443_zpseqetajxz.jpg
 
Comparison of the old vs new. you can clearly see the difference in height 
20160307_190447_zpsnalwph8l.jpg
 
Time for an alignment. If you have any questions please PM or respond!
 

Update time: 
 
After doing the RCA kit, the car would screech when going around a turn too fast or going too fast through a sweeping bend (like merging onto the GWH from cumberland highway (if anyone not in sydney knows where this is), so i had enough of that and ended up getting an alignment, camber was good all around, but toe was at about 10 on both sides, this has now been set to 0 and the car drives so much better, sharp cornering feels so smooth! 
 
The PS pump/RES has always leaked and been frustrating, my initial repair was the oring between the res and pump, this was replaced and never did quite solve the issue. I had another look at this the other day and noticed the top gasket for the lid was stiff and cracked, so i got to work with the RTV gasket maker and just ran a thin layer around the mating surface of the lid and the reservoir and this has now solved my leak!!! hooray!!! so bloody happy that thats one less leak to worry about. 
 
Thought it would be a good idea to check the condition of the spark plugs in the car as well, at the moment, there are PFR6B's gapped at 6.5 in it. I have PFR7B's ready to go in and have gapped them at .7 as they should be. This should hopefully help with the performance of the car and will be replaced after running oil flush through along with a full service. 
 
After the gearbox was replaced, i noticed that when decelerating while in gear, i can hear a rattling/grinding noise, im not sure what it is as it does not happen when in neutral/clutch pedal in, im heading back to All drive subaroo tomorrow to have this checked out, apparently its a common issue with subis but i just want to make sure no damage is being done to the car 
 
Lastly ... the car has finally hit 199 000 KMS , at the moment im runnint Penrite ten tenths 10w-40 in it. If anyone knows of something a little more suitable/cheaper, im open to opinions 
 

Couple of updates guys. 
 
I have has the JDM gauge pod installed for quite some time now, it has no gauges in it :( .. and i found out that the only way to fit 52mm gauges in it is to make a new face. so thats next. I plan on putting in my new Apexi RSM that i installed and my newly purchased AEM analogue water temp gauge in the pod. This should neaten up the car a lot. The RSM will eventually be moved in the future when i get an AEM wideband . 
 
I also picked up a cheap as shift boot from ebay, suede looking with red stitching, looks much better than the previous acordian style one. 
 
_57_zpsnfe9fnam.jpg
 
and From this 
 
boot_zpshq2zaxyw.png
 
to this 
 
IMG_7267_zpscealchne.jpg
 

Time for another update, I went to bunnings and decided to grab some MDF to redo my boot floor as the original carpet was worn and the crappy spare cover was broken and damaged 
 
Ended up spending $25 on a piece of MDF and made up something pretty nice - at the moment its raw, but will be carpeted when i decide to. 
 
Used some offcuts i had to make up two stoppers for each side to hold my box of tools/oils/fluids in and for my zip up toolbox. Overall pretty happy with the outcome, the boot is alot quieter and the mysterious rattle????? - sounds like a thud when going over bumps etc appears to be gone , must have been the spare bumping around or something alike. 
 
On another note ... when i pulled the boot carpet up there was about 3 inches of water in spare wheel well, so i sprayed on some rust converter, and cut a small hole in the boot drain plug to allow water to get out. Also coated thoroughly in sound deadener as the boot was pretty noisy. Does anyone know where common boot leaks are? i dont want this to be common -_- the seals look good but apparently the lights commonly leak. 
 
Pics below 
 
IMG_7401_zpsyzhywdaq.jpg
 
IMG_7403_zps5a6rnks8.jpg
 

Hey all, 
 
Managed to get a deal on something special (see below) straight plug and play for a v4 WRX (early 98 built)!!! 
 
im going on holidays soon so unfortunately it and other mods will have to wait until october 
 
Q8cwMrC.jpg?1
 

Yoyo guys, Upgrade time! 
 
Picked up a 22mm adjustable RSB and also decided to mod my newer style diff bush inserts to fit. 
 
I am beyond impressed words. 
 
the 22mm RSB makes the car feel so planted and solid, i can point and shoot at turns and the car behaves! 
 
The diff inserts - where do i begin. After doing the gearbox, pitch and engine mounts, i was very happy, but i still felt an immense amount of slop when changing gears or dropping the clutch too hard. With these in, its ridiculous - there is no noticeable NVH increase and shifts are smooth as. Rev match shifts are straight in and the car doesnt jerk like the box is about to fall out. 
 
Below are some pics in order, not going to name them, you'll get the idea. Hit me up if you are interested in knowing the diff insert model. 
 
20160724_133756_zpsghsnbv1c.jpg
 
 
20160724_133738_zpsfyb7jicp.jpg
 
 
20160724_141717_zpsqsn2i3b2.jpg
 
 
20160724_161456_zpscstc1fx4.jpg
 

So it's been a while since i posted last and a few things have been done on bae. 
 
After the sway bar and diff insert bushes i spent some time changing the Shift knuckle - this was a little worn out and i thought changing it would make a massive difference - it made a minimal difference -_- so i looked a little further, it turns out my shifter pivot bush was very worn. I had a look around and found TIC make a rebuild kit .. it was $45 before shipping so off to bunnings i went. I found some black sprinkler hose by the meter for $2 and some nylon washers for $9. after popping the shifter out and playing around i found a pretty good combination. 2 X black sprinkler hose sleeves with one nylon washer on each side.  Greased it up and tightened the pivot bolt decently until the shifter felt tight and shes good to go. its made such an improvement and along with the front and rear shifter bushes with the knuckle, shifting feels so crisp and sharp. 
 
20160804_205826_zps7dtb3jsf.jpg
 
20160804_205340_zpskuzflst9.jpg
 
20160804_205405_zpsnem0ac82.jpg
 
20160804_205314_zpsknzlylhq.jpg
 
with the leftovers from the hose and washers, i can probably make about 10 more if anyone needs theirs rebuilt. 
 
While doing the shifter knuckle, i found the best way to remove the pins was to use an appropriately sized drill bit in a socket on a few extensions and used that to drive out the center then outer pin. honestly the best way to do this is to use a punch set dont muck around and waste your time - also REMOVE THE CROSSMEMBER!! i cannot stress this enough, i was up myself and thought i would be able to do it with the crossmember still in BUT i was wrong - its much easier to drive the pins out without trying to wiggle around the crossmember. 
 
old vs new 
 
20160802_205051_zpsr1gykyug.jpg
 
POWER STEERING LEAK!!!!
 
ever since i purchased the car, there has been a power steering leak, i changed the common failure tank to pump O ring but this continued but when this never ended up resolving the issue. Fast forward a few months, i noticed the lid of the tank had PS fluid leaking down the side, when i removed the lid i noticed the lid gasket had gone hard and begin perishing. there were heaps of cracks in the gasket and that this was probably the cause. At the time i couldnt work out the part number for the gasket, i ended up just using gasket goo around the sealing surface hoping that this would work but eventually started leaking again. This week i managed to get the gasket for $15 shipped to Australia. The difference is amazing, the old one is warped and messed up. 
 
Old cracked gasket on the bottom 
 
20160912_123135_zpsnjskxurg.jpg
 
a few months back ichiban had a garage sale, i picked up this sweet set of GC8 4 pots to replace my MY98 sliding calipers. these need new dust boots still but theyre in good nick, also need the S clips for the pads but thats not too hard. these also got a good cleaning and coat of paint. im due for new pads and rotors soon so when its time for that, i will install these and get my braided brake lines on as well. 
 
20160801_225552_zpsxtwvnirp.jpg
 
20160801_225534_zpskqor08hk.jpg
 
20160731_171748_zpsunqkkriq.jpg
 
Any questions, PM or post here :)


#2 surge

surge

    Trusted Member

  • Members
  • PipPip
  • 168 posts

Posted 16 September 2016 - 10:00 PM

Just wanted to say awesome!

Looking forward to updates

#3 duncanm

duncanm

    wha' who ?

  • Members
  • PipPipPip
  • 2,010 posts
  • Gender:Male
  • Location:Sydney

Posted 17 September 2016 - 06:32 AM

welcome - love the shifter bush mod


#4 El_Freddo

El_Freddo

    Rock'n the old Skool

  • Members
  • PipPipPip
  • 2,245 posts
  • Gender:Male
  • Location:Bridgewater/Central Vic/semi-retired nomad
  • Interests:Subarus, 4wd'n Subarus, travelling Subarus, Tinkering... I could go on!

Posted 17 September 2016 - 11:44 AM

Nice. Love the DIY factor in this - even better is that it looks to be sensible DIY, not dodgy bros style ;)

Cheers

Bennie
"The lounge room is not a workshop..."
https://www.imageshack.us/i/po1BKrxbj
1BKrxb.jpg
El Freddo's Pics    -    El_Freddo's youtube

#5 Abraham Iqbal

Abraham Iqbal

    New Member

  • Members
  • Pip
  • 11 posts

Posted 17 September 2016 - 02:43 PM

Just wanted to say awesome!

Looking forward to updates


Thank you Surge :) 


welcome - love the shifter bush mod


Thanks mate - was one of my fav budget mods - TIC equivalent is a little pricey and as cheap ass as that sounds, i dont want to fork out 60AUD for something that will end up wearing out 3 years down the line, the poly pipe is pretty solid and works well :D 


Nice. Love the DIY factor in this - even better is that it looks to be sensible DIY, not dodgy bros style ;)

Cheers

Bennie


Thanks Bennie! I see so many dodgy mods and take solace in knowing that if im doing something i like it done properly (even if it is a DIY)  :D 


Cheers 


#6 motoboy76

motoboy76

    Regular Member

  • Members
  • PipPipPip
  • 689 posts
  • Gender:Male
  • Location:Newy.....
  • Interests:Subaru's, Dirt and road bikes......

Posted 17 September 2016 - 04:11 PM

Welcome looking good....


Yeah some very nice little touches....


Looking forward to doing the same sort of things to my RS.....


#7 ABEIQ

ABEIQ

    New Member

  • Members
  • Pip
  • 32 posts

Posted 19 September 2016 - 12:23 AM


Welcome looking good....


Yeah some very nice little touches....


Looking forward to doing the same sort of things to my RS.....


Thank you Motoboy :D


________________


Just a few more updates guys; 


Fuel economy has been TERRIBLE! i have changed everything short of the injectors and motor haha - im averaging around 300kms MAX out of a full tank which is pretty caca but its also idle hunting on start up - again everything related has been changed. 


Recently purchased a genuine coolant temp sensor (ECU and Gauge) which went in, no change after ECU reset etc, but meh all goes towards reliability of the car regardless. 


Boost leak from IACV BLEH. Good old MY97/98 IACV's - mounted to the Manifold rather than the TB. When i replaced it and cleaned the throttle body (2nd hand IACV), i held the gasket onto the IAVC with gasket goo - stupid mistake, i never realised that in doing this, although the gasket was aligned on the IACV, it was not aligned with the internal seals/check valve and when i bolted it down the inner seal was not mating against the IACV correctly. 


Photo stolen from Fixbroke (hope this is ok) - the seal and check valve have to butt up against the IACV and line up in the gasket on the IACV correctly - if not, BAM!!! boost leak. I will also be ordering the inner seal and check valve from subaru soon (shown below) 


2012-01-05173116.jpg


Gasket mounted to IACV

2012-01-05173055.jpg


I have also fancied window visors/weather shields so managed to pick up a set of one piece visors for a decent price - i think they look good, my brother thinks they look strange because they stretch from front to rear.


Heres a couple of pics  


20160917_153353_zpsrd9f8pk9.jpg


20160917_153400_zps6alm4csp.jpg


I also recently went on holidays, had a bit more of a look at my Link G4+ ECU and hugged it a little before i went away, my partner was less than impressed to say the least :P


20160801_131607_zpslzptk7ax.jpg


In my never ending search for reliability and idle issues - Hanging when coming to a stop (throttle cable checked and adjusted correctly), i came across reports of neutral position switches being a cause of this sometimes so i have one coming this week and a new crank pulley/harmonic balancer with new bolt (to resolve pulley wobble), so more updates when those come :)


Quite some time ago i purchased some mini projectors???? they're really 10W LED spot (probably not the correct wording) lights with projector style lenses attached, i made a bracket up out of aluminium and mounted them behind my grille, they shine a decent distance and i ended up making up a controller for them so that i can switch between flashing modes - solid, hazard light style flashing and another secret one ;) - custom circuit made up using an ATTINY85 micro (for any electronics gurus) which can have as many other modes that i can think of added. this is all wired up and the controller box is now mounted under the dash - they're pretty good for warning other road users and light up street signs the same way normal projectors do without blinding every other road user haha. 


This is switched by the rear fog light switch, i pulled the globe out of it some time ago due to the fact that most road users in Sydney would probably mistake the single globe for a brake light and probably slam on their brakes when not paying attention - yes i know this sounds a little over the top but i wouldn't put it past some people around here. each mode is cycled through by pressing the rear fog button off/on.   


Heres a video link for anyone interested


Cheers :)


#8 ABEIQ

ABEIQ

    New Member

  • Members
  • Pip
  • 32 posts

Posted 19 September 2016 - 10:35 PM

More purchases :D 


Quite some time ago, i installed a silicone inlet - i wasnt happy with the overall fitment and some of the installation with this one, so i ended up purchasing an AVO V3/V4 WRX silicone inlet which also replaces the SFB. Before i get my tune done, i will have this replaced along with a few other PITA jobs i dont really want to do at home 


Silicon%20Intake%20Pipe%20WRXSTi%20MY97-


4 Pots!!!! i finalllyyyyyyy got off my ass and bought the seal kit for these. The seals that came on them when i picked them up for some reason had gasket goo all over them :/. For $58 theyre a pretty worthy purchase to ensure the reliability of my braking. After these arrive, i need the S clips which are pretty costly but will be the next purchase followed by new pads and rotors 


s-l500_zps57nf726k.jpg


Question for those playing along at home - what pads and rotors does everyone recommend. The car isn't a track monster  but i wouldnt mind taking it to the track once or twice in its lifetime. I was leaning towards RDA standard rotors front and back as i cant really justify spending another 80 per set for dimpling. in terms of pads, i was looking at Bendix HD pads all around - apparently very similar properties to the QFM HPX range. 


Any input would be great :D 


#9 Abraham Iqbal

Abraham Iqbal

    New Member

  • Members
  • Pip
  • 11 posts

Posted 21 September 2016 - 07:57 PM

it would appear i have 2 accounts on here -_- been posting from both hahah whoops 


#10 Abraham Iqbal

Abraham Iqbal

    New Member

  • Members
  • Pip
  • 11 posts

Posted 23 September 2016 - 11:16 PM

Finally got my crank pulley installed along with a new bolt, the old one was beginning to wear our and wobble pretty bad - i was beyond concerned that the woodruff key was worn out and causing the wobble, but it turns out that it is in good nick - the edges had slight wearing on them, nothing concerning so i ended up finishing it off. 


It was fairly straight forward, because i have a 40mm Fenix radiator, the rad is set back too far and getting a socket on the breaker bar was impossibru!!! so the fans came out which involved removing both top rad mounts so that the coolant overflow and PS lines could move around a little more when pulling the fans out. there are 4 bolts holding the fans in from the top, then i had to loosen the 4 bolts from the lower rad area - the fans are separate and once the top bolts are out, they move back and slide up by pulling up. We ended up using a 22mm socket on a breaker bar with cheater bar on top - 5th gear and brakes. i was concerned when we were getting the bolt out as the pulley was spinning back a tiny bit but also seemed to flex??? anyway came lose and out. When installing the new one we lined the keyway up and pushed on. The new bolt needs to be done up to 33ft lbs as a first stage and then finished at 132ft lbs. be sure to coat the bolt threads in oil as per subaru specs - best to get a new bolt anyway as they were cheap as! i picked mine up from bunnings ... kidding, subaru genuine :D


Installation was reversed and all complete without wobble :D 


if you need any tips for installation let me know. heaps of pics below. 


20160922_163215_zpswfnaxnpn.jpg


20160922_163224_zpsmlqqqw5m.jpg


20160922_163702_zpsuolepx3p.jpg


20160922_163705_zpswerwuets.jpg


20160922_164924_zpszscncdd0.jpg


20160922_172854_006_zpsahovvsse.jpg


20160922_172918_zpsnvsyffx4.jpg


20160922_172924_zpsrdxkkepa.jpg


#11 ABEIQ

ABEIQ

    New Member

  • Members
  • Pip
  • 32 posts

Posted 27 September 2016 - 12:38 AM

More updates: 


Crank pulley still wobbles a little -_- i think the key is a little too worn but i guess im just being a little over the top with it, it wobbles a tiny bit by normal standards. 


Tonight i got bored as well and decided to pull off my headers to see how much they were leaking ... lets just say they were leaking like water through a sieve. pics below. 


In the past i replaced the OEM gaskets with MLS PSR gaskets hoping this would help but it looks like its been leaking more! I knew cheaper manifolds aren't made too well, but shit! this was terrible, the flange was SOOO warped. I ended up getting a file out and made them as flat as possible - from the center, the edges were warped out about 2mm - 3mm out, so i ended up bringing it closer to 0.5mm. i ended up using permatex red to help seal it up, so as per the instructions, i have it done up hand tight pretty much, and as its now 12:30am, im going to finish torquing it up in the morning before work :D


At the end of the day - DONT CHEAP OUT ON PARTS!! these were on the car when i bought it a year ago, hopefully in december i will get myself some early christmas presents ;)


After filing 


20160926_230854_zpsmp5vruch.jpg


20160926_230850_zpso2f4sudb.jpg


Passenger side blow out 


20160926_225353_zpsemerfmp2.jpg


20160926_215707_zpsznpkjykz.jpg


20160926_215711_zpsaqyvcxvy.jpg


Also, i love Genuine OEM parts, ended up picking up crap loads of things, decided the gasket in the oil cap was cheap enough as well as the washer bottle cap :D


New in cap already 


20160924_104837_zpsg0dggl62.jpg


#12 ABEIQ

ABEIQ

    New Member

  • Members
  • Pip
  • 32 posts

Posted 25 November 2016 - 08:10 PM

Hi all, 
 
It's been a while since i updated this post so here goes; managed to get a crap load of things done in the last two weeks
 
First up was a brake service and upgrade 
 - New pads and rotors all around 
 - New Stainless Steel Lines all around 
 - rebuild 4 Pots replaced front 2 pot sliding pistons - 4 pots were also rebuilt with new seals!  
 - painted up the rear calipers to match new fronts 
 - Ended up going bendix ultimate pads all round with Standard RDA rotors 
 
Note: the previous owner painted the calipers on the car - including sliding hardware -_- 
 
Old crappy rubber lines 
3313156B-6741-4BC9-855E-AC5372140B8F_zps
 
3F72723D-1FEC-42DC-8F77-08EEDD88215B_zps
 
Old 2 Pots VS new 4 Pots 
6EE56CF3-700E-47E7-BB09-2838BC5BA334_zps
 
Old Rear rotors VS new rotors 
D63CB855-CADF-4A8E-BC14-A0DFAA9FEB40_zps
 
Rebuild time!
00000000-0000-0000-0000-000000000354_zps
 
00000000-0000-0000-0000-000000000352_zps
 
00000000-0000-0000-0000-000000000356_zps
 
00000000-0000-0000-0000-00000000035E_zps
 
00000000-0000-0000-0000-000000000350_zps
 
New babies in their home!
753AF6D7-F07E-4AAC-AE6D-59FF8219E029_zps
 
We flushed and changed all the fluid in the braking system, the brakes feel so good now and pull up really well, im surprised they made such a difference - There is actual pedal feel now  :lol: 
 
While chasing down some of my idle problems, i picked up a new O2 Sensor and a new iacv sealer (goes inside the manifold and mates up to the iacv, the old one was pretty brittle  - old vs new 
B308293E-0D3C-4612-9B44-85764D3B9C65_zps
 
Made sure to put copper grease on the threads to stop it seizing up in the downpipe. 
 
83887222-7725-4BB6-902E-1CAF3643EE3F_zps
 
D9F241BE-4A56-4C76-970E-14EAD6E76751_zps
 
16400453-F4AC-48FB-8DAC-7924C2E36911_zps
 
F397E543-25F1-4AB8-B3C3-61F9C5AA70EE_zps
 
My Exhaust has been leaking for a long time now - the previous owner used household clear silicone to seal it up, i ended up replacing this with gasket maker as a temp solution and never got around to using proper gaskets so here they are 
 
2BB4879B-BBB9-41A2-ABB6-B7119B7D2E49_zps
 
I also was pretty unhappy with the chips and flaking paint on the bonnet vent so i picked up some good quality clear and colour matched paint to paint up a new one (second hand). The colour match was nearly perfect and unless you were looking for the difference, you wouldn't see it.  
 
Old vs new painted up 
 
73E88311-0AC1-4429-96EE-910E2FCA87B2_zps
 
Some pics of the painting process and final result 
 
867E188A-15EC-4D68-8D53-E866040E6CD2_zps
 
06EB1572-1358-4126-8D43-F63F8F92AEAD_zps
 
CE13856F-1538-4468-AE01-3584382BF003_zps
 
I will have to buff and polish this in the next week or so, but there is no orange peel at all and the clear pretty much spot on matches the factory paint, if not better. Head out to VG auto paints and see Dave for good advice and prices on paint. 
 
I also spoke to Ben at Bennys Auto Works and picked up another piece of my upgrades, good condition VF35 with absolutely 0 shaft play and no cracking around the wastegate port (common place to crack)  Pic stolen from Ben Neil. 
 
15037103_242792816137147_792145376945945
 
I'll also be replacing the studs on this soon - when they arent stuck -_- i have soaked these in innox and waiting for these to free up. 
 
also ordered a crap load of genuine hoses, including turbo feeds, along with braided connecting hoses for oil and water. Mainly did this because i hear that the oil drain needs to be bent to get the turbo out and i'd rather have something to use instead of cracking the stock one. 
 
s-l1600%201_zpsrjex55vi.jpg
 
I read a few reviews on coolant vacuums and decided to pick one up as its been a PITA to bleed my cooling system in the past, im hoping this will make it MUCH easier, and it was relatively inexpensive to purchase. I will use this when i replace the turbo and coolant lines!  
 
s-l500_zps5sludvlx.jpg
 
One last thing before i go, drivers side central locking - absolute garbage, previous owner replaced the door motor with an aftermarket one, original was probably faulty, when i got the car, the central locking was not working at all, replaced the central locking module, managed to get all to lock, all unlocked except drivers door. had a look at this and it was because there was only one wire running from the kick panel up into the door loom? not sure why, and to get around this, the previous owner just grounded out the other wire for the motor so at least it would lock ( when they actually had it working ) drivers door always had to be unlocked with the key. I didnt want to try and get a new wire up through the loom as its tight on space and i didnt want to damage the rubber loom boot any more then it already is. So instead, i snipped the ground wire in the window module harness and grounded that out to the frame of the door as its a common ground and has a pretty good connection to the rest of the car. I then connected the second door motor wire to the snipped end of the ground wire that was no longer in use. I then picked up the ground wire in the kick panel and de-pinned it from the plug. i then connected this de-pinned wire into the door lock module and gave it a test! it worked! you have no idea how good it feels to have working drivers door central locking! 
 
any questions, feel free to ask!
 
Thanks for reading 


#13 motoboy76

motoboy76

    Regular Member

  • Members
  • PipPipPip
  • 689 posts
  • Gender:Male
  • Location:Newy.....
  • Interests:Subaru's, Dirt and road bikes......

Posted 26 November 2016 - 01:24 PM

Nice update mate...

The 4 pots look good....

Vent looks pretty good to....

#14 ABEIQ

ABEIQ

    New Member

  • Members
  • Pip
  • 32 posts

Posted 26 November 2016 - 04:58 PM

Nice update mate...

The 4 pots look good....

Vent looks pretty good to....


Thank you Motoboy :)


#15 ABEIQ

ABEIQ

    New Member

  • Members
  • Pip
  • 32 posts

Posted 30 December 2016 - 08:17 PM

Hi All, 


Time for another update! 


Recently my clutch pedal started getting stuck then popping back when i would give it a squirt, i looked into different reasons for this and found out it is usually master or slave failing OR clutch return spring. 


The clutch return spring looked to be in good condition albeit rusty. I also checked out the slave which looked fine, and checked the master which had a few drips of fluid around the shaft. I decided the best thing to do would be to change the master with a new one before it failed again! - i had this happen in the past 2 hours from home, which was not fun. 


Below are some pics of during the process - i didn't go OEM replacement because i couldn't get it quick enough, but i managed to pick up a protex master with 1 year warranty, my mate works at a parts shop so it shouldn't be hard to have swapped over if this one fails. 


After the entire process, the pedal still kept sticking, we adjusted the bite point and this still did not fix it :( :( :(. I decided to leave it and order a new spring, before the spring could arrive, i went for a drive with my mates, the pedal got WORSE! after a day or so i was sick of this so i decided to go to bunnings and grab the nearest replacement to tide me over until my new one came from Ben @ Bennys custom works. I checked out the spring to make sure i got the right one and what do you know, the spring had become disconnected and was hanging in my engine bay.


After i replaced the spring, the pedal started behaving properly again, i have had it stick once in the last few days but maybe its just me being paranoid about it. Anyway, the new OEM spring from Ben should be here this week, and when it comes, i'll swap it over and see how things go, I'm really hoping its just the spring that caused issues, if not, ill be replacing the slave .. and after that .. gearbox off to check the throwout bearing :(


I read on the internet in a few places that because the slave is angled upwards on my car and the bleeder is below this point, air gets trapped in the cylinder and makes it near impossible to bleed. In the last pic, you can see that i used an F clamp on the pitch stop to keep the fork depressed thus depressing the slave stopping air getting trapped. Because the head of the clamp can pivot, it did not work too well, instead i had my brother hold a screwdriver against the gearbox forcing the fork to depress the slave like with the clamp. 


22813521-8744-4535-A026-A37469AADDFE_zps


B29662FC-3C8C-47F0-AA84-1A5DCA6A7C9D_zps


2269E7A4-4EF2-4E6C-8978-E56B814F9EAE_zps


Old VS New 


6C44A778-4EA1-4228-AEBF-8826D37538E2_zps


Clamp method to depress the slave 


8C750CDD-4637-411C-884B-F8A3C5F6431F_zps


Thats it for now, more to come soon :) 


#16 ABEIQ

ABEIQ

    New Member

  • Members
  • Pip
  • 32 posts

Posted 30 December 2016 - 08:40 PM

Oh one more thing i forgot, Im going to be making some header tank spacers along with throttle body spacers from PTFE and or Bakelite. My Father in law has a desktop CNC router which is pretty portable, I've already done the designs for the header tank spacers but haven't had time to do the throttle body spacers. I'll be making them from 5mm material and will probably go thicker if i can source it but for now 5mm should be fine :) 


2016-12-12_7-37-48_zpszskj1lfo.png


2016-12-12_7-37-07_zpsbbk1twh9.png


2016-12-12_7-37-24_zpsnxmkomri.png


#17 El_Freddo

El_Freddo

    Rock'n the old Skool

  • Members
  • PipPipPip
  • 2,245 posts
  • Gender:Male
  • Location:Bridgewater/Central Vic/semi-retired nomad
  • Interests:Subarus, 4wd'n Subarus, travelling Subarus, Tinkering... I could go on!

Posted 30 December 2016 - 09:55 PM

Wow mate, you've been busy!

I find your clutch issue interesting as I'm having the same thing show up on a Gen3 that's about to go in for RWC. I'm not sure if its got a return spring so I'll be checking that out tomorrow!

Keep up the good work ;)

Cheers

Bennie
"The lounge room is not a workshop..."
https://www.imageshack.us/i/po1BKrxbj
1BKrxb.jpg
El Freddo's Pics    -    El_Freddo's youtube

#18 ABEIQ

ABEIQ

    New Member

  • Members
  • Pip
  • 32 posts

Posted 31 December 2016 - 09:20 AM

Wow mate, you've been busy!

I find your clutch issue interesting as I'm having the same thing show up on a Gen3 that's about to go in for RWC. I'm not sure if its got a return spring so I'll be checking that out tomorrow!

Keep up the good work ;)

Cheers

Bennie


Thanks Bennie! 


It usually is just the spring, but while you're at it, check your slave and master for signs of leaks (around seals) as well as the slave for leaks around the banjo bolt for the clutch line. These leaks could be letting air into the system causing the issue. 


If your Lib does have a clutch spring, it will probably be that causing issues. 


keep me in the loop man, i'm keen to hear how you go :) 


#19 ABEIQ

ABEIQ

    New Member

  • Members
  • Pip
  • 32 posts

Posted 02 January 2017 - 11:59 PM

Hey guys, 
 
As you've probably figured out, i like my car to appear as stock as possible (other than the few aesthetic mods). I was looking at a solution to a CAI without the risk of hydrolock/Needing a tune (as thats coming in the future), i looked at a few options including an in guard flexible intake pipe from about halfway up the guard then into the stock airbox, i  read around on a few other forums and decided that although the resonator is fairly restrictive, the best air ram would probably be the stock one, but without the resonator, how would this work???? solution, cut resonator off of the stock arm and seal up the big ass hole, it may sound weird now but pics below. It also may be counter intuitive as there is a big ass flat surface now, but if i get the time, i may end up cutting the two necks and joining them with some flexible pipe in the guard. 
 
stock ram arm circled in red 
 
stock%20ram%20arm_zps7i0drnd6.jpg
 
Stock resonator in one piece 
 
4C24C696-97B2-49E8-B26D-6E33C63B3688_zps
 
Resonator separated from intake/ram arm - it does look narrow in this pic but i ended up cutting it a little more - come to think of it, it would have been fine as is in the pic :( 
 
1EF1C6ED-75E4-48BD-9424-BE2394155F0B_zps
 
Hole widened and template made for ABS piece along with ABS piece ready to be joined. 
 
E4FA75BB-A676-42D0-B40A-7169A6F1E93B_zps
 
Side view post cut 
 
C84E8F21-EBA8-47A7-BEF9-C929F3A0CF99_zps
 
ABS piece in place, just tacked edges with CA glue 
 
0B016DCB-408D-4D2A-92E7-21BFB2D3A552_zps
 
Complete and sealed up with epoxy, i had intended to use RTV/Sikaflex, but it would appear that both were left uncapped and dried up :( 
 
9A1C0D8F-927F-4730-A2E6-339012315D08_zps
 
Im open to criticism, again im just testing this though, it may work, it may be garbage, but meh, was bored at 11pm on a Monday night. I am also using an OEM filter at the moment, i will be ordering an apexi or cosworth panel filter this week. 
 
(Y) 


#20 ABEIQ

ABEIQ

    New Member

  • Members
  • Pip
  • 32 posts

Posted 03 January 2017 - 05:24 AM

Clutch Issue still happening :( happens VERY infrequently, like once every week if that and only when im giving it a bit and shift very quickly, no where near as bad as before but maybe thats just the stronger spring masking the issue :(. I will order a slave this week and see if that helps out, apparently its pretty common for the slave to cause this issue.


Also tagged with one or more of these keywords: GC8, wrx, subaru, rexy, ej20

0 user(s) are reading this topic

0 members, 0 guests, 0 anonymous users