Jump to content


Photo

GCEBE - Abrahams 1998 GC8 WRX

GC8 wrx subaru rexy ej20

  • Please log in to reply
41 replies to this topic

#21 ABEIQ

ABEIQ

    New Member

  • Members
  • Pip
  • 32 posts

Posted 05 January 2017 - 11:22 AM

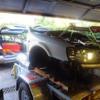
time for a small update again guys, as above, my clutch was still playing up and sticking, it did it pretty bad on the way home yesterday so i had a mate pick up a new slave for me while i was still on the way home. Ended up getting home and replaced it pretty quickly. 
 
When bleeding these, because the slave is angled upwards and the bleed nipple is below this point, air normally gets trapped pretty easily in the slave. I read online about using a clamp to hold the slave shut, the space was limited so i made up a brace to hold the slave shut. 
 
come to think of it, i could have probably just left it unbolted and clamped it shut but then i wouldnt be able to gauge if the pedal felt normal easily, but anyway, below is the brace; pretty much, it goes over the front pitch mount bolt and i just used another nut to hold it in place, then with a bolt and 2 nuts, i made an adjustable stopper to hold the clutch fork against the compressed slave :D, this worked pretty bloody well and the clutch feels great. 
 
62831F9D-4A2C-44BD-9D25-9884FC10A3CC_zps
 
F413BDA4-D2A2-4D93-AABF-39563D9C8A05_zps
 
This morning on the way to work i gave it a bit and didn't feel any sticking, i was pretty rough on it too. about 5 minutes from work the pedal started feeling strange, this time it felt different, like the throwout bearing or fork was stuffed ... eugh brain went in to melt down, did it at any speed, any gear in neutral etc, while i was having a moment, i took my foot off the accelerator and let it rest on the carpet, pressed the clutch a few times and felt the floor mat moving .. turns out the pedal was catching on the floor mat haha. so id say my problem was the clutch slave all along, glad i changed the master and put new fluid in the system though, the master had a leak anyway :(  
 
TLDR: changed clutch slave, resolved sticking issue, thought issue came back, turns out this time the pedal was catching on the carpet. 
 
I also had time yesterday to put the modified stock air ram and ducting in place, this is as factory as it will get without the resonator attached, its functional and does the job. 
 
277BB81A-22F2-4361-B298-CD7D39CA3F06_zps
 
Thats all for now! I will keep an eye on how the pedal feels and if it sticks again :)  


#22 duncanm

duncanm

    wha' who ?

  • Members
  • PipPipPip
  • 2,010 posts
  • Gender:Male
  • Location:Sydney

Posted 05 January 2017 - 02:47 PM

how do you find the modified intake ?  Much more noise ?


If you're still having clutch issues (though it sounds like you've sorted it) - replace the flexible line.  They get pinholes in them and bleed air in slowly.


EDIT: CBF, TLDR - I see you've got a braided line. All good.


#23 ABEIQ

ABEIQ

    New Member

  • Members
  • Pip
  • 32 posts

Posted 06 January 2017 - 05:24 AM

how do you find the modified intake ?  Much more noise ?


If you're still having clutch issues (though it sounds like you've sorted it) - replace the flexible line.  They get pinholes in them and bleed air in slowly.


EDIT: CBF, TLDR - I see you've got a braided line. All good.


Before i modified the intake, i had the resonator and air ram out for a long time, pretty much the airbox was open in the guard and an OEM fender plug installed, Now with this mod, its quieter which is pretty disappointing, but i think its for the best as it retains most of the factory intake system :).


haha yeah i've had the braided line for ages, i think the issue is now resolved, was probably just the slave cylinder on its way out, it was a used spare as i blew up another master cylinder about a year ago, then in the process of bleeding we over extended it and borked it as well. 


#24 ABEIQ

ABEIQ

    New Member

  • Members
  • Pip
  • 32 posts

Posted 21 January 2017 - 06:39 PM

Parts Parts and Parts!!!


Time for another update on GCEBE 


I ended up getting a bunch of subaru genuine parts from partsouq and amayama for when i do the turbo swap to go along with my braided lines for the turbo. Replacement header tank to under manifold coolant pipe, coolant return, coolant feed and oil drain. 


0A32BCD0-9BD5-4769-B6F7-47C667A1E0EA_zps


ADB740E0-3039-4EEC-9049-5C0BBCEC123B_zps


D13D6A3A-7E8D-4728-9AF4-CA3C57CB0127_zps


29206888-3FAE-4397-968B-C0D222E04748_zps


Actual pic of the braided lines i purchased - note these just replace the hard lines, the hard lines break pretty easy when trying to move them out of the way to remove a turbo apparently so i have preempted this and will be chucking these in soon enough. 


1B9CE452-76FD-4CA7-9D2F-A5440B1751D6_zps


I also changed out the exhaust gaskets as they were munched, sounds much better but still have a pesky leak i am trying to work out, pretty sure its the chineese semi unequal headers that the previous owner installed. and with that .. comes a set of Prospeed Racing UEL Headers, i have had my eye on these for a bloody long time and i finally managed to save a little bit last pay run and buy them. Troy was VERY helpful, and delivery was one business day from ordering. The quality is AMAZING! the welds are nice and clean, thick wall stainless steel all around with some beefy AF flanges on both the headers and the up pipe. 


Obligatory unboxing shot of the headers only - i will upload a pic of the up pipe when i get a chance.


77905CF0-F770-414D-96ED-7BD98238871A_zps


I dont want to heat wrap these because when heat wrap gets oil on it, it pretty much becomes a candle wick, i wanted to ceramic coat them as well but the only place i could find in sydney was in moorebank and wanted something like $300 to get them done :(, if anyone knows any good ceramic coating companies in sydney let me know!


Only have a fuel pump, injectors, top mount and tune left!!!!


thats all for now.  


#25 GNGBNG

GNGBNG

    Regular Member

  • Members
  • PipPipPip
  • 496 posts
  • Gender:Male
  • Location:Tamworth

Posted 23 January 2017 - 02:57 PM

Great updates happening on the Rexy.


Just going back to your diff insert bushes, what are the part numbers for those if you don't mind me asking.


#26 ABEIQ

ABEIQ

    New Member

  • Members
  • Pip
  • 32 posts

Posted 23 January 2017 - 06:38 PM

Great updates happening on the Rexy.


Just going back to your diff insert bushes, what are the part numbers for those if you don't mind me asking.


Hey mate they are super pro SPF4297K - they had to be modified to fit, i have a DIY on a few forums about it :) 


#27 ABEIQ

ABEIQ

    New Member

  • Members
  • Pip
  • 32 posts

Posted 23 January 2017 - 06:42 PM

for anyone interested - diff bush insert DIY that i did, i have now posted it on these forums as well .. 


http://www.subyclub....f-bush-inserts/


#28 GNGBNG

GNGBNG

    Regular Member

  • Members
  • PipPipPip
  • 496 posts
  • Gender:Male
  • Location:Tamworth

Posted 24 January 2017 - 12:06 PM

Thanks for that.


#29 Brett82

Brett82

    New Member

  • Members
  • Pip
  • 31 posts

Posted 26 January 2017 - 11:59 AM

Turbo exhaust in Smithfield use to do ceramic coating but dont know if they still do and also not sure what they charge,

would love a sound clip/video of that the car sounds like with these headers on

#30 ABEIQ

ABEIQ

    New Member

  • Members
  • Pip
  • 32 posts

Posted 31 January 2017 - 10:06 PM

Turbo exhaust in Smithfield use to do ceramic coating but dont know if they still do and also not sure what they charge,

would love a sound clip/video of that the car sounds like with these headers on

Thanks Brett! I tried calling them a few times but couldnt get through, i may just head up and visit them, theyre about 20 mins from my house so thats not too bad. Cheers for the recommendation :) 


#31 DankyMatt

DankyMatt

    New Member

  • Members
  • Pip
  • 36 posts

Posted 08 February 2017 - 11:50 PM

keep us updated champ, keen to know if its the slave causing this


98' GC8 WRX


"What's behind you doesn't matter"


#32 ABEIQ

ABEIQ

    New Member

  • Members
  • Pip
  • 32 posts

Posted 10 February 2017 - 08:42 PM


keep us updated champ, keen to know if its the slave causing this


Thanks mate! Update below!


I noticed the gearbox getting notchy and sometimes a little noisy getting into third, every little noise every shift, every bump etc makes me think something is going wrong (im paranoid my car is out to destroy my bank account) - i ended up changing the gearbox fluid with penrite pro gear 75-90 which was recommended by all drive subaroo (company that did the box), and also put in some smooth shift, feels much better now, pretty darn smooth, third gear is still a little notchy but i guess its just a subaru thing, if im shifting quickly into third its rough but when i shift with a decent speed its fine. i was also having issues with my clutch pedal, when shifting between gears, if im slow off the clutch i can feel like a little bump in the clutch pedal only sometimes happening when i disengage only, and when the pedal is nearly fully down - probably about 5% of my total driving time this happens -  its not harsh but it still worried me so i ended up bleeding the system again and also moved the clutch fork back and forth a bit and that issue seems to be fixed, i was worried it was the TOB getting stuck, but yeah seems ok now. i also greased up the clutch pedal and i may just get some lithium spray and get the pedal assembly with it incase i missed any areas, then test. I also picked up a pneumatic bleeder which hooks up to a compressor - absolute piece of crap, does not have much pressure at all and is very fiddly to get working correctly. 
 
below are a few pics of the process, i know the top mount doesnt need to come out to do the fluid, i just wanted to check everything while i was waiting for the gearbox levels to settle so off it came. Ive worked pulling off the top mount down to a fine art haha. 
 
876B825F-1430-4506-8CC2-888738BAFFDB_zps
 
C1F63D3D-B72E-4A18-865B-4AA1D2265B7B_zps
 
EB5389B8-3317-4EF6-99C2-93DB7327386F_zps
 
4FC3A579-AA94-45E8-8695-C26C69D305B1_zps
 
6944C9B5-D2BD-4DC1-8EB2-5810540E2C9F_zps
 
Old fluid :( 
 
745C66B4-4EE8-42B1-9FB7-734D114DB120_zps
 
Thats it for now, im hoping to get the headers ceramic coated soon so i will have some pics of that install in the next month or so :) 


#33 ABEIQ

ABEIQ

    New Member

  • Members
  • Pip
  • 32 posts

Posted 12 February 2017 - 01:54 PM

I also went for a drive today. still can feel the bump in the pedal -_- im going to try and get my car up on stands tonight and make sure everything is tight! it is only happening on odd down shifts and when im a bit rough in first when taking off, i have a feeling something might be loose! 


#34 ABEIQ

ABEIQ

    New Member

  • Members
  • Pip
  • 32 posts

Posted 18 February 2017 - 06:17 PM

So, i spent some time driving my car lately and completely forgot about the pedal feedback issue, i guess the more i concentrate on it, the more i notice it, i havent really noticed it in the past few days, although i havent been on a decent drive yet. 
 
I also went to pick and payless the other day and picked up some of the pedal stopper rubber pieces from a few manual cars because i noticed mine were munched, below is the worst, i guess 19 years of use is really starting to show ahaha. 
 
20E91970-76A3-4081-903E-B09230A01BCC_zps
 
A mate of mine picked up some plastic polish from supercheap and took to his cluster, it came out REALLY well, i decided i would give my cluster a go with meguiars ultimate polish which is very fine and normally used for removing light swirl marks in paint, it cam out AMAZING! the cluster looked caca before, it had grime and lots of fine scratches, i wasnt able to get our the deep scratches by hand, but the improvement is great enough already. 
 
E137FBED-D21E-4A2B-A76D-6B2F2E5412D0_zps
 
Cheers 


#35 ABEIQ

ABEIQ

    New Member

  • Members
  • Pip
  • 32 posts

Posted 20 February 2017 - 08:52 PM

From about the 3rd month of owning my car, the fog light indicator globe has been out, its pretty frustrating not being able to see if it is on with minimal effort, so i ordered some globes to replace this, I will be selling these globes on here in the next few weeks when more come. 
 
I will also be doing a DIY on this when the globes come :) 
 
So, the short of doing this is: 
1. remove trim panels around steering wheel lower 
2. remove wiring
3. pop out button 
4. locate lower globe in the switch and twist counter clockwise 
5. turn over and tap switch module to release globe assembly 
6. i had trouble with step 5 so i used a pick tool to remove it :( 
7. bend globe leads out of their mounting positions and pull globe out 
8. remove rubber boot that is over globe 
9. put boot over new globe and insert into mount
10. put cover on new globe and feed globe wires through mounting base. you may need to trim the cover like i had to, this was because my globe was a little shorter then the OEM one.
11. bend wires around mounting base, these run back down the base towards the globe and then back into the base, you will see what i mean from the pics. 
12. insert again and test .
13. be happy that you can now see the pretty lights! 
 
0398A846-2C1F-4688-8891-E7CC17DE48C8_zps
 
5854E134-2F90-4C4C-9D69-FF2208D12759_zps
 
CC6C4D8D-950F-48F8-9D4C-A778A9834A6B_zps
 
Original Globe 
526492B4-4C3E-47E4-A12F-184A42E54F2B_zps
 
New Globe with trimmed boot 
C34681AA-7E0D-4153-AB42-2B6345AEF759_zps
 
9A738A8C-6EE3-4D6B-B765-F716589BB7CF_zps
 
New Completed globe install 
A4B05904-AB3D-478A-B6C1-10861E67CDA5_zps
 
2A471ED1-D588-47E6-B738-494405A6977C_zps
 
7BA005C0-7C0C-4A3D-A6EA-1D90F60D6359_zps
 
Thats all for now :) 


#36 ABEIQ

ABEIQ

    New Member

  • Members
  • Pip
  • 32 posts

Posted 23 February 2017 - 08:44 AM

Finally got around to changing my air filter, the old one hadn't been changed at all since owning the car, the previous owner said it was done .. but i dont know how truthful that is. The old one was also a cheap crappy paper one, which was pretty caked up. 
 
Ended up going with an AVO drop in filter which is able to be cleaned with water and an air dry. I was looking into A k&n drop in but didnt want the oil used for these to munch my AFM. The AVO filter is extremely high quality and looks and feels well made. 
 
I purchased this from Lee at AVO australia, shipping was quick and the price was reasonable! 
 
Pics below
 
CE1795E7-3D0B-490E-B8ED-11BFA25011DF_zps
 
31B1228C-422D-4BBB-A5CF-B5F996245518_zps
 
68640031-5577-4D63-8EA1-7C4937840F62_zps
 
41BC1A68-47E1-44F5-8C28-DA3CE256DB9C_zps
 
D713BB05-0E96-4246-8E20-6574B5CE586C_zps
 
BC46D4E4-0134-411B-98C3-28F62E79DB88_zps


#37 ABEIQ

ABEIQ

    New Member

  • Members
  • Pip
  • 32 posts

Posted 18 April 2017 - 01:35 AM

Hey all, I have been quiet for some time, sadly, i think im going to slow down on the performance mods and keep the car clean and tidy. I'm potentially going to sell my G4+ ECU and VF35 .. but i am yet to decide on that! 
 
I have spent a few dollary doos on bae lately, just small improvements, Rear strut brace and a radiator shroud. The strut brace was a PITA!!! i thought hey, how hard can it be, 45 mins going quick or take my time with a few brews and complete it in 2 hours ..... 3 hours later and 0 beers, i was an unhappy, sore and sober suby owner. 
 
The whole process was so painful for many reasons, most being that i had a pretty short fuse from a stressful day at work and also because i didnt really have much light to work in. 
 
The basics of the install are; 
1. Remove rear seat base and back. 
2. Remove plastic trims that go around boot opening behind seat back 
3. struggle to find somewhere to place everything without damaging them 
4. Remove strut top nuts on each side 
5. Realise there is one nut on each side that is impossible to easily undo due to seatbelt unit being in the way 
6. Give up for 20 minutes 
7. Struggle some more and get nuts out 
8. Jam strut brace plates into place and bolt back down - realise that wiring loom is in the way, cry a little, remove clips for wiring in boot, unclip most plugs in boot and pull out of the way, cry a lot more 
9. bolt strut brace bar into place 
10. replace all the gear that i pulled out 
11. swear some more
12. spirited drive time 
 
For some reason i didnt take any pics of it completed but i will add some later on, See below for a few pics 
 
Seats out and plastic trim panels removed 
214F72A4-A11E-4DFE-A7C8-05E4B17CF402_zps
 
Location of strut bolts 
97232E96-7EAB-493C-B06D-EA163319E76C_zps
 
PITA Bolt 
28DD0D96-E2F8-4AE5-938E-D4300DD69965_zps
 
To be honest, a pretty painful install but it was well worth it, i paid $100ish from ultrex, it fit well, great quality, and gave a noticeable improvement in the rear, i feel like i can push through corners faster and more controlled then before. 
 
Cooling plate/Radiator shroud! Probably my favourite cosmetic and "performance" mod, of which i am yet to test. this was a simple install, pull out radiator brackets and surrounding bolts, place radiator grommets in radiator place plate back in and then install mounts and bolts again. Ive put a few pics of the install below :) 
 
Before 
C311BC9E-925E-487C-8CFB-1613E108495A_zps
 
After
E3FF26B1-EA27-4BEC-A3C4-96B759E7CC75_zps
 
Grommets that need to remain in radiator 
97232E96-7EAB-493C-B06D-EA163319E76C_zps
 
1A5528BE-FB76-4A1A-995F-DAD7166D13E3_zps


Thats all for now guys, hit me up if you have any questions


#38 GNGBNG

GNGBNG

    Regular Member

  • Members
  • PipPipPip
  • 496 posts
  • Gender:Male
  • Location:Tamworth

Posted 18 April 2017 - 04:58 PM

Yeah, I remember doing my rear strut brace, it tested my patience getting to those strut bolts.


#39 ABEIQ

ABEIQ

    New Member

  • Members
  • Pip
  • 32 posts

Posted 18 April 2017 - 09:55 PM

Yeah, I remember doing my rear strut brace, it tested my patience getting to those strut bolts.

yeah haha was a PITA, took a long time to get them undone and done back up, i have an air ratchet, but i was considering getting a milwaukee battery ratchet to help in the future :) 


#40 blake_

blake_

    New Member

  • Members
  • Pip
  • 54 posts

Posted 26 April 2017 - 05:21 PM

Nice read mate. Very similar to my 98 hatch. Did you end up sorting the iacv problem I changed afm iacv and nuetral switch and still no good. Mine also started doing the dick clutch think after I put another box in recently. Just havnt had time to fix it. Keep us updated


Also tagged with one or more of these keywords: GC8, wrx, subaru, rexy, ej20

0 user(s) are reading this topic

0 members, 0 guests, 0 anonymous users