
I’ve just realised (maybe) that your shell is a left hand drive unit. Looking at the firewall it looks like there’s a mount point for the brake booster on the lhs of the vehicle but no corresponding mount on the rhs, where you’ll be sitting.
All that said, and if it is the case, you’ll probably be tieing in a more suitable mount point for the master cylinder (and booster?) anyway. I’m interested to know if the shell is LHD (can’t remember if you e already said it before and if you’re doing a better, more structurally sound mount for the brake booster/master cylinder.
Cheers
Bennie

584 replies to this topic
#221

El_Freddo
-

- Members
-

- 2341 posts
Rock'n the old Skool
- Gender:Male
- Location:Bridgewater/Central Vic/semi-retired nomad
- Interests:Subarus, 4wd'n Subarus, travelling Subarus, Tinkering... I could go on!
Posted 03 April 2019 - 07:10 PM
"The lounge room is not a workshop..."
https://www.imageshack.us/i/po1BKrxbj

El Freddo's Pics - El_Freddo's youtube
https://www.imageshack.us/i/po1BKrxbj
El Freddo's Pics - El_Freddo's youtube
#222
JDWhiteWRX
-
- Members
-
- 591 posts
Regular Member
- Gender:Male
- Location:Royal National Park, NSW
Posted 03 April 2019 - 07:51 PM
Yes it is a LHD shell, you have a keen eye Bennie. This is something I've known all along though, the car will have a floor mounted pedalbox and no brake booster so it makes no difference in the end.
Joel.
Follow me on Insta: @brzdiy
#223
El_Freddo
-
- Members
-
- 2341 posts
Rock'n the old Skool
- Gender:Male
- Location:Bridgewater/Central Vic/semi-retired nomad
- Interests:Subarus, 4wd'n Subarus, travelling Subarus, Tinkering... I could go on!
Posted 03 April 2019 - 08:00 PM
Yes it is a LHD shell, you have a keen eye Bennie. This is something I've known all along though, the car will have a floor mounted pedalbox and no brake booster so it makes no difference in the end.
Joel.
Hehehe... ironic that a LHD shell ends up with a LHD rack for a RHD setup.
I thought you’d use some other sort of mount system to get the best driver position in the vehicle.
Cheers
Bennie
"The lounge room is not a workshop..."
https://www.imageshack.us/i/po1BKrxbj
El Freddo's Pics - El_Freddo's youtube
https://www.imageshack.us/i/po1BKrxbj
El Freddo's Pics - El_Freddo's youtube
#224
JDWhiteWRX
-
- Members
-
- 591 posts
Regular Member
- Gender:Male
- Location:Royal National Park, NSW
Posted 03 April 2019 - 09:37 PM
Real race cars don't use brake boosters or ABS, well there is a motorsport ABS that costs a fortune but most just go with dual master cylinders with a balance bar.
Follow me on Insta: @brzdiy
#225
Barbbachello
-

- SubyClub Area Rep
-
- 6493 posts
Touring Bruce
- Gender:Male
- Location:Mehico
- Interests:Docking
Posted 04 April 2019 - 11:23 AM
Yeah right, never noticed it being LHD. Awesome work as usual

#226
JDWhiteWRX
-
- Members
-
- 591 posts
Regular Member
- Gender:Male
- Location:Royal National Park, NSW
Posted 07 April 2019 - 05:31 PM
I got some more work done on the car today.
Started by converting my multi-process welder over to MIG since you can never really get all the seems clean enough for TIG when welding to the chassis.

I had to use a little CAD to make up this piece to re-strengthen the location of the front upper control arm mount.
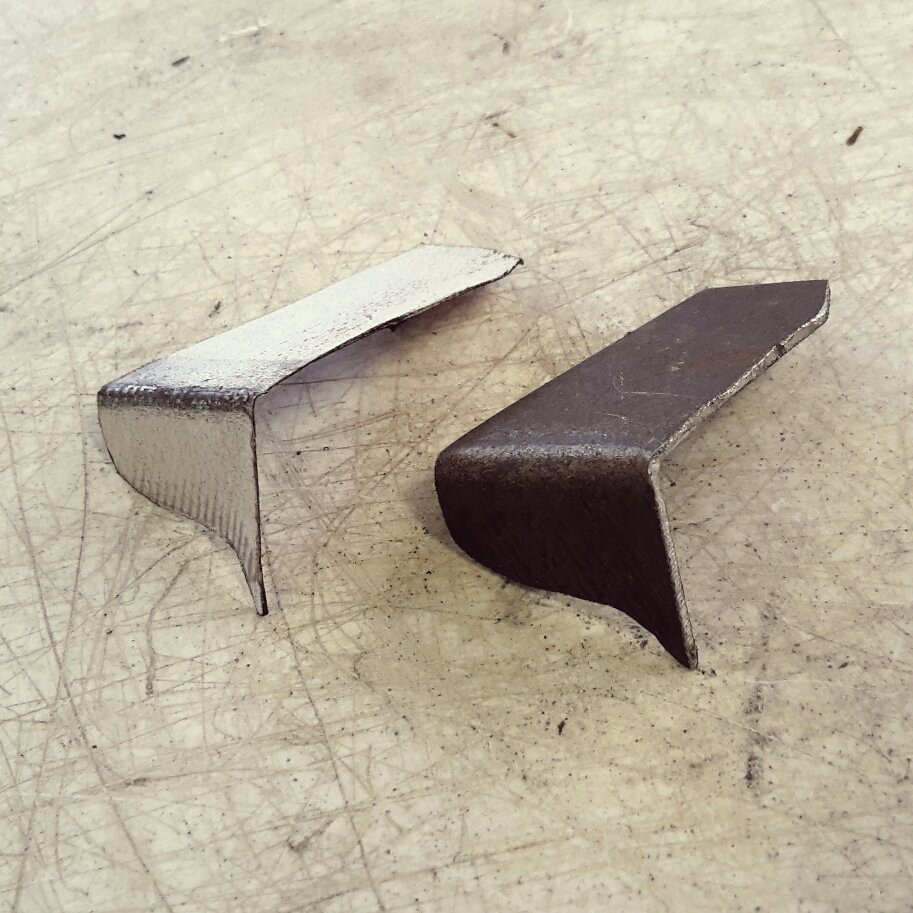 [/url]
This is after welding the small piece in and cleaning up my welds with the grinder.

Then I just went ahead and welded the mounts into the chassis. My MIG welding skills are not great and the majority of the welds look like pigeon poo but I am confident they are plenty strong enough as I usually run it a little hot.

After some minor cleanup with the grinder I gave them a coat of cold-gal.

So one side is now complete and I need to spin the whole shell around to do the other side.
Follow me on Insta: @brzdiy
#227
El_Freddo
-
- Members
-
- 2341 posts
Rock'n the old Skool
- Gender:Male
- Location:Bridgewater/Central Vic/semi-retired nomad
- Interests:Subarus, 4wd'n Subarus, travelling Subarus, Tinkering... I could go on!
Posted 07 April 2019 - 08:58 PM
I found when the MIG was doing the chicken shit weld it would do better with more amps and faster movement (from memory, it’s been a number of years since I did this sort of work on my car). The other trick is to experiment with some scrap bodywork metal and the metal you’re welding in place to see what works best - but I’m sure I’m already telling you stuff you already know and practice. I always thought that MIG was easier than TIG - your TIG welds look mint and your consistency in your welds shows your confidence and ability in this skill.
Keep up the good work!
And thanks for the update.
Cheers
Bennie
Keep up the good work!
And thanks for the update.
Cheers
Bennie
"The lounge room is not a workshop..."
https://www.imageshack.us/i/po1BKrxbj
El Freddo's Pics - El_Freddo's youtube
https://www.imageshack.us/i/po1BKrxbj
El Freddo's Pics - El_Freddo's youtube
#228
JDWhiteWRX
-
- Members
-
- 591 posts
Regular Member
- Gender:Male
- Location:Royal National Park, NSW
Posted 08 April 2019 - 08:37 AM
I don't think my settings are a problem its more technique and limited practice. My MIG welder is Synergic so you just enter the wire size and set the voltage based on a chart for your metal thickness and it sets the perfect amps and wire speed for you.
I always run a few test beads on some scrap before I touch the car to make sure it looks good but then when I get to the car its always much more difficult than running a straight bead on a piece of scrap.
I find TIG much easier, there are no sparks, vision is better, its a very controlled process.
I always run a few test beads on some scrap before I touch the car to make sure it looks good but then when I get to the car its always much more difficult than running a straight bead on a piece of scrap.
I find TIG much easier, there are no sparks, vision is better, its a very controlled process.
Follow me on Insta: @brzdiy
#229
Barbbachello
-
- SubyClub Area Rep
-
- 6493 posts
Touring Bruce
- Gender:Male
- Location:Mehico
- Interests:Docking
Posted 08 April 2019 - 08:45 AM
Love the Bad Obsession sticker and the CAD reference haha
#230
JDWhiteWRX
-
- Members
-
- 591 posts
Regular Member
- Gender:Male
- Location:Royal National Park, NSW
Posted 14 April 2019 - 07:16 PM
I got the shell up on my vehicle positioning jacks today and spun it around so I could work on the passenger side double wishbone conversion.
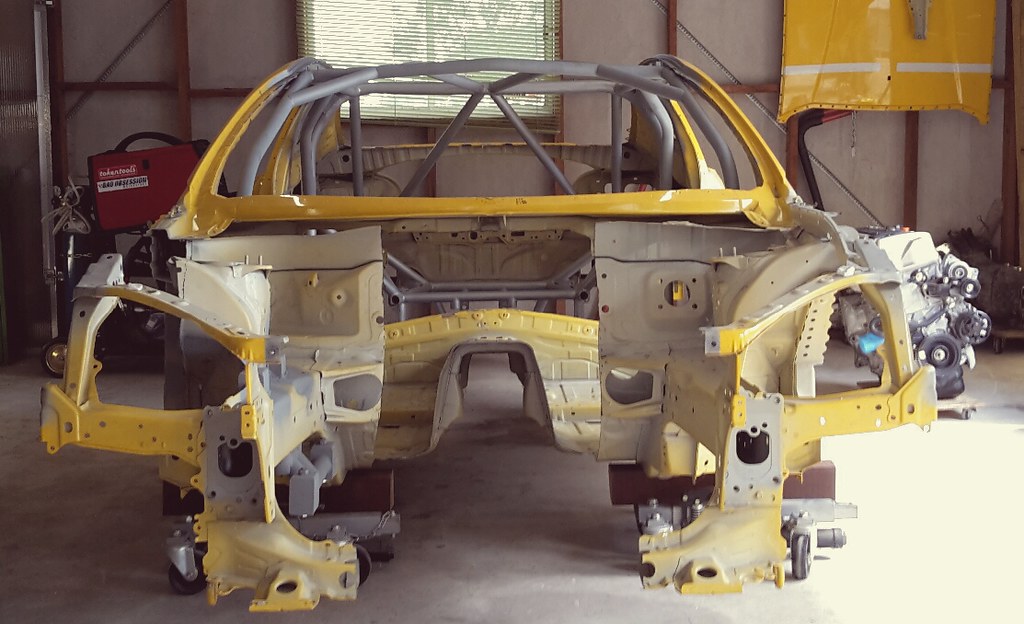
The drivers side took a lot longer because I was kind of figuring out how much metal to remove as I was going. With the passenger side I was just copying so I chopped it all out rather quickly, still a days work though.

Follow me on Insta: @brzdiy
#231
JDWhiteWRX
-
- Members
-
- 591 posts
Regular Member
- Gender:Male
- Location:Royal National Park, NSW
Posted 22 April 2019 - 05:45 PM
I've spent the past 2 days working on the passenger side upper control arm mounts.
Many hours were spent making sure the passenger side mount location exactly matched the driver's side.

Once again my MIG welds look a bit shit but a slight improvement on the other side. I think my main issue is I can't really see the puddle, possibly my auto-darkening helmet settings are way off.

I have placed a large online order of rod ends and spherical bearings and tomorrow I will be picking up some more steel tube to start building the control arms.
Follow me on Insta: @brzdiy
#232
El_Freddo
-
- Members
-
- 2341 posts
Rock'n the old Skool
- Gender:Male
- Location:Bridgewater/Central Vic/semi-retired nomad
- Interests:Subarus, 4wd'n Subarus, travelling Subarus, Tinkering... I could go on!
Posted 22 April 2019 - 09:17 PM
Nice work! How do you get the cuts parallel to the rails so straight and tight in the corners?
There’s not much left of the front end! Will all of this be tied into the cage once the time comes for that step?
I bet you’re feeling good about this build! It’s coming along very well!!
Cheers
Bennie
There’s not much left of the front end! Will all of this be tied into the cage once the time comes for that step?
I bet you’re feeling good about this build! It’s coming along very well!!
Cheers
Bennie
"The lounge room is not a workshop..."
https://www.imageshack.us/i/po1BKrxbj
El Freddo's Pics - El_Freddo's youtube
https://www.imageshack.us/i/po1BKrxbj
El Freddo's Pics - El_Freddo's youtube
#233
JDWhiteWRX
-
- Members
-
- 591 posts
Regular Member
- Gender:Male
- Location:Royal National Park, NSW
Posted 22 April 2019 - 09:30 PM
Nice work! How do you get the cuts parallel to the rails so straight and tight in the corners?
There’s not much left of the front end! Will all of this be tied into the cage once the time comes for that step?
I bet you’re feeling good about this build! It’s coming along very well!!
Cheers
Bennie
Cheers Bennie,
I use an angle grinder as much as possible and then finish the cuts with a Dremel.
Yes the cage will come through the firewall and tie everything together. I would have removed a lot more but I need those bits to help me locate the panels for making the fiberglass molds.
I have to think a few steps ahead with everything, I can't make any molds until the car is on wheels and sitting at ride height so control arms are next and then I got to buy some wheels.
Joel.
Follow me on Insta: @brzdiy
#234
El_Freddo
-
- Members
-
- 2341 posts
Rock'n the old Skool
- Gender:Male
- Location:Bridgewater/Central Vic/semi-retired nomad
- Interests:Subarus, 4wd'n Subarus, travelling Subarus, Tinkering... I could go on!
Posted 23 April 2019 - 07:47 PM
Sounds like an awesome game of chess “against” yourself!
Cheers
Bennie
Cheers
Bennie
"The lounge room is not a workshop..."
https://www.imageshack.us/i/po1BKrxbj
El Freddo's Pics - El_Freddo's youtube
https://www.imageshack.us/i/po1BKrxbj
El Freddo's Pics - El_Freddo's youtube
#235
JDWhiteWRX
-
- Members
-
- 591 posts
Regular Member
- Gender:Male
- Location:Royal National Park, NSW
Posted 24 April 2019 - 07:14 PM
Yesterday I went and picked up some more 1.5" roll cage tube as I had almost ran out and there is still a lot more to be done. I also picked up some 1.25" tube to make the front control arms and modify the factory rear arms so they are adjustable and no longer contain rubber bushings.
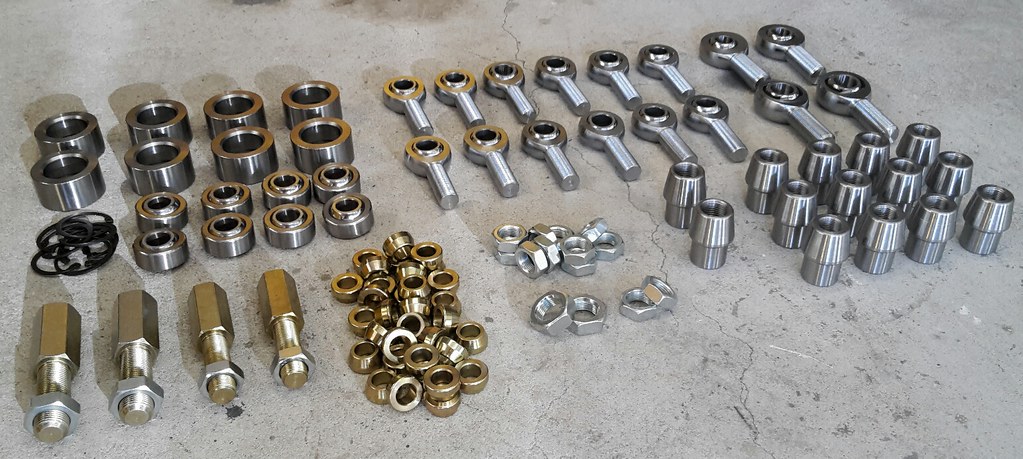
In other news my order of rod ends and associated parts has arrived so I pretty much have everything I need to get started. The only but missing is some 4140 chrome-moly solid bar that will be turned down on a lathe by a friend of mine to make uniball tapered adapters to replace the factory ball joints in the front knuckles and studs in the rear upper control arms.
This is the full order, its enough to do the whole car. They are all racing series ultra high performance chrome-moly steel rod ends with a Teflon/Kevlar liner.
This shot shows the 1.25" DOM tube with a weld in bung and 5/8" rod end. Everything will be adjustable.

Follow me on Insta: @brzdiy
#236
allpaw4
-
- Members
-
- 2182 posts
Chief Sparky
- Gender:Male
- Location:Ararat
- Interests:Cars, Stereos, Electrical
Posted 25 April 2019 - 08:00 AM
Holy crap. This is insane, just when you think something can't be done easily, someone comes out and does it, and better yet, documents it all.
I spent several hours last night and this morning reading this thread. Its awesome work, keep it up man.
Cheers,
Ben
I spent several hours last night and this morning reading this thread. Its awesome work, keep it up man.
Cheers,
Ben
MY00 Red RX, a nice daily that was sold off once the B4 became reliable...
MY02 Blue B4, aka 'The Project' - v8 JDM STi engine package and assorted other 'goodies' - Sold, then bought back for parts. Stripped and crushed.
MY03 Blue RX, the newer old daily, pretty well more B4 than RX now... In the process of being converted to the track toy... Watch this space!
MY02 Silver Wagon, H6 conversion, full blue/black leather and almost full black interior to go with it. In process of being stripped and sold off.
MY03 White/Silver H6 Outback, donor car for silver waghoon. Scrapped.
MY97 Silver RX, acquired to become track car, but plans changed. Scrapped.
MY13 BRG, current daily, very nice to drive, small mods to make it even nicer again.
#237
JDWhiteWRX
-
- Members
-
- 591 posts
Regular Member
- Gender:Male
- Location:Royal National Park, NSW
Posted 04 May 2019 - 09:44 PM
I have officially started making my control arms today, starting with the rear trailing arms.
I started by making a simple welding jig with some scrap metal.
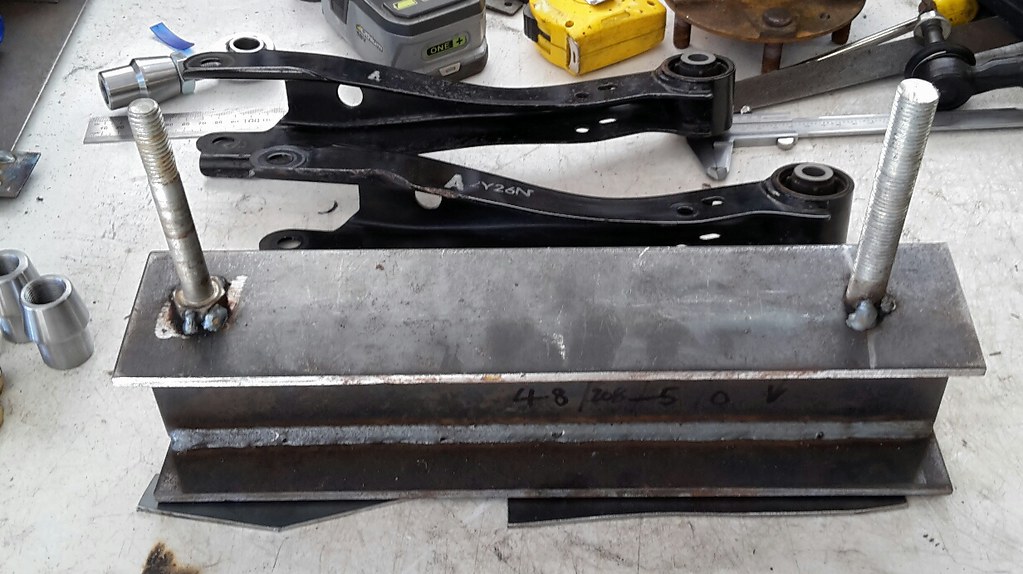
Then I cut the OEM arms at the kink. I no longer need the kink as I have lowered the trailing arm pickup point similar to what the MCA Suspension "traction mod" does. Also this car will run much less droop travel than a road going car.

The jig keeps the original length but I have adjusted the rod end so that I can mostly lengthen the link as this is most likely what will be needed as I adjust camber.

Then I cut some tube to fill the gap and trimmed part of the OEM arm so the tube could slide in.
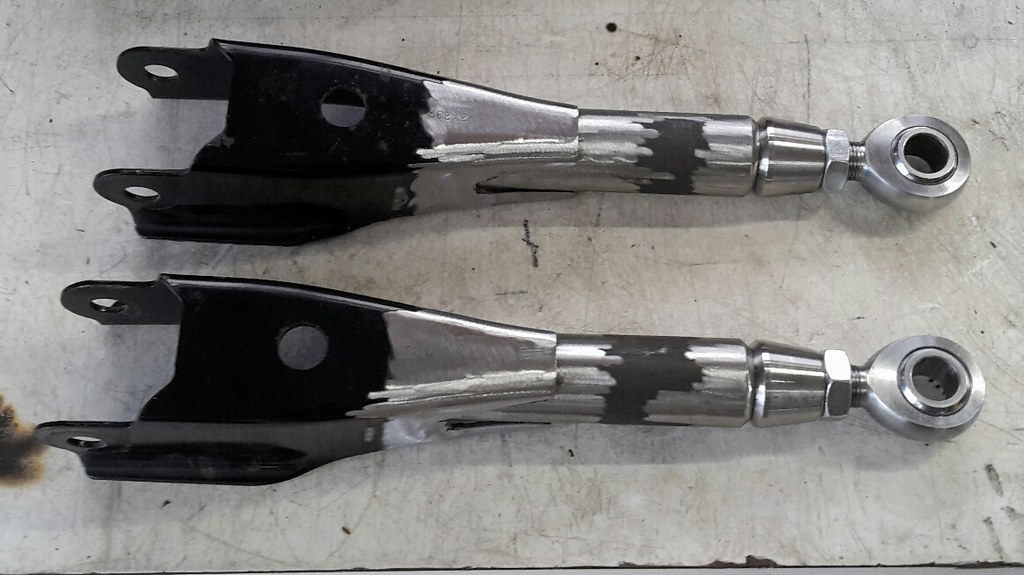
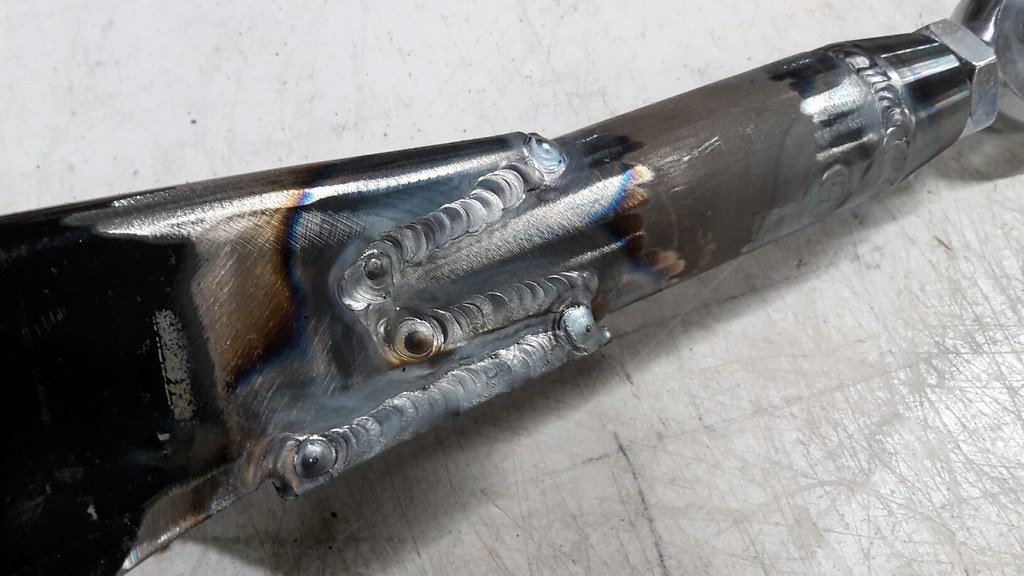
Here it is after welding, you can see I also boxed in the lower part for some extra strength.

Side detail
Then I quick clean up with the wire wheel and some cold gal primer.
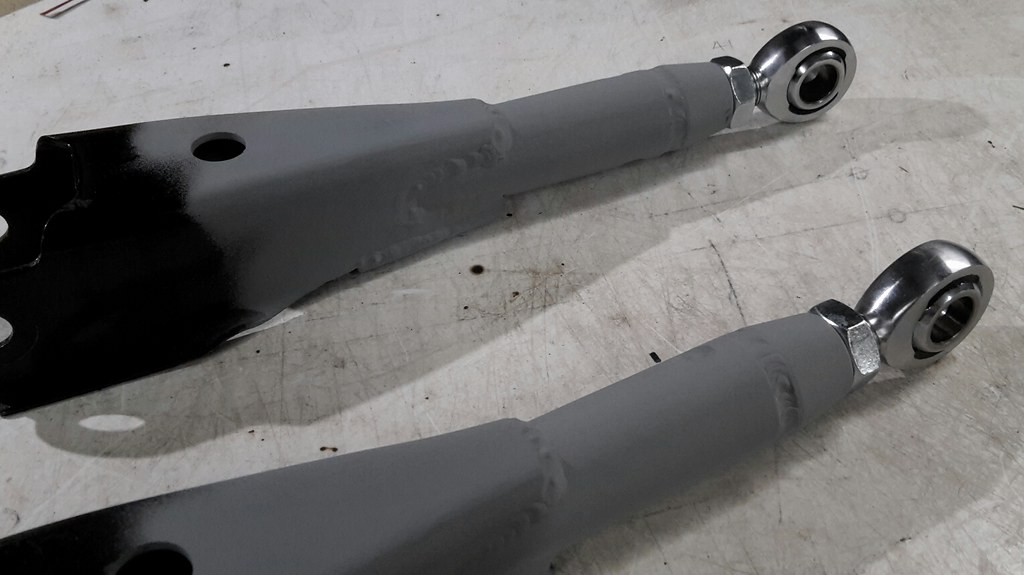
These arms ended up being 230 grams heavier than the originals and cost about $50 AUD to make.
Follow me on Insta: @brzdiy
#238
Barbbachello
-
- SubyClub Area Rep
-
- 6493 posts
Touring Bruce
- Gender:Male
- Location:Mehico
- Interests:Docking
Posted 06 May 2019 - 11:07 AM
Awesome work as usual
#239
crjohnson
-

- Members
-
- 201 posts
Trusted Member
Posted 08 May 2019 - 08:17 AM
Nice Work! Where did you buy the rod ends from?
#240
JDWhiteWRX
-
- Members
-
- 591 posts
Regular Member
- Gender:Male
- Location:Royal National Park, NSW
Posted 08 May 2019 - 04:34 PM
Nice Work! Where did you buy the rod ends from?
Thanks, McGill Motorsports in the UK.
Follow me on Insta: @brzdiy


0 user(s) are reading this topic
0 members, 0 guests, 0 anonymous users

