Callum's soon to be Twin Turbo Outback
#1
Posted 23 May 2017 - 09:02 PM
The day I picked it up
IMG_20160413_1350518231.jpg 105.78KB 15 downloads
A few months later the wheels went on then the lowered springs came
20170219_1729371.jpg 183.08KB
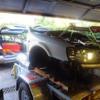
 15 downloads
Was going to stop there but then i bought the 2000 Legacy GT half cut, and the project ball started rolling lol
Its an EJ206, with 97,000k's, I dont mind it being auto cause it will be daily driven through city traffic
20170325_1720541.jpg 94.74KB 15 downloads
Compression test on the half cut came up great, but was the most awkward thing ive ever tried to do on a car lol, and the more i dug deeper into the better it looked, winning. Pulled the engine out over easter and now im currently just building up a mountain of parts to throw at it over the next few months before I start the swap (waiting till im off my P's)
20170416_1533331.jpg 155.61KB 14 downloads 20170416_1651091.jpg 144.84KB
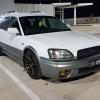
 14 downloads
And over weekend, installed a set of buddy club coilovers (thanks dja) and picked up a set of Rota G-force's and had them painted in a lovely shade of bronze
20170513_1958401.jpg 137.49KB 14 downloads 20170519_1756161.jpg 138.87KB 14 downloads
And heres how the wagon sits currently with 446,000k's, still original engine and I'm just amazed that even after that many Km's it can still do mountain runs and what not, and get me to work the next day without any dramas.
20170521_1435071.jpg 189.42KB 14 downloads
20170521_1029471.jpg 77.02KB 12 downloads
20170520_2254521.jpg 84.68KB 12 downloads
Current mods
- 2.5in exhaust
- K&N filter
- Buddy Club Junior Spec Coilovers
- Leagcy rear UCA's with Whiteline Camber Bushes
- 18x9 +35 Rota G-Force wheels
- Rare JDM Grille
- WRX Bucket seats
- Legacy GT Spolier
- Yellow fog lights
- JDM Momo Steering wheel (modded to retain cruise control toggle)
- STI style front lip
- Zero/Sports push button start
- Zero/Sports floor mats (thanks
patrick27s)
- Greddy front strut brace
- Beatrush rear strut brace
- Ganador Aero Mirrors
Parts i currently have waiting (or on their way)
- EJ206 with full running gear swap
- Zero/Sports tuned ECU
- STI 300km/h dash
- 4/2 Pot brake conversion
- JDM HID headlights
- Reconditioned cyl. heads
- Cosworth Head Gaskets
- ARP Head Studs
- Zero/Sports intercooler splitter
Im aiming to build the car so its something different, and a car I can do everything with, whether it be daily driving through Brisbane city traffic for work, and all the way to track days then picking up groceries on the way home.
Cheers
Callum
#2
Posted 24 May 2017 - 12:30 PM
Be sure to give the AT a good flush, and replace the AT filter (located in the passenger front guard inner).
Best of luck!
'04 Liberty GT Premium "The Sprog Chariot"
#3
Posted 24 May 2017 - 12:38 PM
#4
Posted 24 May 2017 - 01:01 PM
Holy a p plater that did some research and has their head screwed on right. Awesome to see someone doing something the right way. Looks like a good pile of goodies and plans there. Looking forward to reading in the future.
If you want to go any lower look into properly delifting the car. Keeps the suspension geometry and the CVs at a better angles and junk
#5
Posted 24 May 2017 - 01:49 PM
awesome -- more TT outback goodness.
^^ wot he said regarding the lift. May as well do it when you've got all the subframes out for the engine swap.
(ps: donor is Rev A-C ? hope there's no significant differences to prevent plug and prey)
#6
Posted 24 May 2017 - 02:17 PM
I have all wiring behind the donor dash so should be ok to plug and play. Just need to connect the rear harness of the outback to it cause it got cut in half on the donor
#7
Posted 24 May 2017 - 02:29 PM
Just finished the same conversion that you are doing.
My outback has already had a full delift, best to do it when you install the tt conversion as alot of the legacy parts are used.
The bump stops are also bigger on the outback.
Cheers OMR
#8
Posted 24 May 2017 - 03:05 PM
#9
Posted 24 May 2017 - 07:32 PM
Follow me on Insta: @brzdiy
#10
Posted 27 May 2017 - 04:42 PM
20170527_135457.jpg 122.33KB 5 downloads 20170527_135612.jpg 150.31KB 6 downloads 20170527_162616.jpg 208.78KB 6 downloads
Sprayed the fog lights again too cause the sun wasn't too kind on the original clear coat i used. And finally I've leveled out all the coilovers after they've settled down so it sits nice and level now. And actually really surprised at how nice the Buddy Club coilovers ride. You definitely get what you pay for when it comes to coilovers
20170527_161931.jpg 185.31KB 5 downloads
#11
Posted 14 June 2017 - 10:45 AM
Looking good m8. When do you come off P's and start the real fun of converting?
#12
Posted 14 June 2017 - 12:33 PM
#13
Posted 24 July 2017 - 08:48 PM
Update No.2
So here is update no.2, I've nearly got the half cut completely stripped now. Pulled all the wiring out, steering column and brake related parts are all out now waiting for the swap. All that's left to pull out now is the front sub-frame then the cut is ready for the scrap heap.
20170703_1906521.jpg 125.94KB 5 downloads 20170705_171646.jpg 119.88KB 5 downloads 20170705_175311.jpg 112.31KB 5 downloads
Gearbox is out now too, would not recommend removing by yourself cause its a bit of a pain gets quite dodgy and messy lol
20170713_191751.jpg 121.01KB 5 downloads
Rear mount has seen better days.
20170713_192959.jpg 112.04KB 5 downloads
Looking pretty bare now lol
20170713_201802.jpg 111.59KB 5 downloads
Now the fun part of the engine "build" has started. Manifold came off and stripped down for a nice coat of red. I know its not an Sti, but I reckon the red breaks up the dull engine bay quite nicely. Got the injectors cleaned and flow tested, came back all good flowing an even 500cc each, I thought stock yellow tops were 440cc but im happy with that. Pulled the heads off too, to make way for the refurbished and leak free ones along with the Cosworth gaskets and ARP studs. Who knew camshaft bolts could be such a pain in the ass! Got the socket completely jammed in the bolt. Subaru - 1 - Me - 0.
20170625_161857.jpg 93.84KB 5 downloads 20170714_171040.jpg 126.81KB 5 downloads 20170714_172029.jpg 76.52KB 5 downloads
Cleaned gaskets surfaces up with some 1200 grit and a big plane, didnt go too wild on the sanding, just to clean off what was left of the old gaskets and make them nice and smooth. Honing on the cylinders still looks nice, and the pistons had hardly any carbon build up on them.
20170716_165914.jpg 120.02KB 5 downloads 20170717_172927.jpg 109.77KB 5 downloads 20170717_174927.jpg 115.09KB 5 downloads
Heads going back on.
20170718_175423.jpg 118.01KB 5 downloads 20170718_191021.jpg 98.39KB 5 downloads
And Cams going back in along with new seals, replaced the rear main seal too.
20170722_141426.jpg 134.57KB 5 downloads 20170722_151713.jpg 126.34KB 5 downloads
Also bolted on a bigger Sti 11mm oil pump too. Broke the crank angle sensor trying to swap it over though, Subaru - 2 - Me - 0
20170721_174807.jpg 113.94KB 5 downloads
Then a little bit of OCD came on and I painstakingly cleaned every nook and cranny of the block with a fine wire brush and some brake clean. Sooooo satisfying!
20170723_205211.jpg 123KB 5 downloads
Now I'm just waiting on my tax return to come through to order a bunch genuine parts to finish the engine off then the fun of swapping can begin. Will definitely be getting quite picture happy during the swap so watch this space.
Side note: has anyone got a rev D-E bonnet they want to part with, or swap for a rev A-C one?
#14
Posted 24 July 2017 - 09:31 PM
Too late now - but did you check the primary turbo oil feed banjo filter behind the passenger cam wheel?
also - don't throw out the cut until you're absolutely sure you don't need some pesky plastic clip, brake line, or some other widget you didn't think of.
Either that, or strip it completely.
#15
Posted 25 July 2017 - 09:52 AM
Fark and i thought i did a thorough job of freshening up my 20K when I converted. It should run micky mouse for a good long while now and ready for 20 psi
#16
Posted 25 July 2017 - 10:56 AM
So clean you can eat off it!
2002 B4 Rev E
2004 Outback Premium 3.0R
#17 Guest_KONG_*
Posted 25 July 2017 - 03:36 PM
I actually think the TT works better paired to an auto
You're bent, go home Jimbo.
Good read, Callum.
Did the cut come with the Rev A/C dash and dash loom? That would make things a bit easier, plug and play for the STi cluster.
I'm pretty sure you'll need to re-pin the rear door plugs so the windows and central locking work and quite possibly (Not 100% sure) fuel pump and sender.
#18
Posted 25 July 2017 - 03:55 PM
Either get one and wire for it - you need to run a couple of extra wires from the SMJ to the pump and controller, or wire pump to be on 100%.
My central locking and windows didn't need any rewiring or repinning, neither did the fuel sender.
#19
Posted 25 July 2017 - 04:01 PM
Also make sure you sand the paint off the manifold earth strap! Paint + grounding doesnt generally work
#20
Posted 25 July 2017 - 05:47 PM
yeh - ECU will expect a fuel pump controller.Either get one and wire for it - you need to run a couple of extra wires from the SMJ to the pump and controller, or wire pump to be on 100%.My central locking and windows didn't need any rewiring or repinning, neither did the fuel sender.
Which would be easier controller or no controller? What's SMJ stand for?
Also make sure you sand the paint off the manifold earth strap! Paint + grounding doesnt generally work
Yeah was going to sand back all the bolt holes and mounting points to look as clean and factory as possible
You're bent, go home Jimbo.
Good read, Callum.
Did the cut come with the Rev A/C dash and dash loom? That would make things a bit easier, plug and play for the STi cluster.
I'm pretty sure you'll need to re-pin the rear door plugs so the windows and central locking work and quite possibly (Not 100% sure) fuel pump and sender.
Got a complete front loom with the cut and half the body loom still plugged in so should be able to compare rev C to rev D body loom
0 user(s) are reading this topic
0 members, 0 guests, 0 anonymous users