DIY: Cabin [pollen] Air Filter Clean/Replace - gen3 lib
#1
Posted 05 September 2011 - 06:48 PM
This would be a great DIY to do coming into SUMMER, will make that A/C run smooth, fast and COOOOL
Recently my cabin air fan is feeling very weak and according to a sticker in the drivers door frame, this generally means it needs a new air filter.
It says to contact subaru, but id rather skip forkin out money for them to do something simple..
It also says that this should be conducted every 15oooKms or 1 year; so chances are, Yours needs a clean!
I randomly found this thread for a forester so im going to look around the same area and hope its very similar.. This is whats inspired me to do a DIY here on SC.
http://offroadsubaru...hread.php?t=677
^after doing it; overall, its pretty different to the forester!
Here's how to conduct it; and I'm sure you could apply this, or some of this method to other models..
__________
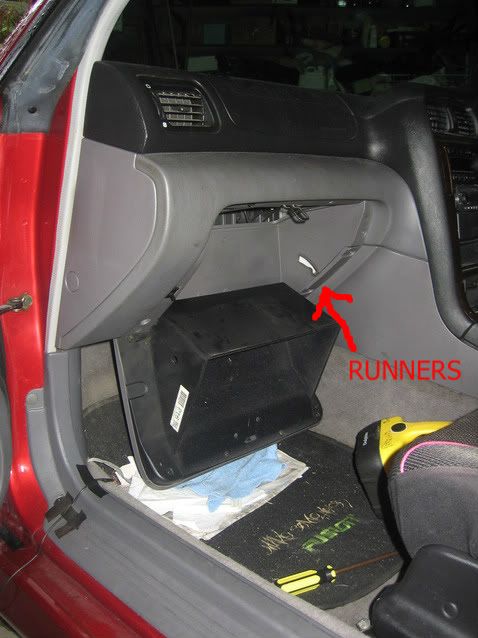
First; open up the glove box, Pop out the two plastic runners on either side by pushing the sides of the glove box inwards.
Alternatively you can pull them out of their runners.
They look like this; I was a little unsure if i was going to break them as i was going in blind...
This will allow the glove box to swing down 180degrees. While still squishing both sides of the glove box inwards, open it up.
This gives you access to most of the screws.
Learning from experience; don't remove these screws yet.
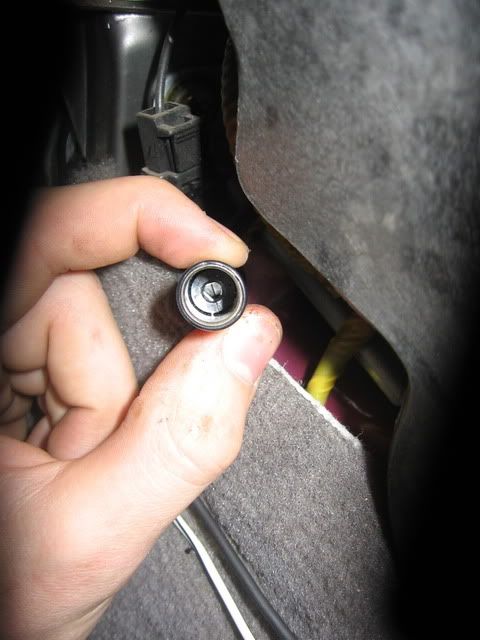
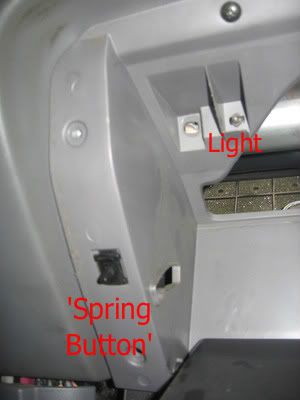
First, you'll need to remove the light and the 'spring button' from the plastic housing. The light is simple, twist it (to the right or left) and then it will fit straight out of the back of the plastic.
This next part was what gave me the greatest trouble out of the whole ordeal..
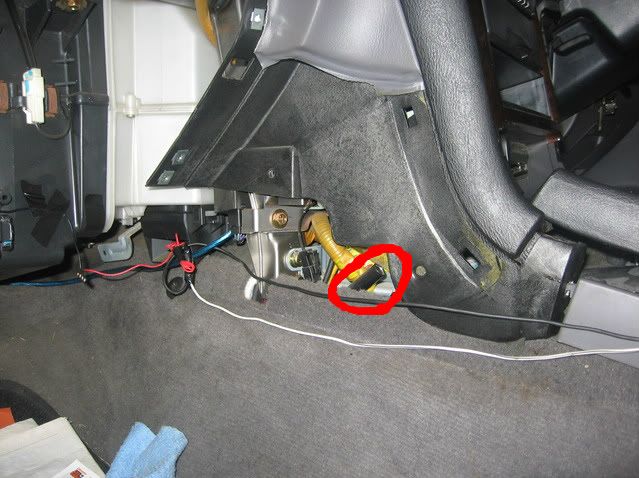
To remove the spring button from the housing, you'll need to detach a loom that sits behind the airbag compartment, kind of.
After finally finding this loom, i realised going in through the left-most air vent would be ideal.
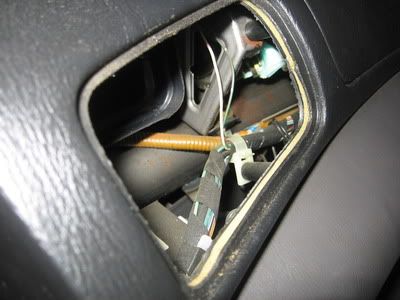
The air vent simply pops out with a flat head screwdriver.
Looking in through this air vent hole; this is the loom:
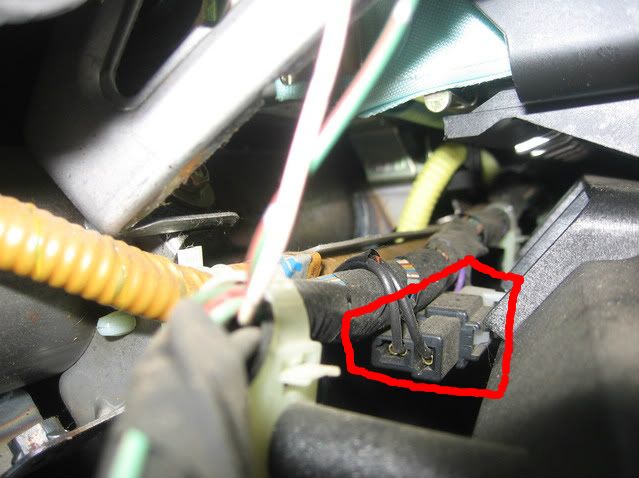
The white part towards the back detaches from the black part.
Getting this detached was the next big struggle, as it's hard to reach; i eventually got it out using pliers and other things.
I found that holding pliers in through the air vent hole with your left hand to grasp the loom, and using your right to go in from underneath works ok.. its difficult and awkward.
A small keyring light helps a lot! A stupid big torch gets in the way!
When you manage this; you can take the 'spring button' out of the housing.
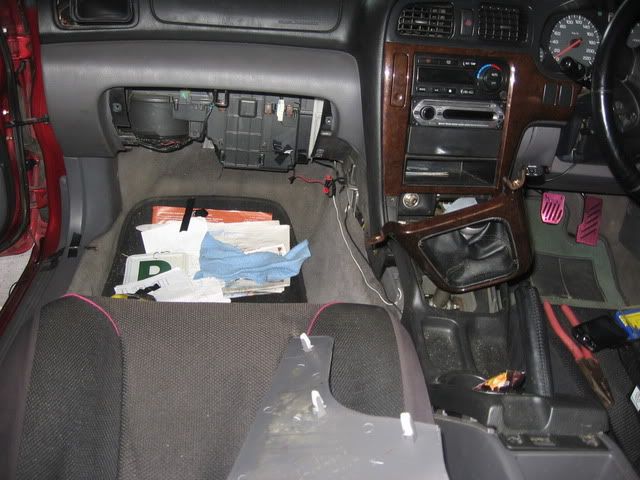
Therefore, you're able to undo the screws around the border of the plastic. There's 9 ..for now: (circled in red) (blue circle indicates location of another screw, explained later)
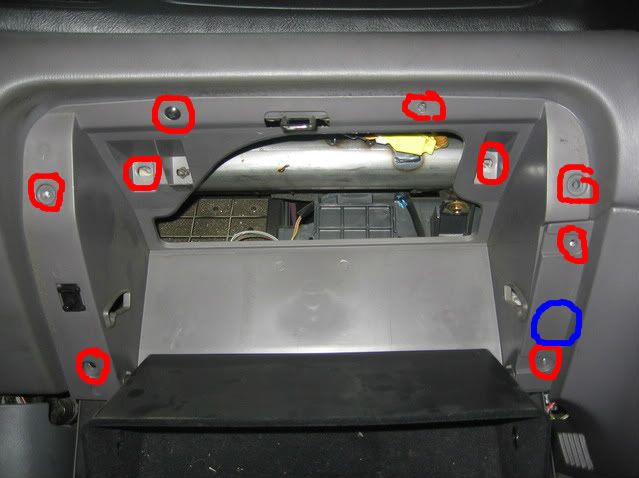
Ok so after these 9, there's still one more (blue circle) which i had a lot of trouble finding as i didnt know it was hidden behind the plastic.. After pulling but it going no where, i did some searching.
To get to this one, you have to take off the plastic panel along the left hand side of the centre console and centre dash.
To do this you need to pop out the gear stick surrounds, unscrew the tray thing at the front via removing 2 screws; remove 2 more at the rear under the lid to the centre console compartment, then lift it up and out over the gearstick and handbrake (Its not required to FULLY remove it though, as the panel we need to remove is not constricted now).
Then firmly but gently pop out these 3 tabs that u can see in the below picture
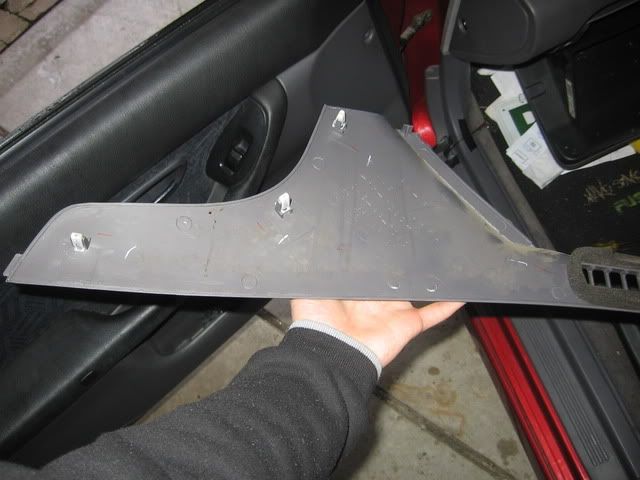
And also remove a screw-tab at the bottom end under the glove box, just to the right of the air vent you can see in the above picture (I didnt take a more specific pic, unfortunately).
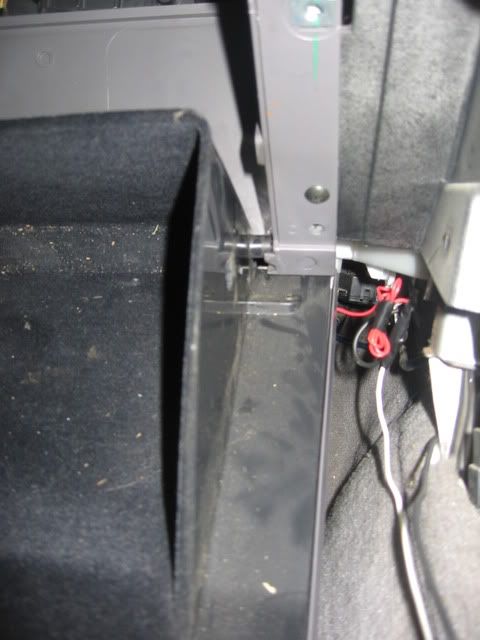
Now you have access to the last screw which was behind the plastic on the right side of the glove box. (Refer to above picture, the blue circle.)
After unscrewing this one, the glove box simply falls off.
SO NOW; you'll have access to the air unit.
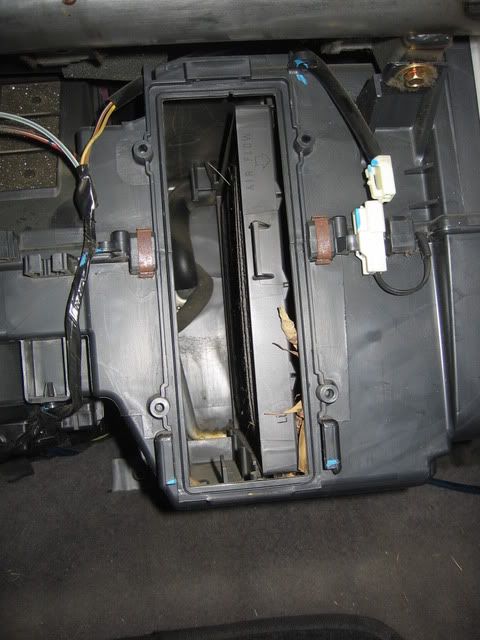
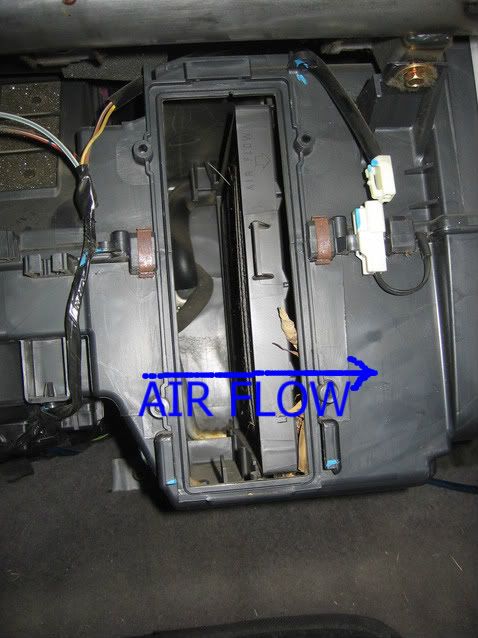
you'll be faced with this:
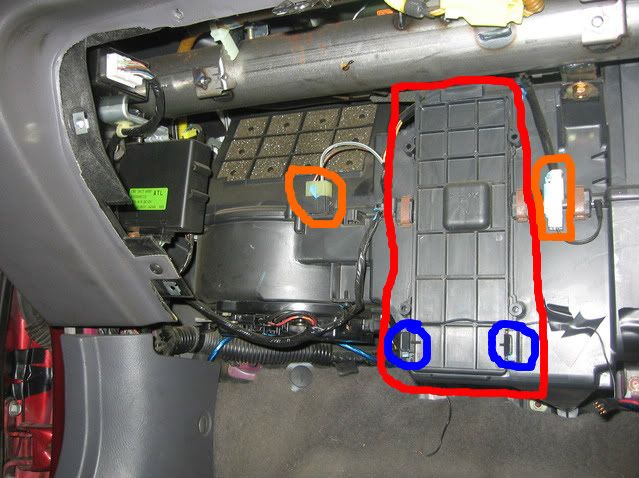
We need to open it up and get out the filter..
Orange cirlce/square are two more looms which have something to do with the running of the air con.. i disconnected them (just coz).
The red box indicates the door. To open it, hold the two tabs inwards indicated by blue. Pull the door downards a little, until u can pull it off with a bit of a downwards motion.
Here's what you'll see:
Pulling out the panel air filter:
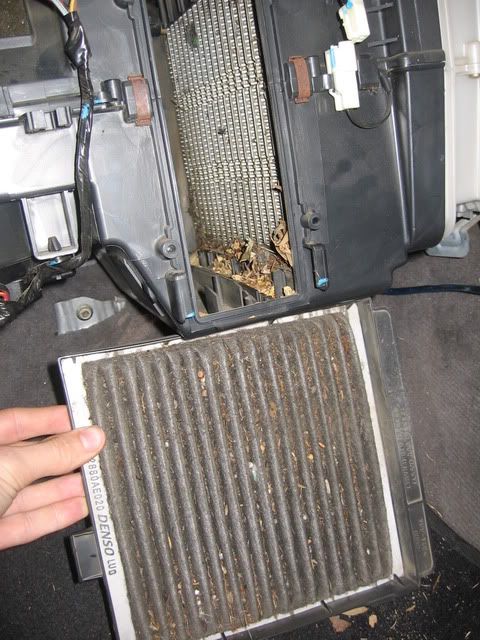
Pretty Dirty huh! leaves everywhere; the panel filter is FILLED with gunk.
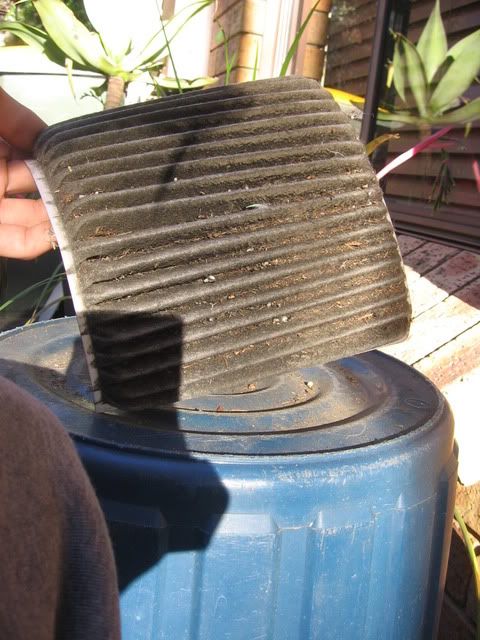
Gently but firmly clean the filter. Cotton buds can be handy.
You can take it out of the plastic casing (remembering the orientation it was at!).
An air compressor gun would be a good idea. ... I dont have one. Lol could go to the petrol station even!
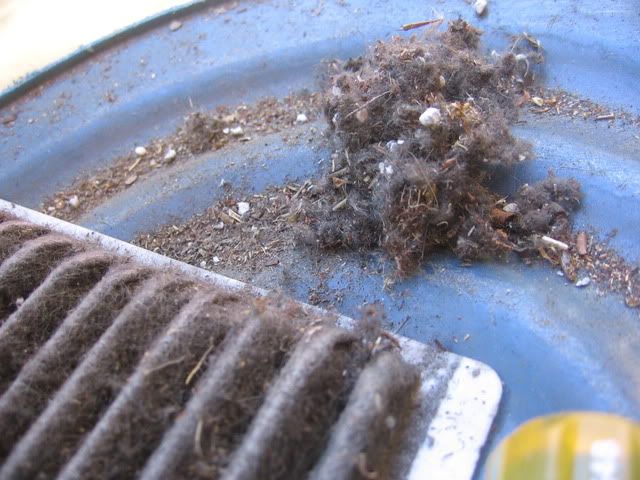
As you can see, lots of shit comes out.. (there was more than this!)
Get a vacuum cleaner into the open door area.
After cleaning, put the filter back in its plastic casing the right way up.
Then put this back into the open door.
An arrow on it marked AIR FLOW indicates which direction.
I plugged it in and turned it on at this point to make sure it was running. All was.
Put the door back on, starting with the door a little bit lower over the opening than where it will end up; then push it upwards.
Here's the important test.
If its made a difference, your air should be moving better through the air vents.
Mine improved dramatically! Back to its good old self!
If not, a trip to mechanic/subaru/someone with knowledge is needed..
Have fun putting it back together don't forget to connect up all the plugs!
.
.
peace.
Forester thread: http://www.subyclub....forester-xt-04/
Liberty wagon: http://www.subyclub....-liberty-wagon/
#2
Posted 29 October 2011 - 03:30 PM
In other news, would anyone know what this is;
Its down behind the cigarette lighter, behind one of the panels i took off to get the glove box out (as seen in 2nd pic).
Which leads me to believe its an alternate AC power source .. ? used in other countries/models? Just interesting to see weird things that subaru have done; similar to whole deal with the hazard lights flashing for remote lock/unlock, etc
Forester thread: http://www.subyclub....forester-xt-04/
Liberty wagon: http://www.subyclub....-liberty-wagon/
#3
Posted 29 October 2011 - 04:20 PM
good diy though
MY07 GT spec B
#4
Posted 29 October 2011 - 05:45 PM
In other news, would anyone know what this is;
Looks like an antenna socket to me.
Nice DIY.
When I did mine I think I washed it in soapy water.
Saved $24 alexxx!
If I told you I was a compulsive liar, would you believe me?
#5
Posted 29 October 2011 - 07:19 PM
Yeah ive got that plug in mine aswell its just an antenna socket...dunno if its connected though as ive never tested it?
Looks like an antenna socket to me.
Nice DIY.
When I did mine I think I washed it in soapy water.
Saved $24 alexxx!
And i washed my filter out but wasnt too happy with it so will be installing a brand spanker asap
#6
Posted 29 October 2011 - 07:28 PM
Jesus, makes me think I should do mine!!!
#7
Posted 29 October 2011 - 10:49 PM
#8
Posted 29 October 2011 - 10:57 PM
I should just convert to single, right?As soon as she hands it to you, slowly take of your pants, then, while staring her straight in the eyes rub it against the tip of you penis, while continuing your painfully intense gaze whisper to her;
"My eye is watering, this might be a bit hot"
Horsepower Factory
Revzone Auto Tuning Centre
#9
Posted 29 October 2011 - 11:34 PM
Relax!! Its only Gen3 onwards that have a pollen filter.Jesus, makes me think I should do mine!!!
Gen2's don't need to worry about this nonsense!
#10
Posted 29 October 2011 - 11:36 PM
#11
Posted 29 October 2011 - 11:45 PM
#12
Posted 30 October 2011 - 10:29 AM
Thats good that you can wash these things, though. I didnt want to risk it seeing as the cardboard engine air filters aren't supposed to be washed.
Well, that antenna plug thing is unusual; especially if its a secondary one. whats the use of having that?
Forester thread: http://www.subyclub....forester-xt-04/
Liberty wagon: http://www.subyclub....-liberty-wagon/
#13
Posted 30 October 2011 - 11:51 AM
Dunno? i was a bit confused when i saw it the first time too, but ive disconnected my antenna completely as im sick of my mates wanting to play stupid radio stations all the time lolWell, that antenna plug thing is unusual; especially if its a secondary one. whats the use of having that?
I just tell them it doesnt work...and ive never, ever listened to the radio in my car, even when it was plugged in.
Ive got enough CD's and mp3's to keep me happy
#14
Posted 31 October 2011 - 08:53 AM
But then again, my AUX plug doesnt work properly, only the right speakers work (not a prob with the cable). it used to work fine if id wrap the cable around the cup holder, that way the plug wuld make proper contact, but that faded off as it eventually ruined it more and more
Forester thread: http://www.subyclub....forester-xt-04/
Liberty wagon: http://www.subyclub....-liberty-wagon/
#15
Posted 27 August 2012 - 10:52 PM
#16
Posted 27 August 2012 - 11:11 PM
I did mine late last year, It was a dirty as hell ( after 7 years) so I bined mine & got a new one.
The worst bit for me was getting the 2 plastic runners out of the g/box.
#17
Posted 27 August 2012 - 11:13 PM
#18
Posted 20 October 2012 - 02:43 PM
Or if you replace it with another branded one do you not need the filter frame?
I did mine today to find out the replacement I had was wrong and the other one he had was to big also.
So I just cleaned mine up and put it back in.
#19
Posted 22 October 2012 - 07:34 PM
...I'm stumped.
He must have given you the right varient, mustn't he have?
Forester thread: http://www.subyclub....forester-xt-04/
Liberty wagon: http://www.subyclub....-liberty-wagon/
#20
Posted 11 November 2012 - 11:34 PM
I got into it with the dust pan brush for ages and got heaps of **** out. Then i got the vaccum onto it with the brush attachment and that got rid of everytihing else. Then just ran some glen 20 over it and let it dry.
Its not like i put a new filter in but holy ****, it feels like i put a new filter in. It was easily only running at about 30% with the fans before. So much better and the air smells fresher to.
I think the AC needs regassing so i might get it serviced in the next few weeks.
All in all, I fully recomend adding this to anyones regular servicing scheadule. Its not hard and it made a massive difference to my car. And for anyone not running one, I suggest you chuck one in. $35 isnt much at all to have clean, filtered air.
Theres a good DIY on OZFOZ for any other forester owners
http://ozfoz.com/for...&st=0&sk=t&sd=a
MY95 Liberty Wagon (Silver)
MY06 FORESTER XT LUXURY (Silver)
(With lots of Extras to come)
Also tagged with one or more of these keywords: Gen3 Liberty, cabin, pollen, air filter
Model Specific →
Liberty / Legacy / Outback →
Builds and Projects →
Bennie's sister's Gen3 RX Liberty WagonStarted by El_Freddo, 29 Oct 2016 Gen3 Liberty, Gen 3 Liberty and 2 more... |
|
|||
Model Specific →
Liberty / Legacy / Outback →
Builds and Projects →
Rusty's Gen 3 addictionStarted by Rustyrobertson, 16 Nov 2014 gen3 liberty |
|
0 user(s) are reading this topic
0 members, 0 guests, 0 anonymous users