Jump to content


Photo

gen3 headlight restore with LED light strip


  • Please log in to reply
16 replies to this topic

#1 Mbooma

Mbooma

    Trusted Member

  • Members
  • PipPip
  • 168 posts
  • Gender:Male
  • Location:North parramatta

Posted 13 March 2014 - 10:40 PM

hey guys in this thread I have pulled my headlights out restored the inner lens an put LED's in them and heres how I did it


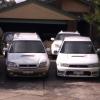
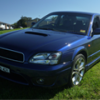
ok so this is what mine looked like before hand


IMG_20140313_084723.jpg


**And these are the tools you will need**

- wire cutters

- soldering iron an solder

- Phillips head screwdriver (perferbly a small head) 

- big flat head screwdriver

- cut and polish

- windex

- paper towel


IMG_20140313_223020.jpg


- first off start by removing the head light which is 3x10mm nuts 1x at the top and 2x next to the headlight where the grill would sit

- unplug the 3 looms connected to the back of the light and remove from car

- start by turning the oven on 200'c leave a shelf at the bottom and that's it


- then start by unscrewing the "6" Phillips head screws (5x red circle screws can be seen clearly the 1x green screw is hidden under a sponge piece)


b817f50d-88da-4fda-baac-8c9a386c4c8e.jpg


- once unscrewed remove all wiring so pull the white seal plug off with the lights (remembering where they come from) also remove the lower wire loom that's connected to the parker (unfortunitly mine had melted so I had to snap mine to remove)


this section you will have to be quick but safe


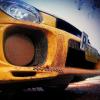
- first place the headlight on a tray and place in the 200'c oven for 4 mins

- set up a towel on the bench so u don't scratch ur outer lens

- once ur oven goes off after 4 mins with a oven mit or teatowel take headlight out

- place light on towel on bench start by quicker using ur flat head and go around an loosen the tabs around the edge just enough so they hav room to not grab in the pull apart


- then on the bottom corner use the flat head to make a peel in the glue then one hand holding the lens and one hold the case start to pull them apart


IMG_20140313_213402.jpg


- if u happen to snag on the tabs use ur flathead to pry open (you do have about 5 mins before the glue drys up )


IMG_20140312_185306.jpg


- once apart in an 2 pieces

- start unscrewing the 5 screw on the lens


6f6b22de-d062-4730-82ba-cd35791e13c9.jpg


- take the blinker/parker backing piece off first or you will struggle later


IMG_20140313_213800.jpg


- then remove the black eyelid


- this gives u a clean area to start cut an polishing the inner lens

- I also used windex an paper towel to make sure it was clean an streak free


- then once clean you can start on the eyelid LED's


IMG_20140313_220214.jpg


- the LED's I used had double sided tape so it was easy to stick down once stuck I used black tape and tucked the wires around the side


IMG_20140313_220224.jpg


- put the eyelid back into the clean polished lens and again tuck the wires to the side


IMG_20140313_220403.jpg


- put the blinker/parker backing piece on with wires tucked outside again and screw them together


IMG_20140313_220550.jpg


- drill a small hole in the back case for the wires to come through


IMG_20140313_220919.jpg


- push the wires through the hole and start to push the case and lens back together


IMG_20140313_221413.jpg


- place in 200'c oven for 2 mins only


- pull the light out of the oven and push the lens and case together and hold for 2 mins then screw all the backing screws in this will help [pull it together


FROM HERE ITS UR CHOICE, I CHOSE TO WIRE MINE UP TO THE PARKER


- with the parker loom cut in half u will hav 1x green(positive) & 1x black(negative)

- strip the loom wires and led wires and splice together


IMG_20140313_221934.jpg


from here its easy just put all the lights back in and bolt back into the car with looms connected and turn car on and test


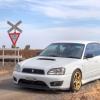
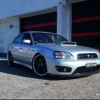
 here is my final product


IMG_20140313_221527.jpg

IMG_20140313_124958.jpg


well I hope u all enjoy my DIY write up


an let me no wat u think and if u hav attempted my DIY


****MBOOMA****


#2 terencehng

terencehng

    New Member

  • Members
  • Pip
  • 62 posts

Posted 13 March 2014 - 11:05 PM

looks good, hope the popo don't defect you


#3 Beckers

Beckers

    OMAR Cubt

  • Members
  • PipPipPip
  • 3,058 posts
  • Gender:Male
  • Location:South of the border, Blackburn
  • Interests:Docking and eating dry meat, Living lyf in the TT VOD

Posted 13 March 2014 - 11:14 PM

Thanks for the tops DIY.

LEDs are not my bag, but each to their own mods.

Would look good if it was possible to cover/fill in the old parker socket hole.


Well done, they do look heaps better


#4 allpaw4

allpaw4

    Chief Sparky

  • Members
  • PipPipPip
  • 2,133 posts
  • Gender:Male
  • Location:Ararat
  • Interests:Cars, Stereos, Electrical

Posted 14 March 2014 - 06:10 AM

Looks alright - although to use them as DRLs as you mentioned in your build thread, you need to get yourself a 12Vdc relay with both N/O and N/C contacts (with pins 87 [N/O contact] and 87A [N/C contact]) - basically a small relay that can be on when the parkers are off, and off when the parkers are on.


According to european laws (which I believe we have adopted here), the DRLs must be independant of the parkers/headlights, and must not be on while these lights are on. The parkers take precedence over the DRLs.


If they are wired as above, they are perfectly legal. If you really want to be a worry wart, find the relevant law in the aussie law book, and print it out, and carry it in the car.


MY00 Red RX, a nice daily that was sold off once the B4 became reliable...
MY02 Blue B4, aka 'The Project' - v8 JDM STi engine package and assorted other 'goodies' - Sold, then bought back for parts. Stripped and crushed.
MY03 Blue RX, the newer old daily, pretty well more B4 than RX now... In the process of being converted to the track toy... Watch this space!
MY02 Silver Wagon, H6 conversion, full blue/black leather and almost full black interior to go with it.
MY03 White/Silver H6 Outback, donor car for silver waghoon.
MY97 Silver RX, acquired to become track car, but plans changed. To be stripped and scrapped in time.


#5 Mbooma

Mbooma

    Trusted Member

  • Members
  • PipPip
  • 168 posts
  • Gender:Male
  • Location:North parramatta

Posted 14 March 2014 - 06:39 AM

"The original parkers goes back in the hole an run as normal. As mine broke ill need to get new ones

An as for getting defected im not overly fussed on wat the cops has to say as the can defect me for bigger things
Thats y i wrote

""FROM HERE ITS UR CHOICE, I CHOSE TO WIRE MINE UP TO THE PARKER""

So its up to u weither u wire them up on a switch or else where

#6 Tim.

Tim.

    Regular Member

  • Members
  • PipPipPip
  • 2,024 posts
  • Gender:Male

Posted 14 March 2014 - 09:03 AM

Morgan is going to die when he reads this!


Props for the DIY. This will help anyone thinking about cracking open their headlights.


#7 Mbooma

Mbooma

    Trusted Member

  • Members
  • PipPip
  • 168 posts
  • Gender:Male
  • Location:North parramatta

Posted 14 March 2014 - 09:45 AM

Whos morgan an y will he die lol

#8 WillC

WillC

    Scrappy Coco the 2nd! Disc0 Disc0

  • Members
  • PipPipPip
  • 1,112 posts
  • Gender:Male
  • Location:Edensor Park
  • Interests:Suby, HOONda, Chasing magical unicorns, turbos. Fruit loops
    Most things with a pulse. Most things that tick and have electric.

Posted 14 March 2014 - 09:57 AM

Looks Great MBOOMa


Toy's Garry

Address : 8/88 Seville Street
Fairfield East NSW 2161
PH : (02) 9755 9882


#9 thatTTguy

thatTTguy

    This isn't where I parked my car..

  • Members
  • PipPip
  • 150 posts
  • Gender:Male
  • Location:Wollongong, NSW
  • Interests:Trials, Snowboarding, Automobiles

Posted 14 March 2014 - 10:05 AM

Love it!
The addition of a relay is a good option too not just for legal reasons.

#10 Mbooma

Mbooma

    Trusted Member

  • Members
  • PipPip
  • 168 posts
  • Gender:Male
  • Location:North parramatta

Posted 14 March 2014 - 10:10 AM

Yea there plenty of ways to do it i just chose the quick easy an painless way ...we all no one less painfull worry on a tt is better for everyone lol

#11 Morgan

Morgan

    ...jus waitin' 4 a m8

  • Members
  • PipPipPip
  • 25,485 posts
  • Gender:Male
  • Location:Central Coast
  • Interests:Taking a poo

Posted 14 March 2014 - 12:18 PM

Why will I die?!


IM47Gcv.jpg


#12 Tim.

Tim.

    Regular Member

  • Members
  • PipPipPip
  • 2,024 posts
  • Gender:Male

Posted 14 March 2014 - 12:48 PM

Spelling and Grammar nazi! No? Morgan, you're cool with this or are you re-writing it as we speak?

#13 Mbooma

Mbooma

    Trusted Member

  • Members
  • PipPip
  • 168 posts
  • Gender:Male
  • Location:North parramatta

Posted 14 March 2014 - 12:59 PM

Haha yea sorry im dyslexic this thread almost took me 2 hrs to write lol thats how bad i am lol

#14 Morgan

Morgan

    ...jus waitin' 4 a m8

  • Members
  • PipPipPip
  • 25,485 posts
  • Gender:Male
  • Location:Central Coast
  • Interests:Taking a poo

Posted 14 March 2014 - 01:42 PM

Haha..


Honestly, I only went through the pictures :P


It's an alright DIY. I wouldn't do it, but it's alright.


I would've left the original parkers in so there's no big hole where they once were. Plus the ebay-spec LEDs aren't great. You can tell when someone cheaps out on the lights...


IM47Gcv.jpg


#15 Mbooma

Mbooma

    Trusted Member

  • Members
  • PipPip
  • 168 posts
  • Gender:Male
  • Location:North parramatta

Posted 14 March 2014 - 02:05 PM

Yea wernt.cheap.. lol an yea i would hav loved to leave them but they were melted so i had to brake the to clean it up an ill put new ones in soon

#16 TittySprinklez

TittySprinklez

    Regular Member

  • Members
  • PipPipPip
  • 357 posts
  • Gender:Male
  • Location:regional nsw
  • Interests:spending all the coin on the rex

Posted 14 March 2014 - 03:18 PM

iv used a headlight restoration kit but have scratched to deep into the headlights, its smooth as glass but hazy as fork, dont know how to fix it, used many a polish :/


#17 Tim.

Tim.

    Regular Member

  • Members
  • PipPipPip
  • 2,024 posts
  • Gender:Male

Posted 14 March 2014 - 03:33 PM

In that case, good work!

DRL, not really my thing though. But if you like it, that's all that matters.


0 user(s) are reading this topic

0 members, 0 guests, 0 anonymous users