

 Find content
 Male
Male

Hey all,
Thought I would share a thread from another forum for my wagon, as despite not intending to mod it much, it seems I have forgot about that...
Power mods
- AVO TMIC
- Invidia Q300 TBE
Suspension and Handling Mods
- BR BC Coilovers
- Cusco front strut brace
- Cusco Rear sway bar
- Summit rear strut brace
Cosmetic Mods
- TommyKaira front mesh grill colour matched, with GT badge
- JDM stickers
- Debadged rear, replaced with Subaru GT badge.
- DAMD rear wing, colour matched
- Valenti rear tail laights (dark smoked)
- Rear apron (removed)
- Headlights by Leo (hks180)
- Rear reflector LED upgrade
- 20'' SSW Phoenix
Interior:
- Prova Si drive knob
Future plans:
- More chassis stability, Cusco Power brace, sway bars and bushes.
- KiDo tune
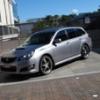
Anyway, it is a MY10 Libwagon, in manual. It was quite hard to find, but I was lucky - I got the colour I wanted, with only 35k kms on the clock.
I had it sent down from Brisvegas by Car Search (thanks Ray Jenkins), who pretty much did everything including rego transfer, inspections, transport, etc.
OK, so it starts as a completely stock wagon, the only mod being copious amounts of dog hair in the back.


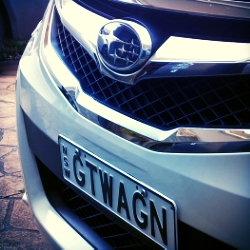
My first mod (not really a mod) was to snag some plates.

Also, drift spec fluffy dice.

Today, I had Moar-Low installed. A set of BC BR coilovers helped with the stance (hard to tell from the crappy pics, sorry).
This,

to this.

Just got back from a run up Springwood Rd, and it is a vast improvement over stock - flat through corners, and the ride is still fairly plush (running 8 on the front and 10 on the rear).
Did a few more small upgrades on the weekend -
Tommykaira mesh grill (will be colour matched with black mesh)

Also debadged the rear, and added a new one.

I will get the same for the grille with my next Japarts order.
Also fitted a Prova SI knob (added about 15kW I reckon).
Installed some Prova blue mirrors today - I was immediately impressed by the wider field of vision, and the clarity.
Plus I think they look tits 8) . Excuse the car being dirty.
I actually removed the stock mirror glass, and fixed the Prova ones in, rather than just double sided taping them onto the stock mirror glass, as suggested by Prova.
It was quite easy once I figured it all out. The first side took about 20 minutes to do (including removal of mirror from car, then removal of mirror glass from base), but once I knew what I was doing the other side only took 5 mins.

This will be a big week of mods, as I try to get a few things done before the weekend (WRX vs EVO on saturday, and the GenV meetup Sunday), but I cannot spill the beans yet...
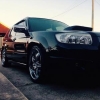
OK , here is a quick pic of the latest mod (do new wheels count as a mod?).
It isn't a great pic, and the car looks really nose high, but it isn't that bad. The stock rims are in the back, and I am parked up a slope.
I'll take some decent pics on the weekend.

Well today I did the first, actual modification that cannot be undone (well not easily anyway).
I fitted up my new DAMD rear wing, after getting it, and the TommyKaira grill painted.
Both are colour matched to the car.
The wing installation was pretty easy, but it was nerve wracking taking an M6 drill to my beautiful car. I had to drill two holes, one in each side of the stock wing/bump, to fix the new one firmly.
So, after measuring and rechecking about 20 times, I did it, and got it right. It is held by two bolts and lots of DS tape.
Step 1 - keep hydrated.

Step 2 - do everything else.

You can see that it follows the roof line nicely, and doesn't stand out a lot, which is why I chose this one.

And the grill, complete with a GT badge.

Also put in an HKS panel filter, which sounds a bit nicer.
It is starting to look better every time I remove something shiny and replace it with something black, and I have some more blackening to do on the front and back...
Stay tuned!
Still loving the rims, they fit really well - there has been no scrubbing or anything bad yet.
Will be getting a TBE zorst in the next month or two I think (have spent enough for a little while).
Anyway, today I installed the rear apron that I picked up from pips06, and I really like the look of it.

First was the tow bar removal.

Then, some swearing, beer, and it was done.

I am a big fan of subtlety, and I think that by only slightly improving on factory you get the best results. It is all personal taste, and mine is clean and simple.
Also visited Leo yesterday, and swapped the lights out.

They should be done next week, so look for the next update then!
OK, Monday mod update 
Yesterday Leo fitted my new lights - thanks mate!

I went for a single CF halo, as well as a painted high beam reflector and other globe upgrades (parkers, low beam, driving lights and number plate).
Just need to replace the front indicator with some chrome globes and they will be done.
Find Leo here!
So today I installed some more goodies.
FIrstly I replaced the back half of the exhaust with an Invidia Q300 system.


Didn't get any other pics, as it started to rain.
Unfortunately it doesn't fit with my nice brand-used apron, so it had to come off. I need to work out what to do about the tow bar hole, or work out how to modify the apron to fit...
But, it sounds fantastic - nice and mellow idling and cruising, but it has a nice rasp when pedal mashing, as well as a good burble.
Also replaced the stock rear swaybar with a Cusco one while I was under there.

Cannot tell if there is any difference yet (still raining), but I'm sure it will make a difference.
I bought a downpipe at the same time as the rest of it, so once I can co-ordinate with KidoMatt, I'll get it installed along with a front sway bar and a sweet tuuune. 
Today I installed a new TMIC.

It was a PITA to get the new throttle body hose on at first, but aside form that, it was a pretty easy install, and I only cut myself twice!
Another update from Ballbag Garage.
In preparation for my KiDo tune next week, I installed the Invidia downpipe today.
I can confirm that the US model does fit, and that the subframe does NOT need to be removed to do it.
First, do this.

Then, remove all this stuff.

The coolant had to be drained, so I could remove the bottom water inlet to reach the top front exhaust stud, but once I did that, it all came off easily.
TIP - buy new exhaust nuts!
The old -

The new!

Took about 4 hours to do, but a good part of that was me dicking around trying to undo the top front nut without draining the coolant.
Also, it helps to have some help, luckily I did.
Be super careful with the sensors, give them a good soak with a penetration fluid, and re-apply it as you remove them. I partially buggered one thread, but luckily I was able to repair it.
Also installed a Summit rear strut tower brace, but I forgot pics - will post them up later.
Really easy install, and I have all my bootspace, unlike the Cusco one which is above the boot floor.
These are the Sidchrome long series sockets, which fit easily. I only just noticed that I have two 11mm sockets and no 13mm :? NFI how that happened!

Anyhoo, here is the brace.
As you can see, it fits under the floor almost flush - the board is raised a few mm, but it is near on flush.


The foam underneath had to be cut as well, about the last 50mm was cut off on the front end.

Winder still fits!

