

 Find content
 Not Telling

Update: He sold it

I can't help but feel that you dodged a bullet.
18 February 2017 - 10:53 PM
Update: He sold it
I can't help but feel that you dodged a bullet.
18 February 2017 - 07:49 AM
It's been a while since I updated this ol' thread.
Late 2016 saw my partner receive an opportunity to complete her PhD abroad so we packed up our lives and moved 16,000kms away from my beloved Forester. Although backdated, I thought I'd share our final adventures :-)
Cheeky snap whilst photographing a wedding at a gorgeous venue called Lauren's Hall in North Melbourne.
Timber workshop by day, reception venue by night.
If you're getting married and want a more industrial setting, this place is amazing!

One of many trips to the snow. Them intake temps ;-)

Rainbow!

August 2016:- Disappeared with a buddy up Mt Bogong for a week of backcountry ski touring. Access to the mountain is via a chopped up logging trail that gets worse and worse each year. First time I made the trip was on a set of worn Pirelli P7's which weren't ideal and I recall a little bit of wheel spin. Current tyres are Yokohama G95 HT/S which came on the S-Edition wheels - not as good as the G051's I had on my SF but they seem to strike the on/off road balance nicely all the same.

Along with our snow camping, photography and ski equipment, we lugged a drone up the mountain and captured some truely sensational footage!
 http://i1025.photobu...zpsfp3kganx.jpg


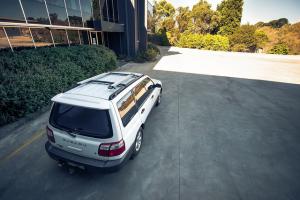
Final adventure was helping cart our possessions from our place into storage. <3 wagon.

Last snap before entering storage.
Gave her a good clean and wax to offer a little protection under the car cover made sure she was all up to date service wise and popped her back on her stock wheels (don't really want to flat-spot the good tyres on the STi wheels...)
Folks have since relocated her to another location which is (thankfully) fully covered and out of the elements.

18 February 2017 - 01:36 AM
Hey mate,
Print on A4.
Make sure the scale is set to 100% if it isn't already. If in doubt, print and physically measure the "scale box" with a ruler. 
I installed the SG 'Type C' wing as fitted to the pre-facelift SG STi which requires 4 holes + a hole for the brake light wiring. Template is actually from the USDM spoiler which is identical to Japanese wing except it doesn't have a tail light. I'm not sure whether this template will help with the later face-lifted SG.
I drilled the upper 'guide' holes first as they're in a definitive location (you'll see a spot weld-like indentation on the inside of the tailgate). I was a little off with this first hole as you can see so I ended up using a step / Christmas tree drill piece to enlarge and centre it. A magnet covered in electrical tape helps catch metal shavings. 
Using the edge of the tailgate and window glass as a guide, set the template in position using the hole you've just drilled and some tape.
Masking tape over your paintwork isn't a bad idea. I had a towel on the roof to lay the spoiler so it was close at hand also. 
From there, it's just a case of drilling the main holes and making sure the spoiler lines up correctly.
Measure twice, cut once etc etc.
If you're a little off, it doesn't hurt to 'slot' the holes a little to offer a little wiggle room to get the spoiler angle right. It roughly lines up with the curve of the tailgate but eyeball it against the curve of the roofline also to check it's positioned right.
Brake light wiring hole is the last hole to make. I don't think it has a definitive location but you want to make sure it's roughly in line with the access hole in the underside of the tailgate. Again, a step drill piece works wonders here. I had a small rubber grommet that I used to centre the cabling though the hole so that it doesn't get cut up on the sharp metal edging.
To finish up, seal the holes with a little spray paint to prevent rust before installing. I used the template to make some double-sided sticky foam 'gaskets' in addition to some sikaflex around the holes to make sure they were well and truly weatherproof. Finish off your good work with some quality stainless fasteners.

This is the part number for the rear-window brake light delete panel - it completes the install nicely I think.


Good luck!

