
I checked my mini me’s work on the steering knuckle that was fitted last weekend when I noticed the connecting shaft between the rack and the steering column is touching the CV boot!
Messaged my mate Dave and the question came back asking about the engine mounts being aftermarket. No idea but I now need to look into these as there’s apparently an issue with some aftermarket engine mounts propping the engine up higher resulting in this steering shaft component becoming more intimate with the CV’s boot.
Fun and games. Most of today was used putting my MIL’s SG Foz back together after repairing the pulled thread on the water pump. Seems the root cause of the small leak was actually a warped plastic thermostat housing. It’s sporting a metal one from the 90’s - and no leaks so far!
Not much will progress on this build until I’ve picked up those exhaust spacer blocks from my folk’s place. Bumpy is sending a wagon care package my way too, thanks mate!!
Cheers
Bennie

Bennie’s 1985(!!) EA81 MY station wagon
Started by El_Freddo, Jul 09 2023 10:23 PM
25 replies to this topic
#21
 EA81 MY station wagon: post #21")
El_Freddo
-
- Members
-

- 2,314 posts
Rock'n the old Skool
- Gender:Male
- Location:Bridgewater/Central Vic/semi-retired nomad
- Interests:Subarus, 4wd'n Subarus, travelling Subarus, Tinkering... I could go on!
Posted 26 August 2023 - 10:33 PM
"The lounge room is not a workshop..."
https://www.imageshack.us/i/po1BKrxbj

El Freddo's Pics - El_Freddo's youtube
https://www.imageshack.us/i/po1BKrxbj
El Freddo's Pics - El_Freddo's youtube
#22
El_Freddo
-
- Members
-
- 2,314 posts
Rock'n the old Skool
- Gender:Male
- Location:Bridgewater/Central Vic/semi-retired nomad
- Interests:Subarus, 4wd'n Subarus, travelling Subarus, Tinkering... I could go on!
Posted 20 September 2023 - 09:38 PM
So I got the exhaust spacer blocks to fit the later model Y pipes. One side has a port on it for the EGR anti pollution gear etc and the other is just a spacer block. This is why they were fitted, it was the easiest way to retro fit the EGR stuff to the engine without major reconfiguration.
I thought it would be easy to get a plug for this hole but apparently not because its a fine thread. Everything plumbing is a coarse thread. I wasnt keen on welding it.
Fast forward a couple of weeks and pick a part brings a brumby in. So I paid them a visit and scored the spacer block without the port in it. So now I *just* need to bolt them on my engine. Yeah, easier said than done. These use all four holes in the head for the exhaust ports, the old Y pipe only used two. Two in the mix are studs that hold the Y pipe on, the other two are smaller bolts with a Hex head and torx slot in them. You need the torx to get them in and out with the engine in the car. And those threads need to be clean.
Add in the fact that the previous owner put a helicoil kit in the two rear holes on an angle and it gets more fun as the longer studs dont hold the spacer square to the head. So after trimming the excess coil that wasnt in the hole I put the spacer on with the two bolts then fitted the studs. Looked at it and saw it was misaligned with the exhaust port so did it all again with the spacer orientated the other way for the same result *facepalm* Hopefully those studs hold otherwise its back to the drawing board there as another helicoil wont do the trick plus theyre a complete bitch to do poorly upside down.
What a fight but I finally got one fitted:
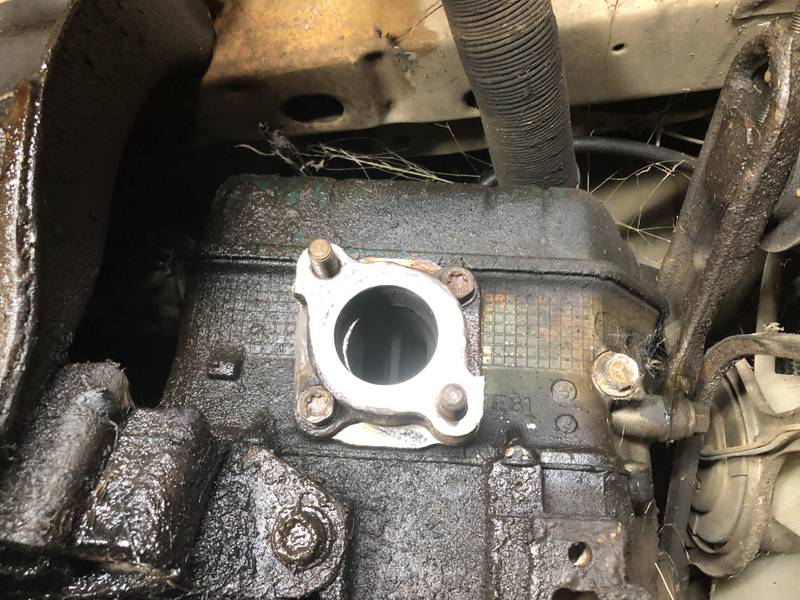
Dont worry about the oily mess. Well tackle that later on at some point.
Im yet to do the other side with the exhaust spacer block - I need to remove a nut on one of the studs, got the second one sorted already, I just ran out of time to get it done as the nut is corroded so much its not a 14mm and the 13mm doesnt fit because the nut is too big. Shifter is needed and if that doesnt work Ill be busting out the angle grinder.
Once all of this is done we can finally move it from the car port under its own steam and get vehicle access to our back yard again. Cant wait for that!
Cheers
Bennie
I thought it would be easy to get a plug for this hole but apparently not because its a fine thread. Everything plumbing is a coarse thread. I wasnt keen on welding it.
Fast forward a couple of weeks and pick a part brings a brumby in. So I paid them a visit and scored the spacer block without the port in it. So now I *just* need to bolt them on my engine. Yeah, easier said than done. These use all four holes in the head for the exhaust ports, the old Y pipe only used two. Two in the mix are studs that hold the Y pipe on, the other two are smaller bolts with a Hex head and torx slot in them. You need the torx to get them in and out with the engine in the car. And those threads need to be clean.
Add in the fact that the previous owner put a helicoil kit in the two rear holes on an angle and it gets more fun as the longer studs dont hold the spacer square to the head. So after trimming the excess coil that wasnt in the hole I put the spacer on with the two bolts then fitted the studs. Looked at it and saw it was misaligned with the exhaust port so did it all again with the spacer orientated the other way for the same result *facepalm* Hopefully those studs hold otherwise its back to the drawing board there as another helicoil wont do the trick plus theyre a complete bitch to do poorly upside down.
What a fight but I finally got one fitted:
Dont worry about the oily mess. Well tackle that later on at some point.
Im yet to do the other side with the exhaust spacer block - I need to remove a nut on one of the studs, got the second one sorted already, I just ran out of time to get it done as the nut is corroded so much its not a 14mm and the 13mm doesnt fit because the nut is too big. Shifter is needed and if that doesnt work Ill be busting out the angle grinder.
Once all of this is done we can finally move it from the car port under its own steam and get vehicle access to our back yard again. Cant wait for that!
Cheers
Bennie
"The lounge room is not a workshop..."
https://www.imageshack.us/i/po1BKrxbj
El Freddo's Pics - El_Freddo's youtube
https://www.imageshack.us/i/po1BKrxbj
El Freddo's Pics - El_Freddo's youtube
#23
allpaw4
-

- Members
-
- 2,175 posts
Chief Sparky
- Gender:Male
- Location:Ararat
- Interests:Cars, Stereos, Electrical
Posted 21 September 2023 - 01:12 PM
Is it worth just blocking it all off Bennie?
Also, try a 6 point 14mm socket, might have a bit more luck with that. Or belt the 13mm onto it, but thats probably a little aggressive lol
Cheers,
Ben
Also, try a 6 point 14mm socket, might have a bit more luck with that. Or belt the 13mm onto it, but thats probably a little aggressive lol
Cheers,
Ben
MY00 Red RX, a nice daily that was sold off once the B4 became reliable...
MY02 Blue B4, aka 'The Project' - v8 JDM STi engine package and assorted other 'goodies' - Sold, then bought back for parts. Stripped and crushed.
MY03 Blue RX, the newer old daily, pretty well more B4 than RX now... In the process of being converted to the track toy... Watch this space!
MY02 Silver Wagon, H6 conversion, full blue/black leather and almost full black interior to go with it. In process of being stripped and sold off.
MY03 White/Silver H6 Outback, donor car for silver waghoon. Scrapped.
MY97 Silver RX, acquired to become track car, but plans changed. Scrapped.
MY13 BRG, current daily, very nice to drive, small mods to make it even nicer again.
#24
El_Freddo
-
- Members
-
- 2,314 posts
Rock'n the old Skool
- Gender:Male
- Location:Bridgewater/Central Vic/semi-retired nomad
- Interests:Subarus, 4wd'n Subarus, travelling Subarus, Tinkering... I could go on!
Posted 21 September 2023 - 09:31 PM
There’s nothing to block off Ben. The later Y pipe that I have to replace the one that they cut out at the wreckers to get to the PS steering rack has a shorter down pipe section due to these spacers. Since all I’ve got is later model Y pipes I need to go this way with the spacers.
I’ll have a go at the six point sockets when I can and see what comes of it. That could work. They’re getting good soak time with some penetrant I put on before my outdoor fun was over for a few days (still going).
Cheers
Bennie
I’ll have a go at the six point sockets when I can and see what comes of it. That could work. They’re getting good soak time with some penetrant I put on before my outdoor fun was over for a few days (still going).
Cheers
Bennie
"The lounge room is not a workshop..."
https://www.imageshack.us/i/po1BKrxbj
El Freddo's Pics - El_Freddo's youtube
https://www.imageshack.us/i/po1BKrxbj
El Freddo's Pics - El_Freddo's youtube
#25
allpaw4
-
- Members
-
- 2,175 posts
Chief Sparky
- Gender:Male
- Location:Ararat
- Interests:Cars, Stereos, Electrical
Posted 22 September 2023 - 10:57 AM
Ah, just thinking of the EGR stuff. Was cheap way to get a bit more performance out of the older engines when I had older vintage mazdas and fords back in the day. Cut out the probes in the exhaust, then put the threads back in. But that said, the probes in the headers on the models I was playing with blocked off about 1/4 of the exhaust pipe, not sure what the subaru ones are like. Plus there was one in every cylinder, not just in the one side.
MY00 Red RX, a nice daily that was sold off once the B4 became reliable...
MY02 Blue B4, aka 'The Project' - v8 JDM STi engine package and assorted other 'goodies' - Sold, then bought back for parts. Stripped and crushed.
MY03 Blue RX, the newer old daily, pretty well more B4 than RX now... In the process of being converted to the track toy... Watch this space!
MY02 Silver Wagon, H6 conversion, full blue/black leather and almost full black interior to go with it. In process of being stripped and sold off.
MY03 White/Silver H6 Outback, donor car for silver waghoon. Scrapped.
MY97 Silver RX, acquired to become track car, but plans changed. Scrapped.
MY13 BRG, current daily, very nice to drive, small mods to make it even nicer again.
#26
El_Freddo
-
- Members
-
- 2,314 posts
Rock'n the old Skool
- Gender:Male
- Location:Bridgewater/Central Vic/semi-retired nomad
- Interests:Subarus, 4wd'n Subarus, travelling Subarus, Tinkering... I could go on!
Posted 23 September 2023 - 10:02 PM
Yeah Ben no probes on this system. I believe the port on one side is to collect exhaust gas to recirculate into the engine through the EGR valve/device. Zero electronics associated with it.
First day back up and about, great day and everything was feeling good!
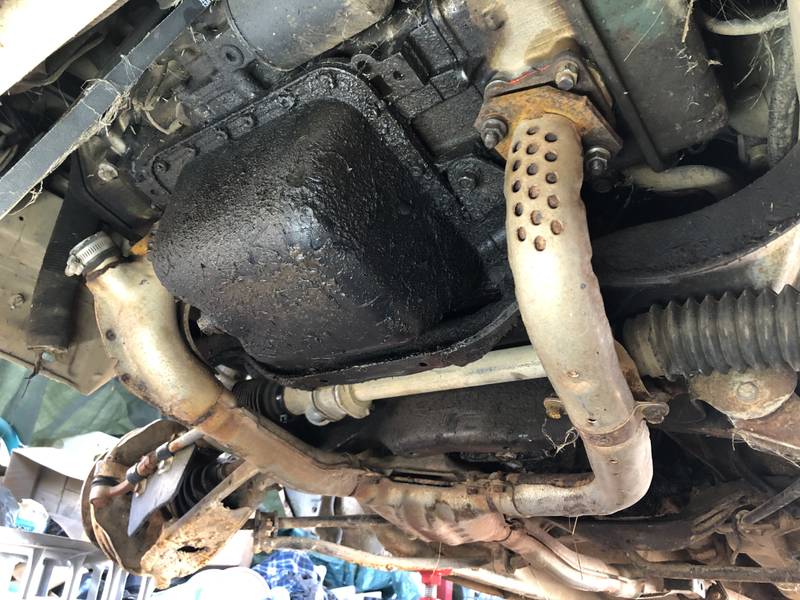
Today was finally the day where I found out if it drives or not. But there was a bit of work to do first. I fitted the passenger’s side spacer block for the exhaust and had to use one of the original shorter stubs for the second torx bolt because the one I had was somehow bent. It can be seen in the pic below. This side went quite smoothly since I knew the process.
I fired it up and let it idle. It was nice to be able to hear other noises rather than a light aircraft spec noise since it now has a whole exhaust on it. This was the point I started finding all the little painful issues such as the sticky throttle pedal. The pivot is rusty and even though I got it moving and lubed up it just wasn’t enough to return to its resting position.
So pedal swap time it was. Luckily for me the brumby halfcut project still sported its pedal box with an operational accelerator pedal. Out it came then off to the wagon for the same treatment. It was easier to remove the wagon’s cutch pedal and cable off the pedal box and drop the steering down to get it out than it was to keep the clutch pedal attached.
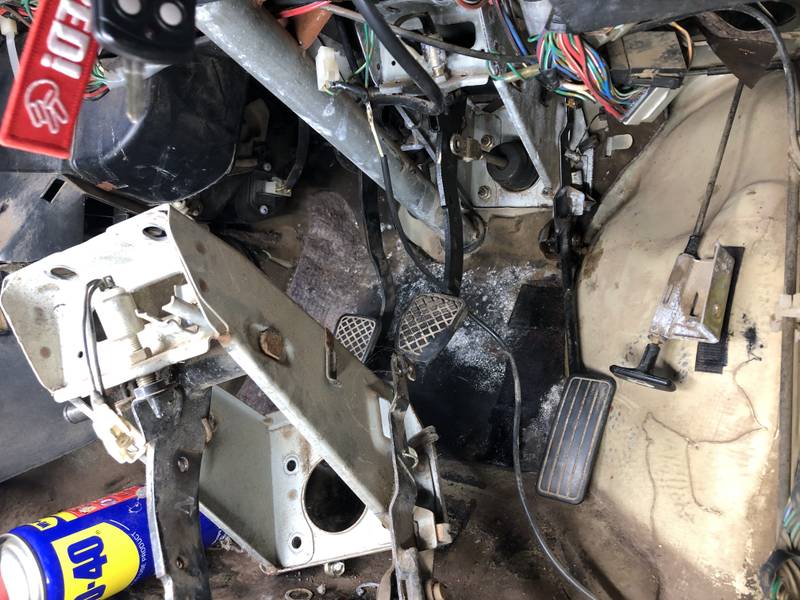
^ brumby pedal box waiting to go in. I didn’t really want to go to this extent but my hand was forced and in the end it was much easier anyway.
With that sorted I found a pin hole in the upper radiator hose and the clutch cable was fitted weirdly. Whoever was at it last time had used the two nuts to clamp the clutch fork rather than have the two nuts lock together at the appropriate spot for good clutch pedal feel. So that’s sorted. Next up was a miss at idle. That issue seemed to be cyl3’s spark plug lead being a bit too short and wasn’t seating properly at the spark plug. I removed the boot at the plug a rerouted the lead so both ends engaged properly.
Then it was time for a short drive - mainly in reverse and without brakes at the pedal, and no interior because that is still beyond grose… but it went well!

I was pretty stoked to have it moving under its own steam. There was another issue I found and that was the thermo fan not kicking in, I thought the temp gauge was lying to me as it was up at the HOT line but then came down after a rev or two but was then back up at it again. A check of the temp sensor wiring to ensure it wasn’t earthing out confirmed it was fitted to the temp sensor properly. There wasn’t any boiling sounds or overheated sounds that I’ve heard before with overheated engines so wasn’t stressed.
Then moving the wagon it was up on the hot line again. I checked the thermo fan wiring and visually it looked like it was connected to the thermo switch at the radiator, but upon physically checking the plug it wasn’t connected with anything other than the outer sheath, that was flicked off and the connector gently squeezed then fitted, the thermo fan kicked in and pulled the temp down quick which was good. It then clicked on and off at the just over half temp mark as it should so that confirmed the gauge was working properly. Happy days.
The AC was tested and it turns on, the gas window at the dryer had the little bubbles that usually indicates it’s working ok, they were consistent anyway. It was blowing hot in the cab. I didn’t realise the heater was on and it seems turning the knob to cold didn’t do anything so there’s something to look into there, either a stuck heater tap and/or a cable that’s slipped its mount.
So good day had and I feel a great result too. Very stoked!
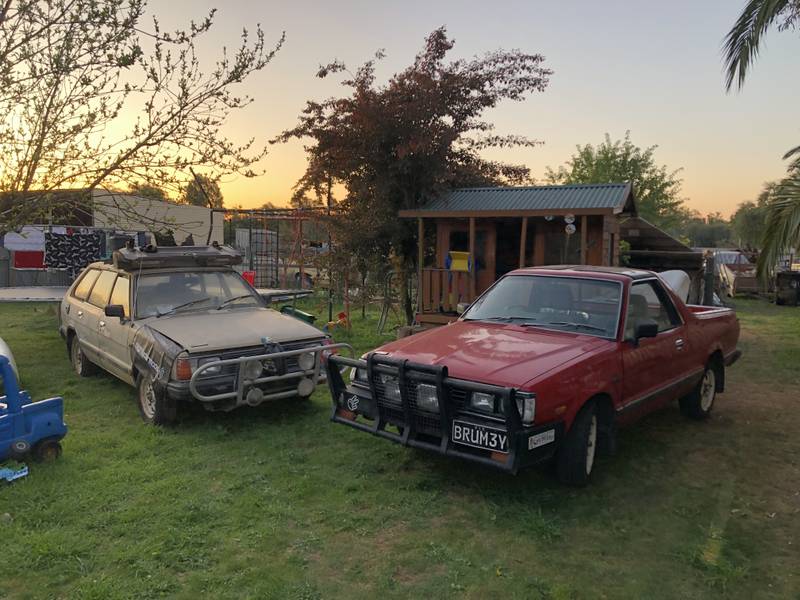
Of course it was a good time for a pic of the two moving MYs at home:
Now to work out where to go from here with the wagon… the dash swap might be the go. I don’t seem to have an awesome one that isn’t crazed or cracked so I’ll probably use the one from Redback Brumby before her dash conversion to the longer analogue six gauge cluster.
Cheers
Bennie
First day back up and about, great day and everything was feeling good!
Today was finally the day where I found out if it drives or not. But there was a bit of work to do first. I fitted the passenger’s side spacer block for the exhaust and had to use one of the original shorter stubs for the second torx bolt because the one I had was somehow bent. It can be seen in the pic below. This side went quite smoothly since I knew the process.
I fired it up and let it idle. It was nice to be able to hear other noises rather than a light aircraft spec noise since it now has a whole exhaust on it. This was the point I started finding all the little painful issues such as the sticky throttle pedal. The pivot is rusty and even though I got it moving and lubed up it just wasn’t enough to return to its resting position.
So pedal swap time it was. Luckily for me the brumby halfcut project still sported its pedal box with an operational accelerator pedal. Out it came then off to the wagon for the same treatment. It was easier to remove the wagon’s cutch pedal and cable off the pedal box and drop the steering down to get it out than it was to keep the clutch pedal attached.
^ brumby pedal box waiting to go in. I didn’t really want to go to this extent but my hand was forced and in the end it was much easier anyway.
With that sorted I found a pin hole in the upper radiator hose and the clutch cable was fitted weirdly. Whoever was at it last time had used the two nuts to clamp the clutch fork rather than have the two nuts lock together at the appropriate spot for good clutch pedal feel. So that’s sorted. Next up was a miss at idle. That issue seemed to be cyl3’s spark plug lead being a bit too short and wasn’t seating properly at the spark plug. I removed the boot at the plug a rerouted the lead so both ends engaged properly.
Then it was time for a short drive - mainly in reverse and without brakes at the pedal, and no interior because that is still beyond grose… but it went well!
I was pretty stoked to have it moving under its own steam. There was another issue I found and that was the thermo fan not kicking in, I thought the temp gauge was lying to me as it was up at the HOT line but then came down after a rev or two but was then back up at it again. A check of the temp sensor wiring to ensure it wasn’t earthing out confirmed it was fitted to the temp sensor properly. There wasn’t any boiling sounds or overheated sounds that I’ve heard before with overheated engines so wasn’t stressed.
Then moving the wagon it was up on the hot line again. I checked the thermo fan wiring and visually it looked like it was connected to the thermo switch at the radiator, but upon physically checking the plug it wasn’t connected with anything other than the outer sheath, that was flicked off and the connector gently squeezed then fitted, the thermo fan kicked in and pulled the temp down quick which was good. It then clicked on and off at the just over half temp mark as it should so that confirmed the gauge was working properly. Happy days.
The AC was tested and it turns on, the gas window at the dryer had the little bubbles that usually indicates it’s working ok, they were consistent anyway. It was blowing hot in the cab. I didn’t realise the heater was on and it seems turning the knob to cold didn’t do anything so there’s something to look into there, either a stuck heater tap and/or a cable that’s slipped its mount.
So good day had and I feel a great result too. Very stoked!
Of course it was a good time for a pic of the two moving MYs at home:
Now to work out where to go from here with the wagon… the dash swap might be the go. I don’t seem to have an awesome one that isn’t crazed or cracked so I’ll probably use the one from Redback Brumby before her dash conversion to the longer analogue six gauge cluster.
Cheers
Bennie
"The lounge room is not a workshop..."
https://www.imageshack.us/i/po1BKrxbj
El Freddo's Pics - El_Freddo's youtube
https://www.imageshack.us/i/po1BKrxbj
El Freddo's Pics - El_Freddo's youtube


0 user(s) are reading this topic
0 members, 0 guests, 0 anonymous users

