
starting to look like a car interior again!
Nothing better than all that wiring disappearing behind the dash.
wha' who ?

Posted 10 September 2014 - 12:16 PM
starting to look like a car interior again!
Nothing better than all that wiring disappearing behind the dash.
Make it BLAAACK!
Posted 15 September 2014 - 12:06 PM


Make it BLAAACK!
Posted 15 September 2014 - 12:29 PM
I found some info in a NASIOC post that at least gives some context to the wires:
wha' who ?
Posted 15 September 2014 - 02:42 PM
I found some info in a NASIOC post that at least gives some context to the wires:
- Black is ground on both plugs.One plug will have- yellow and red=Hi speed- white and blue=Low speedThe other plug will be- yellow and green=Hi speed- white and green= lo speedI'm guessing wiring the high speed in and leaving the low speed is the way to go?
Looking at the lib wiring diagrams I have, the 2.5 and 2.0TT have two two-pin fans. They are called main and sub-fan, but they're both 75W.
the H6 seems to have something more complicated - 4-pin fans (speed controlled) . Was your donor lib an H6?
For the 2.5 and 2.0TT, Wiring is common ground, lo to one fan, high to the other. Not sure it matters left/right which is which.
I think I'd be wiring them to the 'low' speed -- so they kick in early. Wiring them to high speed will have them turn on later.
 H6.pdf 16.21KB
0 downloads
H6.pdf 16.21KB
0 downloads
H4TT.pdf 10.46KB
3 downloads
Make it BLAAACK!
Posted 15 September 2014 - 02:52 PM
Looking at the lib wiring diagrams I have, the 2.5 and 2.0TT have two two-pin fans. They are called main and sub-fan, but they're both 75W.
the H6 seems to have something more complicated - 4-pin fans (speed controlled) . Was your donor lib an H6?
For the 2.5 and 2.0TT, Wiring is common ground, lo to one fan, high to the other. Not sure it matters left/right which is which.
I think I'd be wiring them to the 'low' speed -- so they kick in early. Wiring them to high speed will have them turn on later.
Liberty is/was a 2.5 RX.
I have these fans:
- GC8 - 3 wire connector
- GD (came with rad) same 3wire as GC8 ones
- BH RX - 2 wire
My first thought was to swap out the WRX fans for the lib ones but then you use the mounting spot for the overflow.
Adriano
Posted 15 September 2014 - 03:08 PM
wha' who ?
Posted 15 September 2014 - 05:14 PM
ah ok. I think I understand
You've got a GC8 rad plus fans (3-pin).
Has your rejigged wiring harness got the two-pin liberty plugs?
The lib fans will fit with an overflow. Mine does. Maybe you need a B4 overflow bottle? It doesn't look obviously different in this view:
EDIT: No.. I'm confused. You said you had 3-wire plugs.
"THERMAL MANAGEMENT SPECIALIST"

Posted 15 September 2014 - 05:28 PM
Make it BLAAACK!
Posted 16 September 2014 - 01:28 PM
What alternator did you end up using Luke?
Oh and...good progress is good!
I've got the GC8 WRX one in there at the moment. We'll see how that goes I guess.
ah ok. I think I understand
You've got a GC8 rad plus fans (3-pin).
Has your rejigged wiring harness got the two-pin liberty plugs?
The lib fans will fit with an overflow. Mine does. Maybe you need a B4 overflow bottle? It doesn't look obviously different in this view:
EDIT: No.. I'm confused. You said you had 3-wire plugs.
Pretty sure it's a GD radiator but the GC8 and GD fans appear to have the same 3 pin connector.
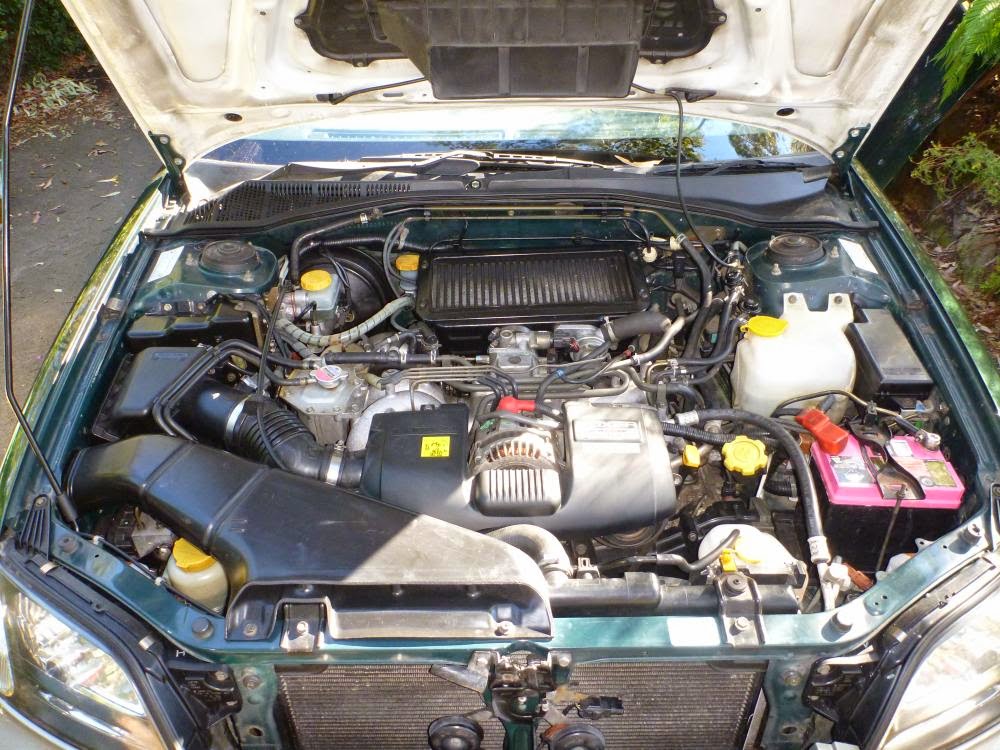
I checked again and you're right, the Lib fan does have mounting for an overflow (of course  ). I mounted the Liberty fans to the radiator along with the overflow. Everything fits and has plenty of clearance
I also managed to find the original Liberty top radiator and thought I'd see if it offered more clearance than the WRX one.
WRX hose left, Liberty hose right:

A much nicer fit.
One thing I almost lost my chops over was finding this:

It's the fitting on the driver side that comes from the header tank. I'm not sure if this was like this when I got it or if it's happened in storage/transit. Does anyone know if this can be fixed/is worth fixing?
As I see it, these are the options:
- Glue another fitting in there
- Seal it up and run the hose somewhere else or block it off at the header tank
- Ditch the rad and use the Liberty one until I can find something else
I'm open to suggestions at this stage
"THERMAL MANAGEMENT SPECIALIST"
Posted 16 September 2014 - 03:12 PM
wha' who ?
Posted 16 September 2014 - 03:12 PM
glad the fans/tank/hoses worked out..
I wouldn't trust glue alone.... maybe drill it out and screw in a brass hose-barb fitting - with some sealant in the threads for good measure.
OEM+

Posted 16 September 2014 - 05:02 PM
That radiator is now rubbish. Very common for that to happen.
Run the Liberty one and block off the line coming from the header tank.

Make it BLAAACK!
Posted 16 September 2014 - 05:06 PM
Make it BLAAACK!
Posted 17 September 2014 - 12:52 PM
Update!
I got the ECU back from Ichiban and decided to get in straight into the car(Huge thanks to Scott with putting up with my questions and phonecalls with extra codes to remove).
I had the following codes removed:
Plugged in

Mounted

Tucked away!

I decided to keep going with the interior


Pretty much complete

wha' who ?
Posted 17 September 2014 - 12:57 PM
hubba hubba - when's start day?
Touring Bruce

Posted 17 September 2014 - 01:02 PM

Make it BLAAACK!
Posted 17 September 2014 - 01:06 PM
I almost forgot I had wired up the fuel pump!
Al includes new wiring to run down to the pump from the GD fuel pump controller (Liberty doesn't have one).
I ran the wiring down the driver side to underneath the back seats. The plan was to wire it in just before the wiring goes through the inspection plate but on the BH the wiring goes through the passenger side inspection plate and then along the top of the fuel tank to the other side. Wanting to be as neat as possible, I didn't want to drill any new holes or cut into one of the fuel line grommets. I ended up running the wiring across to the passenger side and spliced it into the loom before the inspection plate connector. This way the plate isn't wired to the car and serves it purpose in the normal way. I only JUST had enough wiring to make it.

Soldering... sorry Al. I figure being in the car it's pretty protected from heat and the elements.

All taped up (it got tucked away much neater than this afterwards)

Make it BLAAACK!
Posted 17 September 2014 - 01:09 PM
hubba hubba - when's start day?
Hopefully this Saturday. But there's still a couple of bits I realised are missing last weekend - budget is kinda maxed out at the moment :-/
That interior is dying for some jdm treatment as well I think
Very true. I think it's dying for some treatment of any kind really. There's still so much nasty crap from the previous owner in there GROSS!
OEM+
Posted 17 September 2014 - 01:40 PM

Make it BLAAACK!
Posted 17 September 2014 - 01:45 PM
It's on the list man. But I'm out of budget at this stage :-/


0 members, 0 guests, 0 anonymous users


