Jump to content


Photo

Joel's BRZ

#becauseracecar

  • Please log in to reply
583 replies to this topic

#261 Asymmetry

Asymmetry

    New Member

  • Members
  • Pip
  • 51 posts
  • Gender:Male

Posted 26 August 2019 - 11:47 AM

Yeah but probably going to sell it at the end of this year once the race season is over. I could use some money to buy some of the more expensive items I need for the BRZ.


Still a sort after car, sold mine for $14K last year. with 160,000 km on it. Even beaters examples with 200,000km still go for $8k


#262 Niko

Niko

    Member's Member

  • Members
  • PipPipPip
  • 7,511 posts
  • Gender:Male
  • Location:Sydney City

Posted 28 August 2019 - 01:23 AM


Still a sort after car, sold mine for $14K last year. with 160,000 km on it. Even beaters examples with 200,000km still go for $8k


TBH yours was a good example of a GG, even I considered buying it.


But yeah, the GD/GG chassis seems to still be really popular, especially in weekend motorsports. You see GE/Hs going for cheaper than GD everyday. 


#263 JDWhiteWRX

JDWhiteWRX

    Regular Member

  • Members
  • PipPipPip
  • 590 posts
  • Gender:Male
  • Location:Royal National Park, NSW

Posted 28 August 2019 - 09:50 AM

I think since mine is no longer registered it may limit my prospective buyers a little since not everyone has a tow car and trailer.

Follow me on Insta: @brzdiy


#264 Asymmetry

Asymmetry

    New Member

  • Members
  • Pip
  • 51 posts
  • Gender:Male

Posted 28 August 2019 - 10:56 AM


TBH yours was a good example of a GG, even I considered buying it.


But yeah, the GD/GG chassis seems to still be really popular, especially in weekend motorsports. You see GE/Hs going for cheaper than GD everyday. 


Thanks, its ripping around northern beaches now. Yeah was in good condition, I see a few at auctions now and then, most just trashed, really sad considering how good they are. 


I have a GH XV I think the suspension geometry is better than the GD, no reason why a GH cant be competitive. VA STI on the other hand they nailed it IMO


I think since mine is no longer registered it may limit my prospective buyers a little since not everyone has a tow car and trailer.


Put back the interior and rego it. Pits is $500, over $6K+ difference when it comes to sale. Be lucky to get $3K for what I seen. 


#265 JDWhiteWRX

JDWhiteWRX

    Regular Member

  • Members
  • PipPipPip
  • 590 posts
  • Gender:Male
  • Location:Royal National Park, NSW

Posted 28 August 2019 - 01:53 PM

Put back the interior and rego it. Pits is $500, over $6K+ difference when it comes to sale. Be lucky to get $3K for what I seen.


It's a bit beyond that now, the entire brake system has been manualised with a rather large hydraulic handbrake. Putting it back to standard would take months and lots of parts I don't have any more.

43762814680_f942cfe8c3_z.jpg

Follow me on Insta: @brzdiy


#266 Asymmetry

Asymmetry

    New Member

  • Members
  • Pip
  • 51 posts
  • Gender:Male

Posted 28 August 2019 - 03:23 PM

Damn cool but yeah beyond that. Might consider part out?


#267 El_Freddo

El_Freddo

    Rock'n the old Skool

  • Members
  • PipPipPip
  • 2,244 posts
  • Gender:Male
  • Location:Bridgewater/Central Vic/semi-retired nomad
  • Interests:Subarus, 4wd'n Subarus, travelling Subarus, Tinkering... I could go on!

Posted 28 August 2019 - 09:26 PM

Damn cool but yeah beyond that. Might consider part out?


Is that a vulcher circling already??

Cheers

Bennie
"The lounge room is not a workshop..."
https://www.imageshack.us/i/po1BKrxbj
1BKrxb.jpg
El Freddo's Pics    -    El_Freddo's youtube

#268 Asymmetry

Asymmetry

    New Member

  • Members
  • Pip
  • 51 posts
  • Gender:Male

Posted 29 August 2019 - 08:46 AM

Is that a vulcher circling already??

Cheers

Bennie

LOL no, have a 17 STI, dont need parts. Just quick calculation, engine 3K, turbo 1K, gearbox 2k, brakes 1k, wheels 1k, then the rest


that said Joels is a well built track car, it only takes one buyer with a good eye.


#269 JDWhiteWRX

JDWhiteWRX

    Regular Member

  • Members
  • PipPipPip
  • 590 posts
  • Gender:Male
  • Location:Royal National Park, NSW

Posted 29 August 2019 - 01:48 PM

I'd rather just sell it as a complete package, I mean the thought of dealing with that many people stuffing me around, no thanks.

Follow me on Insta: @brzdiy


#270 Niko

Niko

    Member's Member

  • Members
  • PipPipPip
  • 7,511 posts
  • Gender:Male
  • Location:Sydney City

Posted 29 August 2019 - 06:57 PM

Plenty of people in market for ~$5k track cars.


#271 Asymmetry

Asymmetry

    New Member

  • Members
  • Pip
  • 51 posts
  • Gender:Male

Posted 30 August 2019 - 09:41 AM

I'd rather just sell it as a complete package, I mean the thought of dealing with that many people stuffing me around, no thanks.


Oh the crazies I had for my car, that was one item. Yeah you're right, screw that


Plenty of people in market for ~$5k track cars.

Yeah, unlike those this is great car, not some rust held together by paint Nissan junker


#272 JDWhiteWRX

JDWhiteWRX

    Regular Member

  • Members
  • PipPipPip
  • 590 posts
  • Gender:Male
  • Location:Royal National Park, NSW

Posted 17 November 2019 - 10:11 PM

Today I made a welding jig to build some rear upper control arms. The jig works for both passenger and driver side arms. Making the control arms will not be easy due to the large angle of the stud into the knuckle which is part of the factory design to clear the chassis rails. Those are gone in my car but the angle remains in the knuckle so I have to keep it.

49078510132_1ac5393ec5_c.jpg

49078510097_762f631a88_c.jpg

The stud is held in the jig with a bolt just like it is in the knuckle.

49078308381_d467cffda7_c.jpg

Next weekend I hope to start building the new control arms.

Follow me on Insta: @brzdiy


#273 El_Freddo

El_Freddo

    Rock'n the old Skool

  • Members
  • PipPipPip
  • 2,244 posts
  • Gender:Male
  • Location:Bridgewater/Central Vic/semi-retired nomad
  • Interests:Subarus, 4wd'n Subarus, travelling Subarus, Tinkering... I could go on!

Posted 18 November 2019 - 09:37 PM

I can’t wait to see your progress on building these arms!

Cheers

Bennie
"The lounge room is not a workshop..."
https://www.imageshack.us/i/po1BKrxbj
1BKrxb.jpg
El Freddo's Pics    -    El_Freddo's youtube

#274 JDWhiteWRX

JDWhiteWRX

    Regular Member

  • Members
  • PipPipPip
  • 590 posts
  • Gender:Male
  • Location:Royal National Park, NSW

Posted 24 November 2019 - 07:53 PM

The parts I needed to keep working on the rear upper control arms did not show up in time for the weekend so I moved to the front of the car to work on the front upper control arms.

Things were going well, I got everything into position on the car with the plan of mocking up one control arm using my knuckle jig and then tacking it together before moving to the bench and creating another jig to hold it in place before fully welding and to make the other side.

49114877917_5125827582_c.jpg

My problem is the tube I am using is a little larger than the height of the spherical bearing housing. My plan was to heat the tube with my TIG torch and then squish it in the vice to bring the diameter down to the size I need. I have seen other aftermarket arms where they have done this where the tube meets the bearing.

49114687806_2961a1ef2d_c.jpg

Well it didn't go so well, the first problem was that it was hard to prevent the TIG from melting the tube but at least I know it was hot enough, I was only testing on scrap so I pushed on.
Once I started turning the vice it seemed to work but it was slow and I think the metal may have cooled too much as it became difficult to turn and then the vice handle bent.

You can see I got the size down a little but the tube looks nasty and I still need it a little smaller than that.

49114183283_654f688cc5_c.jpg

I need to come up with a better method, I'm open to ideas? maybe a hydraulic press is needed to increase the squeeze speed.

Follow me on Insta: @brzdiy


#275 JDWhiteWRX

JDWhiteWRX

    Regular Member

  • Members
  • PipPipPip
  • 590 posts
  • Gender:Male
  • Location:Royal National Park, NSW

Posted 01 December 2019 - 07:43 PM

This week I went out and bought the best hydraulic press I could afford, the quality seems pretty good for the money and I'm sure it will be good enough for what I need. The only thing I don't like about it is that its a bit short and I have to crouch down to use it. I can easily build a little platform for it though to bring it up to a more comfortable height.

49150764961_d3b4b48c70_c.jpg

Today I spent most of the morning building a tool out of scrap metal that would allow me to squish my control arm tubes in a reproducible way.

It has some solid round bar in the base so I know when to stop pressing and a bit of angle at the back to keep the depth consistent.

You can see my first pressing to the left in this photo. I am still using my TIG to heat the metal but at about half the amps of my first attempt so I can control the heat easily.

49150768871_a722301c49_c.jpg

No its not made from solid gold :D
49150279268_a25f5ffa82_c.jpg

So then it was time to move everything into position and start making the front upper control arms. I am keeping the rod ends parallel to each other so when I make adjustments to the length for either camber or caster there is no spreading effect.

49150268283_d181e071bf_c.jpg

The string lines give me the angle for my tube notcher, I prepared all the tube for both sides as they will be the same. The squished end is where they will differ from each other.

49150760861_fdf21dc6ac_c.jpg

At this point I ran out of time, hopefully next weekend I will complete these upper arms.

Follow me on Insta: @brzdiy


#276 JDWhiteWRX

JDWhiteWRX

    Regular Member

  • Members
  • PipPipPip
  • 590 posts
  • Gender:Male
  • Location:Royal National Park, NSW

Posted 08 December 2019 - 08:34 PM

I got some work done today on the front upper control arms.

I started by getting everything into position again, I have set it at 2 degrees negative camber and 8 degrees of positive caster.

I squared up the rod ends again so they are parallel to each other and then tacked on a small piece of angle to hold it in place while I squished and notched the other tubes. The squishing process in my new hydraulic press went really well.

Once I was happy with the fitment I tacked everything together. The whole process took a long time, especially notching by hand where the tube meets the spherical bearing.

49187060402_0bf7e87bd2_c.jpg

I then removed the control arm from the car and checked that it would fit the other side and it does. I am talking about the space between the rod ends being equal on both sides. I need to know this as I am making a jig for the other side based on the arm already made, just a mirror image.

Then I started making my welding jig which will locate the 2 rod ends and the spherical bearing.

49186369123_6857921c3b_c.jpg

The plan is to build the jig before fully welding the control arm to prevent distortion. I will then make a mirror image just by measuring the angles for the other side, the only thing that changes for the other side is the angle that the spherical bearing mounts on which is easy to measure.

That's as far as I got today.

Follow me on Insta: @brzdiy


#277 El_Freddo

El_Freddo

    Rock'n the old Skool

  • Members
  • PipPipPip
  • 2,244 posts
  • Gender:Male
  • Location:Bridgewater/Central Vic/semi-retired nomad
  • Interests:Subarus, 4wd'n Subarus, travelling Subarus, Tinkering... I could go on!

Posted 10 December 2019 - 12:36 PM

Once again Joel, awesome effort put into this!

Will you be knocking up two sets of control arms “just in case”? Might as well while you’re at it I reckon. Yes painful time and effort wise, plus the extra coin for materials, but future Joel might really love you for it. At the very least you’ll have a set of nicely engineered and executed set of control arms for others to admire if they know what they are ;)

Cheers

Bennie
"The lounge room is not a workshop..."
https://www.imageshack.us/i/po1BKrxbj
1BKrxb.jpg
El Freddo's Pics    -    El_Freddo's youtube

#278 JDWhiteWRX

JDWhiteWRX

    Regular Member

  • Members
  • PipPipPip
  • 590 posts
  • Gender:Male
  • Location:Royal National Park, NSW

Posted 10 December 2019 - 02:38 PM

Thanks Bennie,

I will be keeping all my welding jigs so if I need some longer or shorter control arms in the future I can make another set. There is limited range of adjustment for camber/caster with the rod ends so at some point you may need a different length control arm.

Follow me on Insta: @brzdiy


#279 JDWhiteWRX

JDWhiteWRX

    Regular Member

  • Members
  • PipPipPip
  • 590 posts
  • Gender:Male
  • Location:Royal National Park, NSW

Posted 15 December 2019 - 09:24 PM

I finished one of the front upper control arms today, it took a long time as its summer here now and I didn't want to put too much heat into it welding so I spent a lot of time waiting for it to cool.

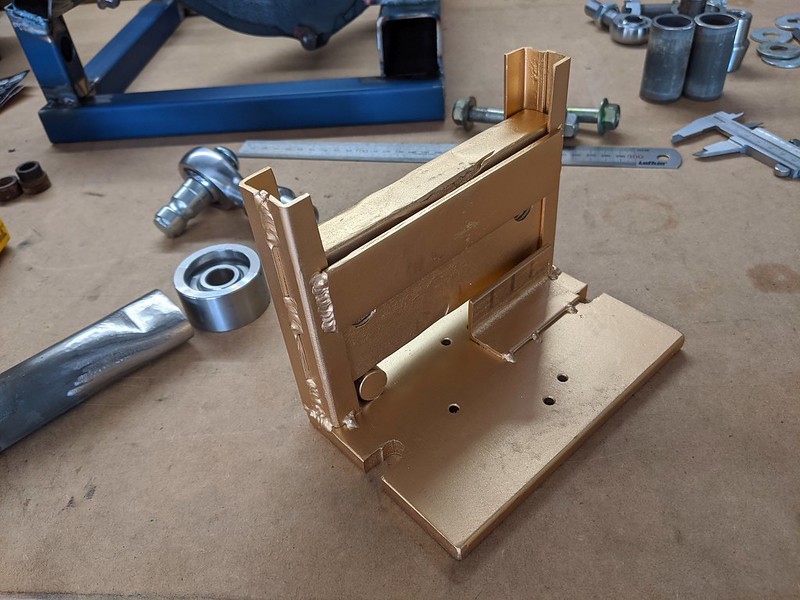
Started off by completing my welding jig.

49220895383_d9a7e3695f_c.jpg

Then I completed all the welds on the drivers side control arm with the arm in the jig to prevent distortion.

49221741222_7085ac3fe0_c.jpg

All done.

49221743397_11a9d51d7c_c.jpg

I then flipped the control arm over to make the a jig for the passenger side which is just a mirror image of the drivers side. The only change is the spherical bearing leans the opposite way, so all I had to do was measure the angle and lean the threaded rod I was using to locate the spherical bearing back the opposite way.

You can see the jig now does both sides. I will keep it in case I need to make another set of different length arms some time in the future.

49221742282_2b436bfb61_c.jpg

Ran out of time at this point but everything is now ready to start fabrication on the passenger side control arm now.

49221037663_902b12b33f_c.jpg

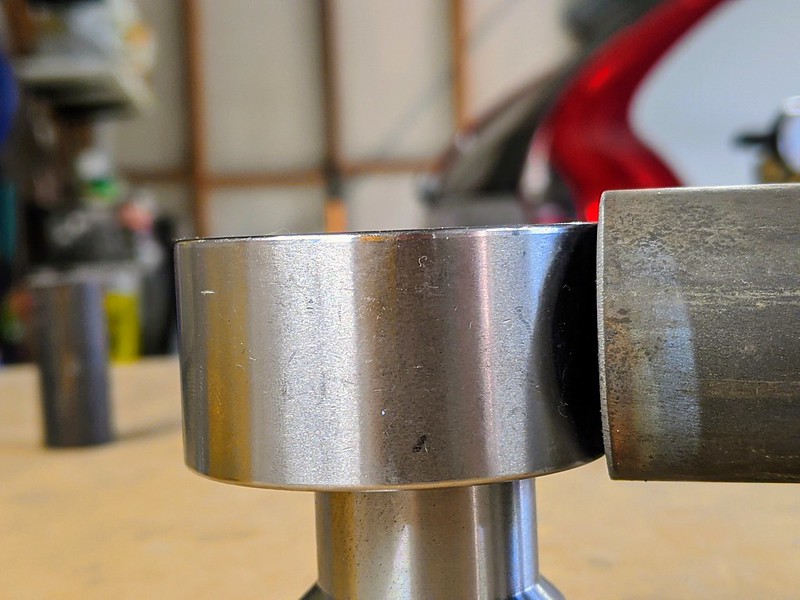
Below are the six pieces that held my project up for many months, they are the tapered studs for the front RX8 uprights and the studs that locate the rear upper control arms in the factory BRZ rear uprights.

I measured the taper of the RX8 ball joints very accurately but I was not able to find off the shelf studs to fit, mostly because nobody lists the stud dimensions on their website and nobody replies to emails when you ask for dimensions.

I reached out to Racefab in NZ because he makes the studs I needed but he would not sell them to me because I was not buying his control arms.

So I found some studs that had dimensions listed but they were slightly too large so I had a friend turn them down on a lathe to suit the RX8 upright.

For the rear studs I have to give a huge shout out to Jeff at Racer X Fabrication who was willing to sell me the studs even though I was not going to be using their control arms. When they arrived I was very impressed with the quality and design.

49221523701_2ecc0ccc39_c.jpg

Follow me on Insta: @brzdiy


#280 JDWhiteWRX

JDWhiteWRX

    Regular Member

  • Members
  • PipPipPip
  • 590 posts
  • Gender:Male
  • Location:Royal National Park, NSW

Posted 22 December 2019 - 10:18 PM

Today I got a fair amount of work done on the passenger side front upper control arm. I would have finished it but had to finish up early for my Wife's birthday celebration. There is probably another 20 minutes of welding to be done before its finished.

ArqAHXQ.jpg?1

Follow me on Insta: @brzdiy


0 user(s) are reading this topic

0 members, 0 guests, 0 anonymous users