Jump to content


DIY : Twin Turbo intercooler removal & installation


  • Please log in to reply
21 replies to this topic

#1 Guest_KONG_*

Guest_KONG_*
  • Guests

Posted 29 October 2013 - 03:06 PM

Not a basic and easy job but it's fairly straight forward & I'll run through the process in the order that I find easiest. 

My engine is a revision D  EJ208

There may be differences in model revisions that I am unaware of but you should be able to work with this DIY. 


If you have additional information, methods or techniques that you feel may assist this DIY please feel free to chime in.


Also note that I have used a couple pics from other forums and thanks goes out to the people who originally posted those pics.


Tools needed


8mm socket

12mm socket and ratchet with medium extension bar

Large & medium flathead/phillips head screwdriver depending on your hose clamps

Pliers


Tips 
 
I lay a folded up blanket across the the top of the engine for a padded surface to lay the intercooler on once it is off & flipped upside down.
Be careful not to damage the fins or bang the intercooler around.
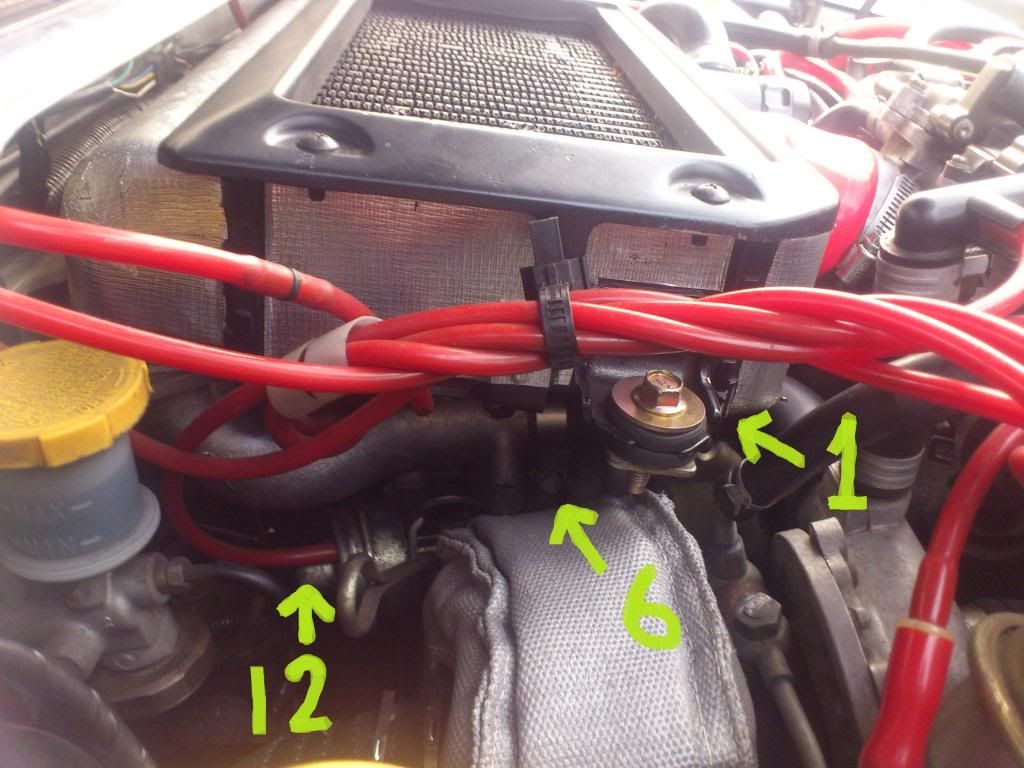
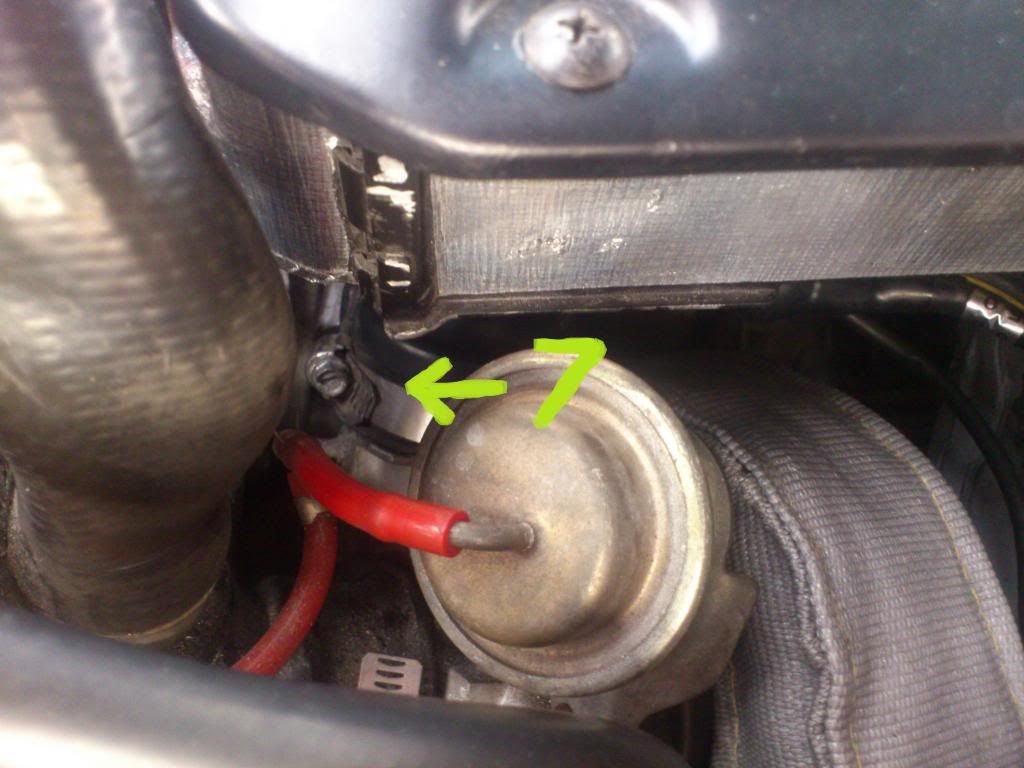
If you need to remove the intercooler entirely from the engine bay you should label the vac line that connects to the actuator.  
The other three lines that connect to under the intercooler may be repositioned in any order but I wrap a piece of tape around them to keep them together and out of the way.  
 
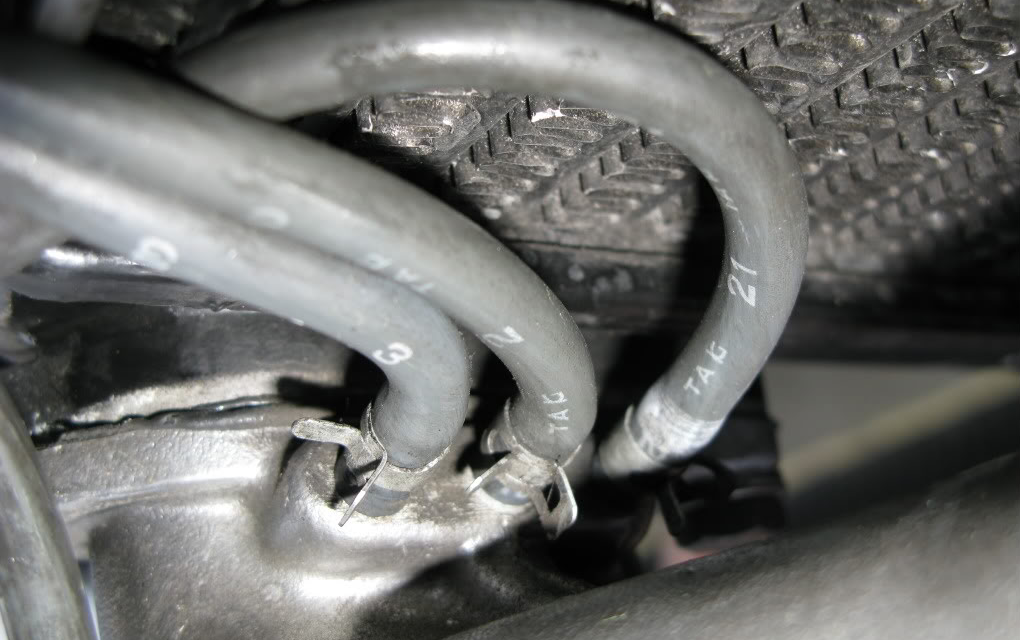
The vac lines under the intercooler.....
 
Capture2_zps1abf1d92.png
 
 
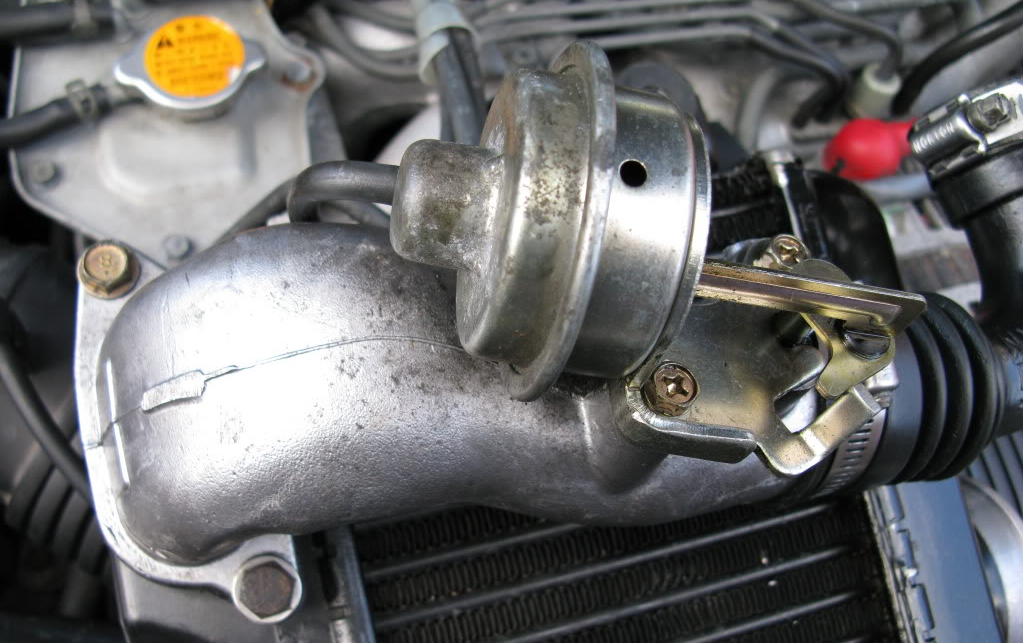
The actuator on the secondary inlet side....
 
Capture3_zps8dff3941.png


Getting started


If you have a strut bar you may need to remove it for access.


01) Remove the two mounting bolts on both sides of the intercooler 2x12mm
02) Remove completely the passenger side intercooler support bracket attached to the intake manifold 2x12mm
03) Remove the clip to free the vac lines from the intercooler shroud. 
04) Loosen the main inlet hose clamp connected to throttle body 8mm pipe clamp.
05) Loosen the driver side intercooler plastic hose connecting to secondary turbo, 8mm hose clamp.
06) Loosen slightly the driver side intercooler plastic hose connecting to under the intercooler, 8mm hose clamp.  (Just loose enough for it twist but tight enough for it to stay on the intercooler pipe) 
07) Loosen the passenger side intercooler plastic hose connecting to the primary turbo, 8mm hose clamp.
08) Loosen slightly the passenger side intercooler plastic hose under the intercooler, 8mm hose clamp. ( As before, just loose enough for it twist but tight enough for it to stay on the intercooler pipe) 
09) Remove the hose and vac line from the recirc valve or BOV at the front of intercooler (spring clip or hose clamp)
10) Wiggle and pull upwards the intercooler on the passenger/primary side until the plastic hose pops off the primary turbo outlet and the main throttle body hose is clear of the throttle body. Then the intercooler should lift out.
11) Carefully lift and flip the intercooler being mindful of the connecting vac lines underneath.
12) Remove and label the vac line to the actuator on the aluminium secondary inlet pipe if necessary.  
 
 
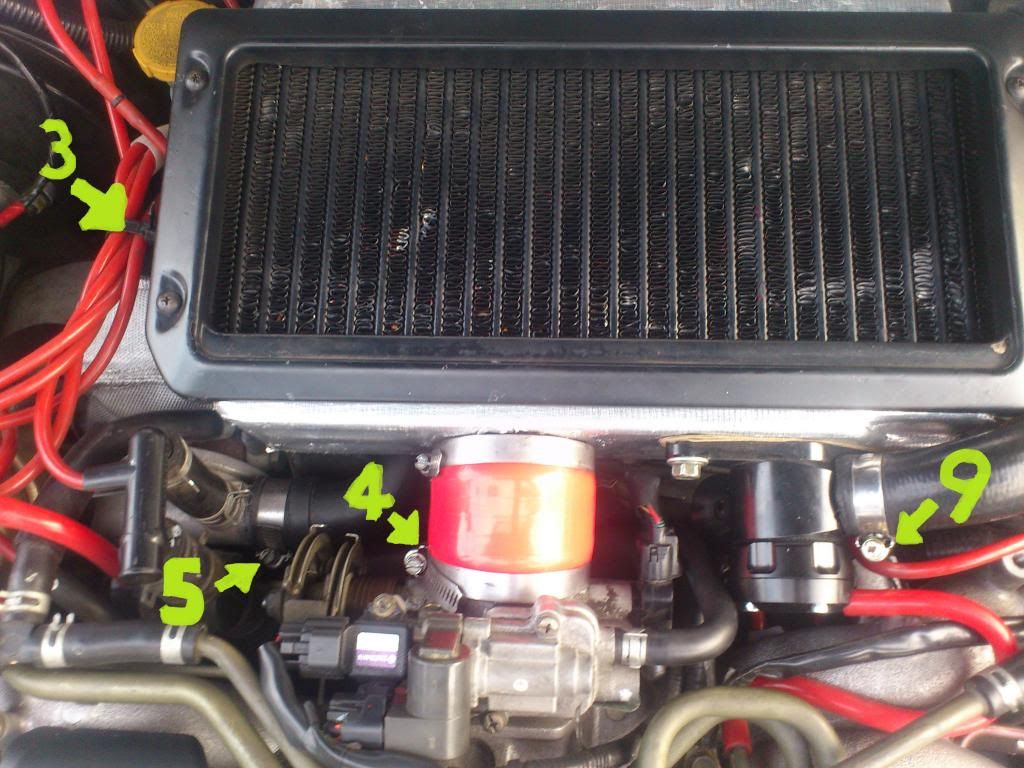
Secondary turbo driver side.....
DSC_0922_zps72f5fca7.jpg
 
DSC_0921_zpsf9c18018.jpg
 
 
Primary turbo passenger side....
DSC_0919_zps25c2772e.jpg
 
 
Tips for installation 
 
Refitting can be difficult. It's fiddly and can test the patience of even the most experienced mechanic. Just persevere and think logically, if it's not working out for you there is a reason and you need to find it.
 
Be gentle or you will be up for new plastic pipes that connect to the turbos. They're an expensive Subaru only part and easy to destroy.
 
If it isn't going on, don't force it! Remove and inspect the pipes to see if they are round and haven't been bent or creased out of shape.
 
The best thing you could do to make installation easier is to replace the throttle body hose with a silicone one. Highly recommended to assist installation. It makes installation so much easier.  Trust me on this! 
You'll need a 2.75 inch silicone joiner and you may need to trim it to the same shape of the removed joiner with a sharp knife.
 
Some people use a smear of oil on the inside of the plastic pipes to assist them sliding onto the turbos. If you take my advice and get a silicone throttle body hose you won't need to.  I actually prefer to keep the connections clean so they seal perfectly and I use wax and grease remover to remove any oil inside the pipes before installing them to prevent any chance of them popping off under boost.
 

Installation
 
It's pretty much the reverse order of removal. 
The plastic pipes should be still attached to the intercooler and you should be able to rotate them on the aluminium intercooler connections. You don't want them to come off during the installation process so tighten the clamps just enough to allow some movement.   
 
Make sure the 3 vac hoses are connected underneath the intercooler.
Get the intercooler roughly in place, align the primary pipe connection, then connect the pipes in the order of ...
Primary turbo (passenger side)
Throttle body  (Middle)
Secondary (Driver side) This will take some manipulation but there is a flexi join on the pipe to allow for this. 
 
Make sure all the hose clamps on the turbo to intercooler plastic fittings are in a position where you can actually tighten them.
Check that the intercooler outlet hose onto the throttle body is fitted ok and then the plastic pipes to the turbo outlets are still in place and on the turbo as far as they can go..
Tighten the throttle body clamp first checking all pipes are in position as move to the next pipe for tightening.
Tighten up all 4 hose clamps on the 2 plastic turbo to intercooler pipes under the intercooler. 
Refit the passenger side support bracket and attach loosely to the manifold. 2x 12mm.
Bolt in the intercooler support bolts 2x12mm
Now tighten the bracket onto the manifold.
Refit the recirc hose & spring clip/hose clamp.
Attach the "labelled" vac line to the actuator on the aluminium secondary inlet pipe.  
 
I now like to tighten up the hose clamps with the 8mm socket 1/4 to 1/2 a turn. Tighten them too much and they will snap.
 
Done & Done. 
 
 
If you get stuck or have any questions feel free to drop me a PM.
 
Cheers, WhiteJoshBossKong


#2 nickknack

nickknack

    Regular Member

  • Members
  • PipPipPip
  • 2,619 posts
  • Gender:Male
  • Location:VoD

Posted 29 October 2013 - 03:38 PM

Nice write up BossJosh. Hopefully I can put it to use in the future!


#3 SAV84C

SAV84C

    Regular Member

  • Members
  • PipPipPip
  • 3,480 posts
  • Gender:Male
  • Location:Sydney

Posted 29 October 2013 - 03:52 PM

Do u find that the silver heat tape actually helps or does nothing?


#4 Hypnotic

Hypnotic

    Everything you see is an hallucination

  • Members
  • PipPipPip
  • 23,835 posts
  • Gender:Not Telling
  • Location:In the alley way
  • Interests:long walks behind abandoned buildings.

Posted 29 October 2013 - 03:54 PM

Great write up.


As soon as she hands it to you, slowly take of your pants, then, while staring her straight in the eyes rub it against the tip of you penis, while continuing your painfully intense gaze whisper to her;
 
"My eye is watering, this might be a bit hot"

I should just convert to single, right?
 
Horsepower Factory

Revzone Auto Tuning Centre

#5 Guest_KONG_*

Guest_KONG_*
  • Guests

Posted 29 October 2013 - 03:58 PM

Do u find that the silver heat tape actually helps or does nothing?


I think so. I did the heat wrap on the dumps and turbo blankets at the same time so I don't really know how much of a difference the tape alone would make.


I think it would have to do something though.


#6 Zac

Zac

    1544C

  • Members
  • PipPipPip
  • 15,686 posts
  • Gender:Male
  • Location:Westside
  • Interests:Stuff

Posted 29 October 2013 - 04:06 PM

Thanks Boss, I'll have to do that one day since I pretty much have half a working TMIC.. lol


2002 B4 Rev E

2004 Outback Premium 3.0R


#7 Cam.

Cam.

    OEM+

  • SubyClub Area Rep
  • PipPipPip
  • 4,906 posts
  • Gender:Male
  • Location:Newy

Posted 29 October 2013 - 05:42 PM

Good on you for writing this.

The plastic pipes make it the worst. I've done a heap of stuff on Subaru's over the years and this is in my top 3 most hated things.

Have fun guys!


Asb2OgK.jpg?1


#8 B4TT

B4TT

    Soviet Leader

  • Members
  • PipPipPip
  • 39,547 posts
  • Gender:Male
  • Interests:Rodina-Mat

Posted 06 November 2013 - 02:38 PM

The plastic pipes make it the worst.


Farking oath, I put silicone on mine - made it so many betters.


#9 Liberty

Liberty

    Regular Member

  • Members
  • PipPipPip
  • 23,869 posts
  • Gender:Male
  • Location:Sydney
  • Interests:tl;dr

Posted 06 November 2013 - 03:46 PM

Excuse my ignorance, but what are the benefits of using silicone over plastic or the normal rubber?


Wanting to buy/looking for: single genuine STi rim, genuine STi front lip, Corazon or Zero/Sports grille and another OEM grille

Can you hook a brother up? Please contact me now. I have cash ready.

~

3fxl2Ca.jpg

~

2006 Liberty MY06 3.0R SpecB wagon


#10 LPM_B4

LPM_B4

    LPM_FOZ

  • Members
  • PipPipPip
  • 854 posts
  • Gender:Male
  • Location:Newcastle/Wauchope/Bellangry/CURED OF HIV

Posted 06 November 2013 - 03:56 PM

more workable to the max 

i.e makes removing and more importantly fitting a lot easier


#11 Liberty

Liberty

    Regular Member

  • Members
  • PipPipPip
  • 23,869 posts
  • Gender:Male
  • Location:Sydney
  • Interests:tl;dr

Posted 06 November 2013 - 04:13 PM

How does it go for longevity in comparison with the other materials?


Wanting to buy/looking for: single genuine STi rim, genuine STi front lip, Corazon or Zero/Sports grille and another OEM grille

Can you hook a brother up? Please contact me now. I have cash ready.

~

3fxl2Ca.jpg

~

2006 Liberty MY06 3.0R SpecB wagon


#12 Guest_KONG_*

Guest_KONG_*
  • Guests

Posted 06 November 2013 - 09:37 PM

Gaz...


It's stronger, more durable, more flexible, sexier, better all round.


#13 Liberty

Liberty

    Regular Member

  • Members
  • PipPipPip
  • 23,869 posts
  • Gender:Male
  • Location:Sydney
  • Interests:tl;dr

Posted 06 November 2013 - 09:38 PM

Thanks Josh. Worthwhile doing, dare I say it, to an N/A 3.0R? Or would that just make it more of an aesthetic thing?


Wanting to buy/looking for: single genuine STi rim, genuine STi front lip, Corazon or Zero/Sports grille and another OEM grille

Can you hook a brother up? Please contact me now. I have cash ready.

~

3fxl2Ca.jpg

~

2006 Liberty MY06 3.0R SpecB wagon


#14 Guest_KONG_*

Guest_KONG_*
  • Guests

Posted 06 November 2013 - 09:44 PM

Radiator hoses maybe. Not sure if it would be of much benefit elsewhere ie. vac & brake hoses etc.  Definitely a great upgrade on factory plastic inlet & intercooler pipes.


#15 Liberty

Liberty

    Regular Member

  • Members
  • PipPipPip
  • 23,869 posts
  • Gender:Male
  • Location:Sydney
  • Interests:tl;dr

Posted 06 November 2013 - 09:46 PM

Sweet. Might add that to my list of things to do then. For the radiator that is. If it does sweet fork all elsewhere then I won't bother adding it. Thanks Josh.


Wanting to buy/looking for: single genuine STi rim, genuine STi front lip, Corazon or Zero/Sports grille and another OEM grille

Can you hook a brother up? Please contact me now. I have cash ready.

~

3fxl2Ca.jpg

~

2006 Liberty MY06 3.0R SpecB wagon


#16 B4TT

B4TT

    Soviet Leader

  • Members
  • PipPipPip
  • 39,547 posts
  • Gender:Male
  • Interests:Rodina-Mat

Posted 11 November 2013 - 01:02 PM

Excuse my ignorance

No.


#17 Liberty

Liberty

    Regular Member

  • Members
  • PipPipPip
  • 23,869 posts
  • Gender:Male
  • Location:Sydney
  • Interests:tl;dr

Posted 11 November 2013 - 01:09 PM

Why-you-little.jpg


Wanting to buy/looking for: single genuine STi rim, genuine STi front lip, Corazon or Zero/Sports grille and another OEM grille

Can you hook a brother up? Please contact me now. I have cash ready.

~

3fxl2Ca.jpg

~

2006 Liberty MY06 3.0R SpecB wagon


#18 cowie165

cowie165

    Garage 改善

  • Members
  • PipPipPip
  • 599 posts
  • Gender:Male
  • Location:Newcastle, NSW

Posted 15 February 2015 - 07:30 PM

Hey Josh, just wanted to say thanks for the write-up. This weekend I changed my hoses to silicone and tidied up the IC. Straightened fins using toothpicks (I want the 3hrs of my Saturday arvo back), and gave it a light lick of paint. Here's a couple of pics.

Again, thanks for the DIY mate (y)

Mark


As removed:

2015-02-14142010_zpsaa41d8c6.jpg


Insert 3 hours of your life:

2015-02-14173949_zps10042d8f.jpg


And painted. Voila.

2015-02-15134643_zps6c553323.jpg


"Installation is the reverse of the removal procedure."
 
BH9 02-05 / BD9 07-14 / BE5 14-> / GGA 18->
 
2001 Legacy B4-RSK / 1999 ZX-9R C2


#19 Jimbo

Jimbo

    Livin' the Legacy

  • Members
  • PipPipPip
  • 2,771 posts
  • Gender:Male
  • Location:B'town

Posted 15 February 2015 - 07:33 PM

What a result! How did you go about paint?


'04 Liberty GT Premium "The Sprog Chariot"


#20 cowie165

cowie165

    Garage 改善

  • Members
  • PipPipPip
  • 599 posts
  • Gender:Male
  • Location:Newcastle, NSW

Posted 15 February 2015 - 07:52 PM

Thanks Jimbo. I masked off around the edge and used some Duplicolor Satin Black caliper paint left over from caliper overhauls a few months ago. I'm not sure if it's the ideal paint for the job, but it was what was on the shelf and I kept it reasonably light across the fins.


Satin Black and a tidy engine bay is my nod to CRUISN :-)


"Installation is the reverse of the removal procedure."
 
BH9 02-05 / BD9 07-14 / BE5 14-> / GGA 18->
 
2001 Legacy B4-RSK / 1999 ZX-9R C2


0 user(s) are reading this topic

0 members, 0 guests, 0 anonymous users