Jump to content


Photo

Mark's RevC B4-RSK


  • Please log in to reply
255 replies to this topic

#221 cowie165

cowie165

    Garage 改善

  • Members
  • PipPipPip
  • 599 posts
  • Gender:Male
  • Location:Newcastle, NSW

Posted 30 December 2016 - 08:41 AM

Thanks moto. It's one of the most frustrating and then most rewarding parts of working on cars and bikes! I hate taking it to a shop - half because it is acceptance of your failure and half because the shop always give you that look when you ask them to fix your DIY :lol:


haha, Pat I'm on it! :D We had a big family do here yesterday with 20 people (oh and during the 41'C day a power line went down and the suburb (read: our aircon!) lost power). Sweaty times. I'm on the fence on whether to start the mirror covers or fit the coilovers. Either way the car needs to be on stands for a couple of days. And Santa gave me a 550mm trolley jack last week. Awesome! Can't wait to try that out and have more room under the car.


Thinking things through I might jack the car and hit the strut bolts with WD40 for a day or two and work on the mirrors first while that soaks in. Trying to fit the sti springs was one of those jobs where I've tapped out and had to take it to the shop when I couldn't get crack the rear nuts. Ended up needing a hoist with a 1m breaker and two dudes pulling on it.


"Installation is the reverse of the removal procedure."
 
BH9 02-05 / BD9 07-14 / BE5 14-> / GGA 18->
 
2001 Legacy B4-RSK / 1999 ZX-9R C2


#222 patrick27s

patrick27s

    Trusted Member

  • Members
  • PipPip
  • 296 posts
  • Gender:Male
  • Location:Sydney

Posted 01 January 2017 - 02:55 PM

Ahha working in the power industry that sounds about right. Things only go wrong when it's extremely hot or extremely cold ahha

No rush haha, I'm only joking.

#223 cowie165

cowie165

    Garage 改善

  • Members
  • PipPipPip
  • 599 posts
  • Gender:Male
  • Location:Newcastle, NSW

Posted 01 January 2017 - 07:55 PM

Mrs and I came down with something that benched both of us yesterday (no NYE party :( ). Managed to get some work done today though.


No decent pics today but the summary is that I was working on the radio harness and turning it from a twist-tied & taped dog's breakfast into something reliable. Here's a pic of the factory loom where you can kinda guess at what the rest of it looked like:

Attached File  unspecified-3.jpg   73.89KB   8 downloads


And you know how there's some tools or gadgets that you buy that make such a big difference to how you work? Like your first trolley jack, or a hammer drill, or a ratchet spanner. Well I found another one yesterday and it's awesome. (https://www.jaycar.c...-guide/p/TH1827)

Attached File  heavy-duty-wire-stripper-cutter-crimper-with-wire-guideImageMain-515.jpg   29.8KB   8 downloads


If you have one you know what I'm talking about. If not, this tool is a boss for your electrical work. With a single close it strips the insulation from your wire and man it speeds things up like you wouldn't believe. So much time saved. $20 is a solid gold bargain.


Ok so the short version is that I tidied up the radio harness, connected the amp and speakers to the headunit, and repacked the centre console. Speaker cable has been run from the boot to the a-pillars and I'll look at getting it through the door tomorrow. Also decided to move the amp power cable from passenger to driver side. I didn't check for a firewall hole prior to laying the cable and it's a headache to get it from passenger to driver's side around the heater core.


Fun fact:

The Subaru illumination wire for the headunit uses two wires and isn't compatible with your standard single-wire illumination/dimmer control on aftermarket headunits. So if you're looking at the loom and you see the violet dimmer wire and a random second ground, you need to connect both (which will make your HU match the instrument dimmer setting on the indicator stalk). If you don't use the dimmer ground you won't be getting the correct voltage.


On Subaru models up to around 2006, this line varies in voltage from close to 12 volts (with the knob at the "dimmest" setting) down to 0 volts (with dimmer knob at "brightest" setting).  Note that this is backwards from the method used in some other cars.

The car's instrument panel lights are connected between the illumination and dimmer lines.  So the bulbs effectively "see" a range of voltage from 0 volts (dimmest) to 12 volts (brightest).

Source: http://ae64.com/20-pin-pinout.htm


So if you've fitted an aftermarket headunit to a Gen2,3, or 4 and your dimmer function doesn't work this is probably why.

Attached File  Untitled3.png   90.78KB   8 downloads


"Installation is the reverse of the removal procedure."
 
BH9 02-05 / BD9 07-14 / BE5 14-> / GGA 18->
 
2001 Legacy B4-RSK / 1999 ZX-9R C2


#224 Robert

Robert

    Brappp

  • Members
  • PipPipPip
  • 9,419 posts
  • Gender:Male
  • Location:Central Coast, NSW
  • Interests:Door Frames

Posted 01 January 2017 - 08:29 PM

Awesome info

Was wondering why I couldn't get it to work

You mean connect the dimmer ground to the head unit ground right ?
Connecting both together would surely cause blown fuses

#225 cowie165

cowie165

    Garage 改善

  • Members
  • PipPipPip
  • 599 posts
  • Gender:Male
  • Location:Newcastle, NSW

Posted 01 January 2017 - 10:44 PM

I thought about connecting the two but some more reading explained why that wouldn't work. Guys tried connecting both Pin1 and Pin7 to the aftermarket dimmer wire. No joy. More info below. Some guys talked about using a relay to reverse the voltage seen by the headunit. I bought a BH9 from the dealership back in the day and I remember the stock headunit had about four different dimmer levels - same as the dash and controlled by the stalk. Now I understand why. There might be a fix there but it's too far down on my list to get stuck in to it so I just terminated Pin 1 & 7 and called it a day. If you find a fix, I'm all ears! :D


Illumination/Dimmer Pins

Subarus have two pins on the radio connector for illumination:

  • Pin 1 ("Illumination +") gets +12 volts when the parking or headlights are on; open-circuit otherwise.
  • Pin 7 ("Dimmer") changes voltage as you adjust the dimmer knob. It varies from about 10 volts (with knob at the dimmest setting) down to 0 volts (with knob at brightest setting). This pin is also called "Illumination - (minus)". Note that this is reverse from many other cars (where 0 volts = dimmest illumination).

The radio illumination lights (and instrument panel lights) are connected between these two lines. So the bulbs effectively "see" a range of 2 volts (dimmest) to 12 volts (brightest).

If you're keeping the factory radio (perhaps adding an amp or sub, or transplanting the radio to another car), you need a harness that has all 14 pins. Most after-market harnesses do not have a wire for the Dimmer pin. Without that pin, the factory radio's illumination will not work at all. See posts starting here.

When installing an after-market head unit that includes a wire for dimmer or illumination: In most cases these HUs only support a two-stage dimming feature -- either full bright (daytime) or slightly dimmed (night driving). Connect this type to pin 1 (the car's illumination(+) signal). You may also need to change a menu option on your HU to enable the dimming feature.

If you have a head unit (or gauge) that wants to see a variable-voltage illumination wire that's not "reversed," (so higher voltage = brighter), you can use this circuit designed by "vrg3" which converts the Subaru's +/- illumination wires into a dimming voltage relative to ground. It's mentioned in this post here on NASIOC (it's worth reading the remainder of the thread too).

Source: https://forums.nasio...ad.php?t=749402


More stuff:

https://forums.nasio...610#post3716610

https://forums.nasio...05&postcount=23

http://legacygt.com/...trol-51629.html


"Installation is the reverse of the removal procedure."
 
BH9 02-05 / BD9 07-14 / BE5 14-> / GGA 18->
 
2001 Legacy B4-RSK / 1999 ZX-9R C2


#226 CRUISN

CRUISN

    Doin it my way.

  • Members
  • PipPipPip
  • 6,970 posts
  • Gender:Male
  • Location:Melbourne
  • Interests:Family, Surfing, Cars.

Posted 02 January 2017 - 08:53 AM

That harness looks like what I've come across in a few cars I've bought. Some people really shouldn't touch wiring. :sarcastic:

Nice info on the HU illumination. Mine is two stage.

OEM+


#227 El_Freddo

El_Freddo

    Rock'n the old Skool

  • Members
  • PipPipPip
  • 2,245 posts
  • Gender:Male
  • Location:Bridgewater/Central Vic/semi-retired nomad
  • Interests:Subarus, 4wd'n Subarus, travelling Subarus, Tinkering... I could go on!

Posted 02 January 2017 - 12:35 PM

Those wire stripping tools are awesome. Followed very closely by the connector crimping tool.

Good to know about that dimmer wire too (now have a Gen3 in the family).

Cheers

Bennie
"The lounge room is not a workshop..."
https://www.imageshack.us/i/po1BKrxbj
1BKrxb.jpg
El Freddo's Pics    -    El_Freddo's youtube

#228 cowie165

cowie165

    Garage 改善

  • Members
  • PipPipPip
  • 599 posts
  • Gender:Male
  • Location:Newcastle, NSW

Posted 02 January 2017 - 06:33 PM

I decided to make a start on the E-SAMS mirror covers today. I still like them, despite the collective subyclub jury being out. I also learned that E-SAMS had their factory destroyed by the tsunami in 2011 and they closed up shop, never to open again. I also saw a couple of for sale posts by Subaru drivers around the world selling these for US$300 and up. Stoked that Myles sold them with the garnish for less than half of that. Now that said today has been a total mission and I've only done one side. And that doesn't include connecting to the indicator loom. That's a job for Ron. Will work on getting both sides converted first (to keep the car driveable) and connect both indicators up later this week. CRUISN recommended removing the inner guard from the front wheel arch and going through there - sounds like top advice so I'll do that.


Mirror removed and glass separated. Handy thread from UK Legacy: http://www.uklegacy....-a-wing-mirror/

The thread doesn't mention heating the plastic surrounding the glass but it's in the FSM and that made all the difference for me in getting the glass out.

Attached File  unspecified-4.jpg   96.92KB   8 downloads


Not a great start... It's one of the three bolts that secure the mirror folding motor. They were supported by some apocalypse-strength loctite or something. Major pain in the backside. New bolts ordered.

Attached File  unspecified-10.jpg   54.87KB   7 downloads


Snuck the E-SAMS wiring through alongside the factory wiring. Getting it in the same light blue tube meant unpin the harness and I didn't see the payoff and couldn't be bothered. A fair bit of messing around involved here to get the wire through the triangular door piece, then up and in to the folding motor, then out and into the mirror cavity. Drilled a 3mm hole through the original mirror and fed the other end of the wires through.

Attached File  unspecified-5.jpg   85.92KB   7 downloads


Old double-sided tape removed with wax/grease remover + WD40 soak.

Attached File  unspecified-6.jpg   113.02KB   8 downloads


Joined the wires properly. Reassembled the whole lot. Removed tape from the mirror garnish and voila (excuse the lousy garage pic, I'll do another once she's had a wash)

Attached File  unspecified-7.jpg   69.08KB   8 downloads


Comparo pic

Attached File  unspecified-8.jpg   61.59KB   8 downloads


At least 2hrs of work all up. Almost 30mins of that was lost messing around stripping the head off that bolt. Ideally I'll do the other side in 1.5hr tomorrow. Beer o clock.

Next PITA is getting the indicator wiring and speaker cable through the skinny-ass rubber thing in the door jamb. I get that speaker wire isn't necessary for my non-SPL audio setup but I'm committed so it will happen.


"Installation is the reverse of the removal procedure."
 
BH9 02-05 / BD9 07-14 / BE5 14-> / GGA 18->
 
2001 Legacy B4-RSK / 1999 ZX-9R C2


#229 Jimbo

Jimbo

    Livin' the Legacy

  • Members
  • PipPipPip
  • 2,771 posts
  • Gender:Male
  • Location:B'town

Posted 02 January 2017 - 07:05 PM

Mate.

They look so good. Love them. Who could not like them?!

Makes it look like the factory mirrors are off an Excel or something!


'04 Liberty GT Premium "The Sprog Chariot"


#230 CRUISN

CRUISN

    Doin it my way.

  • Members
  • PipPipPip
  • 6,970 posts
  • Gender:Male
  • Location:Melbourne
  • Interests:Family, Surfing, Cars.

Posted 02 January 2017 - 08:09 PM

Looking good. Makes stock mirrors look poo.


Glad that I bought my set as a complete bolt on mirror. 5 mins to swap over :P


OEM+


#231 patrick27s

patrick27s

    Trusted Member

  • Members
  • PipPip
  • 296 posts
  • Gender:Male
  • Location:Sydney

Posted 02 January 2017 - 08:49 PM

Damn, I always loved them. But after seeing pics with comparison to side mirrors they look so much better. Might have to try find some haha

Solid work mark! Keep it up!!

#232 cowie165

cowie165

    Garage 改善

  • Members
  • PipPipPip
  • 599 posts
  • Gender:Male
  • Location:Newcastle, NSW

Posted 03 January 2017 - 06:55 AM

Cheers guys, I like them too. For me it really breathes a lot of life into Gen3 and you forget the age of the car.


And Mark you really dodged a bullet there!


I test fit the front speakers last night - the drop right in to the existing housing (Mark I think you said the same thing a while back). Tweeters fit in the same place as stock. Used a hot glue gun to secure them (not a mechanical fix (which I'd have preferred) but it was slim pickens on solutions). Thanks Mrs C for the loan of her gear! :ph34r:


I'm thinking about putting the crossover inside the car (instead of inside the door) and using the OEM speaker wiring. Still undecided.


"Installation is the reverse of the removal procedure."
 
BH9 02-05 / BD9 07-14 / BE5 14-> / GGA 18->
 
2001 Legacy B4-RSK / 1999 ZX-9R C2


#233 duncanm

duncanm

    wha' who ?

  • Members
  • PipPipPip
  • 2,011 posts
  • Gender:Male
  • Location:Sydney

Posted 03 January 2017 - 07:59 AM

I dropped some small xovers in the door recently -- cut a recess out of the slab of door foam for them. Worked well.

#234 gromtech

gromtech

    New Member

  • Members
  • Pip
  • 16 posts

Posted 04 January 2017 - 08:18 PM

Wow I better keep an eye out for some of those mirrors, what a difference they make.

#235 cowie165

cowie165

    Garage 改善

  • Members
  • PipPipPip
  • 599 posts
  • Gender:Male
  • Location:Newcastle, NSW

Posted 15 January 2017 - 06:56 PM

After spending nearly four days working on the car on and off I needed a break from four wheels for a bit. Back now and I thought I'd share a few pics of what went on in case someone googles any of this down the track because they're stuck.


So I was up to fitting the RH side mirror cover. That time it took 1.5hrs. Not much of a saving but still a bit faster. One of the headaches of fitting with only double-sided tape is the lack of alignment marks. After I fitted the RH side I noticed it wasn't lined up as nicely as the earlier LH. Despite being over the whole job I figured that it'd bug me forever knowing that it wasn't lined up quite right and that I'd see it every time I got in the car. Used some fishing line slipped under the cover to remove the tape, prepsol again, retape, refit. Better. Happy.


Then it was time to wire the mirrors up to the existing indicators in the front fender. Mark recommended removing the guard liner and going through there. Great advice. Worked well. I cleaned the liner while it was out and fed the wiring from the indicator through to the cabin via the plug at the bottom of this panel under the A-pillar. The photo is taken from the front wheel looking back at the cabin.


Attached File  2017-01-03 16.00.30 (576x1024).jpg   174.57KB   8 downloads


Attached File  2017-01-03 16.01.07 (1024x576).jpg   151.28KB   8 downloads


Close up of the door wiring sleeve.

Attached File  2017-01-03 16.01.17 (576x1024).jpg   85.23KB   7 downloads


I had a win and was able to straighten the sleeve enough to get a piece of wire down there. I tried some soft copper wire (used for training bonsai)(don't ask) but it bent too easily. Coat hanger wire ended up being the best. It needed a spot of WD40 to keep it from catching on the existing loom. Fed it through, bent the end into a J-hook, wiring clamped on, and pulled it up and through. It was epic. Then I did it again for the door speaker wire. Then again for the driver's side. Much headache. Many cursing. Wow.


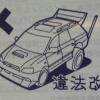
Random WIP photo. Note the JDM flare on the dash. Guaranteed to be out-of-date and blow your hand off if you ever used it in anger.

Attached File  2017-01-04 16.24.22 (1024x576).jpg   128.57KB   7 downloads


Side mirror covers wired up and tested. Good to go.

I learned that I also reassembled the LH mirror glass incorrectly. There's a retaining spring that I didn't refit the right way. More headache (who likes doing jobs twice?) but pulled the mirror apart and corrected the error.


Pulled out the 15 year old factory speakers. Not looking so hot.

Attached File  2017-01-04 18.03.06 (1024x576).jpg   145.58KB   7 downloads


New speakers fitted. New tweeters fitted into the factory spot. Crossovers mounted inside the door after checking for door glass clearance. Good to go. Then I was waiting on my sub enclosure to arrive and me to work out how to fit the amp in the trunk.


Next job

Attached File  2017-01-04 18.03.45 (1024x576).jpg   114.87KB   7 downloads


When setting the initial height I used the distance between rings on the helper spring. A better way seemed to be measure ring to top. Worked that out later.

Attached File  2017-01-05 09.59.41 (576x1024).jpg   134.36KB   7 downloads


Stage 2 Weight Reduction. Cleaning a bunch of gunk out from around the rear inner guard.

Attached File  2017-01-05 15.33.44 (1024x576).jpg   149.03KB   7 downloads


And old struts out. Cleaned after the pic and now ready for their new owner.

Attached File  2017-01-05 17.26.39 (576x1024).jpg   212.08KB   7 downloads


I didn't get the Bilstein c-spanners with the coils. I bought some adjustables because I wanted something fast. They aren't horrible, but the hinge thing really gets in the way and makes them difficult to get good purchase on the strut ring. Also featuring my custom tools for loom relocation #builtnotbought

Attached File  2017-01-06 12.12.43 (576x1024).jpg   163.6KB   7 downloads


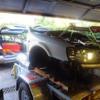
Hey I had a different win with the rear suspension. The FSM calls for you to go in via the trunk. I happened to have the seats still out from chasing that ground fault a few weeks ago so I went in throught the cabin. The rear strut bolts are super easy to access from inside as you're not hanging half out the car and half on your belly trying to work underneath the boot lining. I highly recommend trying this method if you're a sedan owner.

Attached File  2017-01-05 15.03.59 (1024x576).jpg   113.51KB   7 downloads


Mrs has just served tea so I'll post the completed photos in a minute. Sorry if these photos aren't so good. I tried new software to resize and the new image quality kinda sucks.


"Installation is the reverse of the removal procedure."
 
BH9 02-05 / BD9 07-14 / BE5 14-> / GGA 18->
 
2001 Legacy B4-RSK / 1999 ZX-9R C2


#236 cowie165

cowie165

    Garage 改善

  • Members
  • PipPipPip
  • 599 posts
  • Gender:Male
  • Location:Newcastle, NSW

Posted 15 January 2017 - 07:47 PM

Dash is finally back together. All the audio cables/wiring now tidy and out of sight.

Attached File  2017-01-06 15.52.53 (1280x720).jpg   84.24KB   6 downloads


Coilovers fitted. The rear height sagged after the first day. Rear height dropped around 10mm. I spent some time googling trying to find out if coils 'settled' like new springs. After two hours of messing around the penny dropped and I remembered that I fueled the car on the test drive. From empty. Moving on...


This photo makes it look lower than it is.

Attached File  2017-01-11 16.41.45 (1280x720).jpg   97.03KB   6 downloads


And a parcel from Reevesy arrived too.

Attached File  2017-01-11 16.42.16 (1280x720).jpg   97.13KB   6 downloads

Attached File  2017-01-11 16.42.29 (1280x720).jpg   93.38KB   6 downloads


Carbon looks neat but it's not what I'm after so I need to suss out how to paint carbon fibre. Well more how do you cut and polish an uneven surface like carbon. Regardless, I really like the scoop extension. That'll be the last exterior part going on the car.


One more photo just because. I'll bring the rear up another 10mm.

Attached File  2017-01-10 16.34.52 (1280x720).jpg   89.07KB   6 downloads


I'm just waiting on a new camber washer to arrive from Amayama and then it'll go in for an alignment. Don't think I'll bother with corner weighting for now.


"Installation is the reverse of the removal procedure."
 
BH9 02-05 / BD9 07-14 / BE5 14-> / GGA 18->
 
2001 Legacy B4-RSK / 1999 ZX-9R C2


#237 Jimbo

Jimbo

    Livin' the Legacy

  • Members
  • PipPipPip
  • 2,771 posts
  • Gender:Male
  • Location:B'town

Posted 15 January 2017 - 09:58 PM

Well done, Mark! 

I'd have had enough after the mirror cover install for one day. You even trucked on and did a whole suspension refit!

I wish I could find the same motivation....

She's looking reaaaal good  :drinks: 


'04 Liberty GT Premium "The Sprog Chariot"


#238 Robert

Robert

    Brappp

  • Members
  • PipPipPip
  • 9,419 posts
  • Gender:Male
  • Location:Central Coast, NSW
  • Interests:Door Frames

Posted 15 January 2017 - 10:24 PM

That looks Awesome

#239 Guest_KONG_*

Guest_KONG_*
  • Guests

Posted 16 January 2017 - 06:00 AM

Outstanding  :drinks:


#240 CRUISN

CRUISN

    Doin it my way.

  • Members
  • PipPipPip
  • 6,970 posts
  • Gender:Male
  • Location:Melbourne
  • Interests:Family, Surfing, Cars.

Posted 16 January 2017 - 10:57 AM

Pretty sweet ride..... for a sedan. :P

OEM+


0 user(s) are reading this topic

0 members, 0 guests, 0 anonymous users