
Looking nice Moto. Are they the BC BR coil overs?

Moto's RS
Started by motoboy76, Jan 25 2016 07:29 PM
180 replies to this topic
#121

GNGBNG
-

- Members
-

- 496 posts
Regular Member
- Gender:Male
- Location:Tamworth
Posted 24 October 2016 - 10:55 AM
#122
motoboy76
-
- Members
-
- 689 posts
Regular Member
- Gender:Male
- Location:Newy.....
- Interests:Subaru's, Dirt and road bikes......
Posted 24 October 2016 - 03:20 PM
Looking nice Moto. Are they the BC BR coil overs?
Thanks GNG defiantly have fun with it...
Yep they are BC BR coil overs.....
#123
GNGBNG
-
- Members
-
- 496 posts
Regular Member
- Gender:Male
- Location:Tamworth
Posted 25 October 2016 - 07:59 AM
Same as what I have fitted, I've been very happy with mine. On the softest setting they are great for daily driving, and the hardest setting is perfect for my track days.
#124
motoboy76
-
- Members
-
- 689 posts
Regular Member
- Gender:Male
- Location:Newy.....
- Interests:Subaru's, Dirt and road bikes......
Posted 25 October 2016 - 08:12 AM
Same as what I have fitted, I've been very happy with mine. On the softest setting they are great for daily driving, and the hardest setting is perfect for my track days.
Thanks for the tips can't wait to test them out....
How did your painting with the side skirts go....
#125
motoboy76
-
- Members
-
- 689 posts
Regular Member
- Gender:Male
- Location:Newy.....
- Interests:Subaru's, Dirt and road bikes......
Posted 27 October 2016 - 03:41 PM
Just a little update, picked these up today that came across Facebook that were on a car being wrecked....
 IMG_1639.jpg 118.75KB
9 downloads
IMG_1639.jpg 118.75KB
9 downloads
Also grabbed a ute full off things from Tim today, thanks buddy....
#126
motoboy76
-
- Members
-
- 689 posts
Regular Member
- Gender:Male
- Location:Newy.....
- Interests:Subaru's, Dirt and road bikes......
Posted 20 November 2016 - 02:47 PM
So thought it was about time for a update....
It turned out that the little hose was not the source of the leak and it was the power steering pump itself...
IMG_1642.JPG 126.75KB
5 downloads
I had bare FE230 steering rack sitting there so thought i may as well upgrade sooner, so I also sourced a remote res WRX power steering pump to put in there as well...
I just waiting for the suction line to turn up and then I will mount the res and it should be good to go...
Here are a couple of pics of the rack and pump...
IMG_1647.JPG 98.65KB
5 downloads
IMG_1648.JPG 95.98KB
5 downloads
I also got a L & E GC to GD steering knuckle....
IMG_1646.JPG 67.34KB
5 downloads
So i tracked down so rack ends to suit and also got some whiteline tie rod ends and put together my first steering rack.....
IMG_1678.JPG 124.51KB
5 downloads
IMG_1679.JPG 129.8KB
5 downloads
IMG_1680.JPG 137.16KB
5 downloads
IMG_1683.JPG 159.44KB
5 downloads
While I had the room around the injectors I thought it would be a good time to swap them out for larger one.....
A big thanks to Rob as he gave me a bit of guidance....
IMG_1685.JPG 48.74KB
5 downloads
IMG_1692.JPG 166.6KB
5 downloads
IMG_1693.JPG 121.6KB
5 downloads
Got the steering rack mounted and ran the lines up, hope I don't have to do it again in a hurry, also got the pump mounted....
IMG_1694.JPG 180.71KB
5 downloads
The other night at work I fabbed up a little bracket to make a later model alloy header tank to fit..
IMG_1699.JPG 95.44KB
5 downloads
Quite happy with how it turned out....
IMG_1700.JPG 155.54KB
5 downloads
As you can see in the above pic I gave the inner guard a bit of a tidy up and mounted the Gen 2 air box in...
Looking through Cowie's thread the other night gave me the motivation to give the interior that I have for the RS a bit of a clean, I used the same stuff as Cowie...
Before pics...
IMG_1650.jpg 236.17KB
5 downloads
IMG_1651.jpg 291.61KB
5 downloads
IMG_1658.JPG 167.7KB
5 downloads
IMG_1663.JPG 135.04KB
5 downloads
After pics...
IMG_1656.jpg 240.47KB
5 downloads
IMG_1654.jpg 278.57KB
5 downloads
IMG_1662.JPG 159KB
5 downloads
IMG_1668.jpg 222.58KB
5 downloads
Really happy how they came out..
Well that is it for now.....
#127
Guest_KONG_*
Guest_KONG_*
-

- Guests
Posted 20 November 2016 - 05:56 PM
Great work, Clive.
Mad update too.
Mad update too.
#128
motoboy76
-
- Members
-
- 689 posts
Regular Member
- Gender:Male
- Location:Newy.....
- Interests:Subaru's, Dirt and road bikes......
Posted 20 November 2016 - 06:42 PM
Great work, Clive.
Mad update too.
Thanks Kong I appreciate it...
Its great learning how to do all this myself, but thats what this car was all about...
#129
Robert
-

- Members
-
- 9,419 posts
Brappp
- Gender:Male
- Location:Central Coast, NSW
- Interests:Door Frames
Posted 20 November 2016 - 07:16 PM
Looks awesome
I'm surprised the remote res ps pump fit with the Rs coolant crossover pipe
I had a hell of a time trying to get it to fit on my gen 2 with a gc cross over pipe
I'm surprised the remote res ps pump fit with the Rs coolant crossover pipe
I had a hell of a time trying to get it to fit on my gen 2 with a gc cross over pipe
#130
motoboy76
-
- Members
-
- 689 posts
Regular Member
- Gender:Male
- Location:Newy.....
- Interests:Subaru's, Dirt and road bikes......
Posted 21 November 2016 - 07:08 AM
Looks awesome
I'm surprised the remote res ps pump fit with the Rs coolant crossover pipe
I had a hell of a time trying to get it to fit on my gen 2 with a gc cross over pipe
Thanks Rob...
Yeah the pump mounted up no dramas at all, the line down to the rack on the other had needed some persuasion to get it to fit.....
But other than that it is coming together nicely....
#131
Matty_Lib
-
- Members
-
- 138 posts
rslyf
- Gender:Male
Posted 21 November 2016 - 12:01 PM
Looks awesome mate, loving the progress. I run the same coilovers in my wagon, very happy. ☺️
Sent from my D6503 using Tapatalk
Sent from my D6503 using Tapatalk
#132
GNGBNG
-
- Members
-
- 496 posts
Regular Member
- Gender:Male
- Location:Tamworth
Posted 21 November 2016 - 03:46 PM
Hey Moto, what's the leather trimmed seats originally out of?
#133
El_Freddo
-

- Members
-
- 2,314 posts
Rock'n the old Skool
- Gender:Male
- Location:Bridgewater/Central Vic/semi-retired nomad
- Interests:Subarus, 4wd'n Subarus, travelling Subarus, Tinkering... I could go on!
Posted 21 November 2016 - 04:47 PM
Looking good mate!
And a great time to do the PS rack work on the bench, much easier than in the vehicle!
Neat looking bracket too. I might have to try out a bush mechanic's version of this at some stage...
Cheers
Bennie
And a great time to do the PS rack work on the bench, much easier than in the vehicle!
Neat looking bracket too. I might have to try out a bush mechanic's version of this at some stage...
Cheers
Bennie
"The lounge room is not a workshop..."
https://www.imageshack.us/i/po1BKrxbj

El Freddo's Pics - El_Freddo's youtube
https://www.imageshack.us/i/po1BKrxbj
El Freddo's Pics - El_Freddo's youtube
#134
cowie165
-
- Members
-
- 599 posts
Garage 改善
- Gender:Male
- Location:Newcastle, NSW
Posted 21 November 2016 - 06:33 PM
Looks great moto! That clean turned out minters. Really nice.
Hey Moto, what's the leather trimmed seats originally out of?
^This! :-) Is it GD club spec?
"Installation is the reverse of the removal procedure."
BH9 02-05 / BD9 07-14 / BE5 14-> / GGA 18->
2001 Legacy B4-RSK / 1999 ZX-9R C2
#135
motoboy76
-
- Members
-
- 689 posts
Regular Member
- Gender:Male
- Location:Newy.....
- Interests:Subaru's, Dirt and road bikes......
Posted 22 November 2016 - 08:56 PM
Looks awesome mate, loving the progress. I run the same coilovers in my wagon, very happy. ☺️
Sent from my D6503 using Tapatalk
Thanks Matty....
Yeah can't wait to get the rears in and set them up properly...
Hey Moto, what's the leather trimmed seats originally out of?
Yeah mate Cowie is right they are out of a GD, they will sit a little higher than GC8 seats but I I'm not super tall so I think they should be ok...
Looking good mate!
And a great time to do the PS rack work on the bench, much easier than in the vehicle!
Neat looking bracket too. I might have to try out a bush mechanic's version of this at some stage...
Cheers
Bennie
Yeah Bennie you are spot on about working on the rack on the bench...
I'm really happy how the bracket turned out for the header tank, it looks the goods I reckon....
Give one a crack mate....
Looks great moto! That clean turned out minters. Really nice.
^This! :-) Is it GD club spec?
Thanks Cowie yep I think the seats turned out minto that's for sure, got to strip the interior and clean the carpet so I can put them in...
More updates coming soon I hope....
Thanks for the comments guys keep them coming.....
#136
GNGBNG
-
- Members
-
- 496 posts
Regular Member
- Gender:Male
- Location:Tamworth
Posted 23 November 2016 - 08:03 AM
Thought they may have been out of a GD.
At least you know they do sit higher than the GC8 seats.
I have enough trouble trying to fit in my car with a helmet on, but my sunroof does take up some headroom as well.
#137
motoboy76
-
- Members
-
- 689 posts
Regular Member
- Gender:Male
- Location:Newy.....
- Interests:Subaru's, Dirt and road bikes......
Posted 23 November 2016 - 12:07 PM
Thought they may have been out of a GD.
At least you know they do sit higher than the GC8 seats.
I have enough trouble trying to fit in my car with a helmet on, but my sunroof does take up some headroom as well.
Yeah I'm hoping if I wear a helmet that I have clearance because I do have plans to do some track days in it....
I don't have a sunroof in mine so fingers are crossed.....
#138
motoboy76
-
- Members
-
- 689 posts
Regular Member
- Gender:Male
- Location:Newy.....
- Interests:Subaru's, Dirt and road bikes......
Posted 12 February 2017 - 06:37 PM
So It has been a while since I had done a update so here we go.....
So I got the pump and rack mounted and it all went together pretty nicely, but over night i went back in the garage and saw so fluid on the ground as it turned out it was coming from the seal on top of the pinon...
IMG_1739.JPG 96.91KB
3 downloads
So I tracked one down through Partsouq and out came the rack again.......
IMG_1775.JPG 115.52KB
3 downloads
IMG_1776.JPG 88.42KB
3 downloads
IMG_1777.JPG 113.66KB
3 downloads
IMG_1778.JPG 107.07KB
3 downloads
Was a bit of a struggle to get the old seal out, My old man came up with an idea to try a adjustable angle grinder tool it worked a treat...
So It was now time to tackle the rear coil overs and fuel pump while i was doing these things I decided to clean the boot out and put in the better condition boot linings....
Here are a few pics of the process.....
IMG_1753.JPG 238.86KB
3 downloads
IMG_1754.JPG 171.79KB
3 downloads
So coilovers are in now its time for the fuel pump so while i was doing it was time to tidy up the boot...
IMG_1759.JPG 113.06KB
3 downloads
IMG_1758.JPG 167.75KB
3 downloads
While i had the I gave the boot a bit of a clean....
IMG_1762.JPG 173.71KB
3 downloads
IMG_1763.JPG 95.91KB
3 downloads
A shot of the Walbro before installation....
IMG_1755.JPG 166.52KB
3 downloads
Here are a few shots of the tidier boot linings, looks much nicer....
IMG_1813.JPG 213.47KB
4 downloads
IMG_1815.JPG 119.16KB
3 downloads
IMG_1814.JPG 121.27KB
3 downloads
So now it was time to take the interior, so I ripped out the RS seats front and rear, pulled the carpet and gave it and the floor a major clean out...
Here are a few pics of the process....
IMG_1784.JPG 201.93KB
3 downloads
IMG_1787.JPG 230.71KB
3 downloads
IMG_1791.JPG 139.46KB
3 downloads
IMG_1792.JPG 133.53KB
3 downloads
IMG_1799.JPG 165.6KB
3 downloads
IMG_1801.JPG 156.27KB
3 downloads
Before I put the carpet back in I thought it was a good time to put the red stitched handbrake....
IMG_1802.JPG 140.37KB
3 downloads
IMG_1803.JPG 143.92KB
3 downloads
Now here is a few pics with the carpet back in....
IMG_1795.JPG 121.49KB
3 downloads
IMG_1796.JPG 88.56KB
4 downloads
Before I put the seats in I thought id would be a good time to put the alloy WRX pedals in, there was a bit of dogy boost gauge wiring I fixed up as well....
IMG_1790.JPG 136.84KB
4 downloads
IMG_1808.JPG 116.12KB
4 downloads
Seats in, I think they look great...
IMG_1843.JPG 226.42KB
4 downloads
IMG_1818.JPG 67.21KB
4 downloads
So with the bulk of interior work done it was time to get ready for the tune which was a boost controller install, and fit a Power FC, the FC hand controller had a dogy down button , got one off eBay soldered it in and it worked a treat...
For the Boost controller I made a mounting plate where the ash tray goes, I think it looks tidy....
IMG_1826.JPG 119.92KB
4 downloads
Also fitted the head unit I got for Christmas....
IMG_1828.JPG 232.74KB
4 downloads
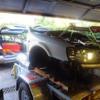
So with the Boost controller Power FC it was time for a tune...
It started up on the FC so i was able to get it on a trailer, and off to see Nathan at NDC....
IMG_1839.JPG 187.59KB
4 downloads
Nathan said the tune went well and that it drives like a normal RS but gets up and goes when needed, there is a low boost setting of about 7psi and a high boost setting of 17psi....
I wanted a safe tune and he said 17psi was getting close to the limit of the water to air intercooler, but this got me just short of 160 kw's at the wheels...
I'm very happy with how it goes...
I couldn't get it for a couple of days so he was keeping it there for me and on the last day when he went to put it away it wouldn't start...
He said it was getting power to the fuel pump but it wasn't running....
So the next day he ripped it out and found this....
fullsizeoutput_2a53.jpeg 82.37KB
4 downloads
So it looks like I have some water contamination of the fuel take have any of you guys had to deal with this before and have some ideas to fix it up...
Any help would be great, I'm thinking of pulling the tank and cleaning it some how I'm all ears....
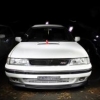
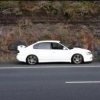
So I have just been driving it short trips to keep the fuel pump moving on the low boost setting, here is a out and about pic.....
IMG_1842.JPG 218.83KB
4 downloads
I'm really happy with how it sits, it's come along way....
There are a few more mod's on the way...
Well that is it for the moment hope you guys don't get a pic overload, but you can never have to many pics right....
Hope you guys enjoyed the update let me know what you think....
#139
Adictions
-
- Members
-
- 165 posts
Trusted Member
- Gender:Male
- Location:narre warren
Posted 12 February 2017 - 07:34 PM
Interior looks great, awesome how well it fits. Nothing like a good clean sometimes that boot looked nasty before haha ,nice work 
Is the fuel old? I know with diesel you can see if its contaminated with water as they don't really mix so you can see some water sitting at the bottom, not sure about petrol though 

#140
duncanm
-
- Members
-
- 2,019 posts
wha' who ?
- Gender:Male
- Location:Sydney
Posted 12 February 2017 - 07:52 PM
Interior looks great!
Isn't there a drain plug on the tank ?
Not sure how you clean out the nasties, though..


0 user(s) are reading this topic
0 members, 0 guests, 0 anonymous users

