
Haha tell her it's a long term investment
That requires the garage
And your time
All the time
and a hoist

Touring Bruce


Posted 07 October 2013 - 09:54 PM
Haha tell her it's a long term investment
That requires the garage
And your time
All the time
and a hoist

Regular Member
Posted 08 October 2013 - 11:30 AM
Yeah, no she is fine with me playing with cars, had her out on the track in my car too which she enjoyed a lot.
Only problem is we are doing some minor renovating on our house and I need to finish that before I play with cars again, lucky I finished most of it on the weekend.
She could barely see over the steering wheel 

Follow me on Insta: @brzdiy
Regular Member

Posted 09 October 2013 - 03:35 PM
Ahh, I think I know who you are now. I read through almost all of your DIY's on wrx.org page (might have been another forum). I'm pretty sure it was you. Gave me the idea to put the lateral links on my rear swaybar made of garden hose and some worm drive clamps 
Sweet work with the outback! Wish I had the patients and skill to attempt the gearbox refresh. Same goes with my Rear Diff. After some atrocious, rough shifting when I first got my license. The amount of back lash in my drive train is ridiculous! Makes it very hard to be smooth and flowy when driving hard/fast 
2000 RX Gen 3 Liberty - Sold
http://www.subyclub....-2000-gen-3-rx/
2004 BMW E46 325i Manual - Current weekend warrior
2003 Gen 3 Outback H6 Manual - Current Daily
http://www.subyclub....uild-pic-heavy/
Regular Member
Posted 10 October 2013 - 08:03 PM
Today I finished changing all the fluids in the car, we are taking it on a big road/camping trip next month down the South Coast and back through the Vic alpine roads into Thredbo, hopefully a little off road action too, some 1500km's all up.
Fluids changed were as follows:
Engine (twice actually to flush out the caramel milkshake)
Coolant
Gearbox
Rear Differential
Brakes
Power Steering
Should be a good test for the somewhat revived Outback.
Follow me on Insta: @brzdiy
Regular Member
Posted 10 October 2013 - 09:37 PM
Interior Clean & Sound Proofing
I mentioned this car originally came from the country, well it was covered in red dust inside and out. The only way I felt I could clean it properly was to remove the interior, wash it, let it dry in the sun then re-install.
I figured while its out I may as well prepare the car for a decent sound system (not purchased yet) and try and make it as quiet as possible inside. I looked at lots of car audio forums for ways to do the sound proofing but a lot of it seemed over the top (more is better) then I found this website and thought it was a more scientific approach ( no offence to car audio guys out there).
http://www.sounddeadenershowdown.com/
So basically I have followed this websites ideas but sourced some cheaper materials with similar properties but lets start with the cleaning.
Everything out for cleaning, I mostly used carpet cleaner and wet towels. The carpet just got hung over the clothes line and pressure blasted.

Inside was dusty!


After the cleaning


Then I started putting some Dynamat on parts of the car that weren't already stiff.


Then I added a full extra layer of carpet underlay, it was a little tricky getting the carpet back in with the extra thickness under it but not too hard.


Next was the doors, starting by removing the plastic and giving them a good clean inside and out.

Cleaned

Now I put Dynamat on the inner and outer skins of the doors, again mostly focusing on larger areas of panels with flex in them instead of just covering every square centimetre.

Next layer is my substitute for closed cell foam (CCF), I just used some leftover packaging foam I found at work. The idea with this layer is it isolates the next layer from the door.

The next layer is my substitute for mass loaded vinyl (MLV), I managed to find a roll of yoga mat (sold by the meter) at Bunnings. From what I can tell this stuff is the same.

Ideally you would put another layer of the foam on top of that next to decouple it more before replacing the door trim but it was too hard to get the door trim back on with all the extra layers.
Driving the car now is noticeably quieter than before and I still haven't done the rear doors. All up I spent $176 on the dynamat bulk pack (Still have plenty left over) and $72 on the MLV substitute (still have enough to finish the car).
Follow me on Insta: @brzdiy
Snack down!

Posted 10 October 2013 - 09:46 PM

Regular Member
Posted 10 October 2013 - 09:50 PM
The thing I can hear most now is the wind on either the leading edge of the bonnet or maybe its the windscreen wipers, might look into retro fitting some more aerodynamic wipers.
Follow me on Insta: @brzdiy
Touring Bruce
Posted 10 October 2013 - 10:39 PM
Someone better tell Cruisin he has a challenger
Regular Member

Posted 10 October 2013 - 10:54 PM
+1.
Amazing work man. Attention to detail amazes many of us here. Can't wait to see it finished!
Wanting to buy/looking for: single genuine STi rim, genuine STi front lip, Corazon or Zero/Sports grille and another OEM grille
Can you hook a brother up? Please contact me now. I have cash ready.
~

~
Doin it my way.
Posted 10 October 2013 - 11:46 PM
Love the detail. 
Although you left tar on the door, should of looked like this......

OEM+
Regular Member
Posted 15 October 2013 - 08:48 AM
I found a guy doing a similar sound proofing project to me on a MY11 wrx hatch using the same website I am following if anyone is interested.
http://forums.nasioc...d.php?t=2554256
Follow me on Insta: @brzdiy
Regular Member
Posted 16 October 2013 - 09:37 AM

Follow me on Insta: @brzdiy
Regular Member
Posted 22 October 2013 - 11:00 AM
Today I have ordered a Crossbred Performance sump guard to protect the car a little when venturing off road. The car was missing the plastic tray when I bought it but I figured I may as well get something a little more sturdy.

These are 3mm zinc plated steel, price was $180 plus post. More photos coming when I do the install. I looked at a few other brands but this seamed to be the clear winner in terms of bang for buck.
Follow me on Insta: @brzdiy
Regular Member
Posted 29 October 2013 - 09:38 PM
Some Stereo Upgrades & More Sound Proofing
I ordered a new head unit for the car to replace the combined cassette player and sporadically functional CD player. The new one has all the modern features including blue-tooth hands free phone connection and 3 pairs of RCA out for amps and subs, HP/LP filters and time alignment.
First thing was to remove the old one, there were a couple of sneaky screws above the ash tray!
I then had to run the wires for the microphone for taking calls whilst driving. I put it right up close to my head.
I grabbed these quick install harnesses so I would have to do any soldering. Very easy, you buy one for the car and one for the brand of stereo you are using and it just plugs in (actually I had to re-pin the speakers as they were mixed up front to rear).
I also had to get this adapter for the Subaru radio antenna
Adapter on left, Suby plug on right.
After that was done it was just a matter of screwing the new head unit into the DIN and replacing the trims. The new head unit has nice big buttons which are easy to use whilst driving and it also has infinite colour selection for the lights so I was able to match it to the factory dash lights.
Next it was time to finish sound proofing the rear doors. Front were already done. Trim panel off
Cleaned inside and out
Dynamat inside and out
There is more inside the door as these panels are big and flat and more likely to resonate
Foam layer for decoupling
Dense vinyl layer as sound barrier
That's it for now, its truly amazing how quiet this car is now inside. The new stereo sounds great even with the tired old speakers and is a good base to build on when time and money permits.
Follow me on Insta: @brzdiy
...jus waitin' 4 a m8

Posted 29 October 2013 - 09:48 PM
Those sneaky screws on the ash tray get everyone the first time 
HU looks factory.
Thumbs up.
Doin it my way.
Posted 30 October 2013 - 10:47 AM
Nice work.
My main prerequisite with a HU is that it matches to the oem illumination color.
OEM+
GRANDMA's BOY

Posted 30 October 2013 - 03:30 PM
The thing I can hear most now is the wind on either the leading edge of the bonnet or maybe its the windscreen wipers, might look into retro fitting some more aerodynamic wipers.
It could be the side mirrors even!
Amazing work you've done here! I'll be looking into doing it in the far future haha.
Forester thread: http://www.subyclub....forester-xt-04/
Liberty wagon: http://www.subyclub....-liberty-wagon/
Regular Member
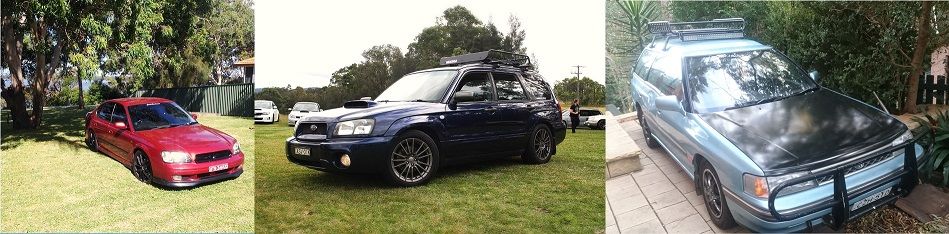
Posted 30 October 2013 - 07:38 PM
Got a nice photo of my cars this afternoon 

Follow me on Insta: @brzdiy
Regular Member
Posted 31 October 2013 - 07:41 PM
Sump Guard
Today the sump guard from Crossbred Performance showed up so I wasted no time and fitted it to the car. I had to drill two new holes at the rear but was told about that when I bought it, not hard to do. Overall I am very happy with this piece in terms of bang for buck, it should take a fair beating and be easy enough to panel beat if needed. Weight was around 6kg, its zinc plated mild steel in 3mm thickness.
top
bottom
Bolted up to the car


Follow me on Insta: @brzdiy
Doin it my way.
Posted 01 November 2013 - 04:47 PM
Nice bit of kit.
OEM+


Tech: The basics →
Do-It-Yourself Guides →
Info: Turbo EZ30D knowledge baseStarted by timslib, 02 Jul 2021 |
|
|
||
Tech: The basics →
Single Turbo →
Where to get turbos rebuilt?Started by El_Freddo, 03 Sep 2020 |
|
|
||
Model Specific →
Impreza / WRX / STi →
Engine / Driveline →
Blow off valve for '07 hawk eyeStarted by 07hawkwrx, 03 May 2017 |
|

|
||
Model Specific →
Forester →
Builds and Projects →
Tips on modding a 97' turbo FozStarted by Kahn McCall, 02 Jan 2017 |
|

|
||
Suby Club Community →
General Discussion →
Tips on modding a 97' turbo FozStarted by Kahn McCall, 02 Jan 2017 |
|

|
0 members, 0 guests, 0 anonymous users

